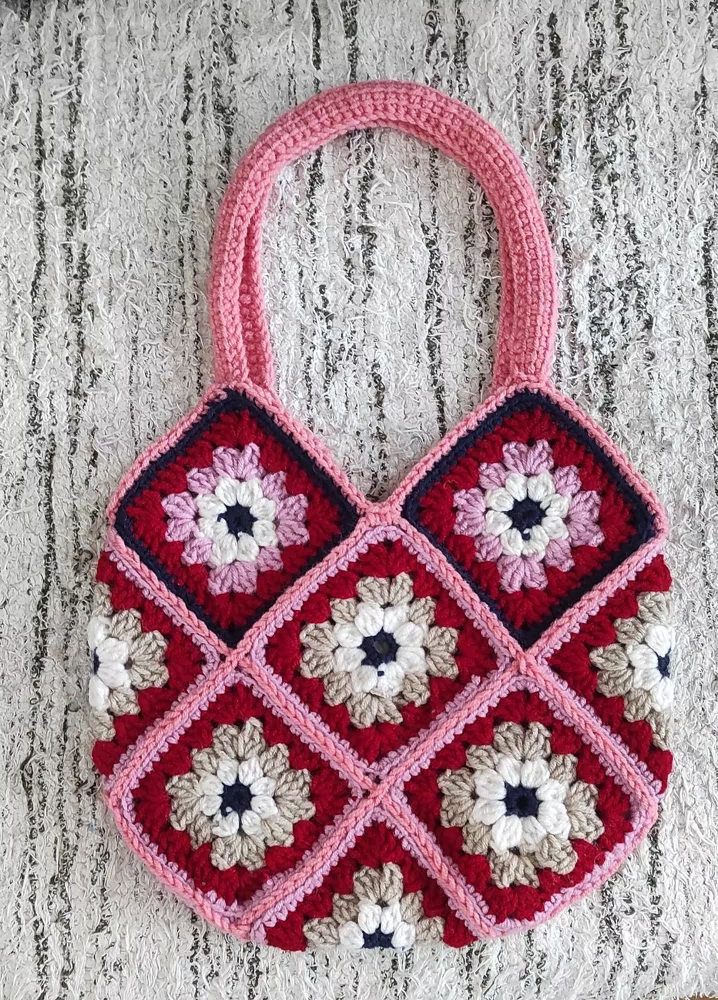
If you’re looking for a creative project that combines style and practicality, this Square Granny Purse Hand Bag – Tutorial is just what you need.
This charming, handmade bag is the perfect accessory for any occasion, whether you’re heading out for a casual day or dressing up for a special event. With its retro-inspired granny square design, this purse adds a touch of vintage charm to any outfit while being functional and fun to make.
In this tutorial, we’ll walk you through the steps to create your very own square granny purse hand bag. Even if you’re new to crochet or crafting, this project is beginner-friendly and a fantastic way to practice your crochet skills.
Not only will you have a stylish bag by the end, but you’ll also have the satisfaction of having created something beautiful with your own hands.
Before we dive into the detailed steps, gather your supplies, which include yarn, a crochet hook, a lining fabric, and a bag handle or strap. Once you have everything ready, follow this Square Granny Purse Hand Bag – Tutorial to create a one-of-a-kind purse that’s sure to turn heads wherever you go!
1. Materials Needed for the Square Granny Purse Hand Bag
To begin your square granny purse hand bag, you’ll need to gather all the materials for the project. The first and most important material is yarn. Choose a yarn that is durable yet soft, such as cotton or a cotton blend. You’ll want a yarn that can hold up to regular use but still has enough flexibility for the crochet stitches.
You’ll also need a crochet hook that matches your yarn size. Most granny square patterns work well with a 4mm or 5mm hook, but be sure to check your yarn label for the recommended size. Having the right hook will help your stitches stay even and neat throughout the project.
Next, you’ll need a fabric for lining the inside of the purse. This will add structure and durability to your granny square purse and prevent small items from slipping through the crochet holes. Choose a fabric that complements your yarn color for a polished, cohesive look.
Don’t forget about the handles! You can either purchase ready-made bag handles or make your own using crochet, macramé, or even leather straps. The handles will give your square granny purse hand bag a professional finish and make it easier to carry.
Lastly, you’ll need a few basic sewing supplies, such as a needle and thread, to attach the lining and handles to your bag. Once you have all these materials ready, you’re prepared to move on to the next step of the Square Granny Purse Hand Bag – Tutorial.
2. Crocheting the Granny Squares
The heart of any square granny purse hand bag is the iconic granny square pattern. In this step, we’ll go over how to crochet the granny squares that will form the body of your purse. If you’re new to crocheting granny squares, don’t worry—they’re simple to learn and repetitive enough that you’ll quickly get the hang of it.
Start by creating a magic circle or chain four and join the ends to form a small ring. The granny square is typically made by crocheting sets of three double crochets into the corners of each round. You’ll work in rounds, increasing the size of the square as you go. Begin with a few rounds for a small, compact square, or add more rounds to make larger squares for a bigger purse.
As you crochet, be mindful of your tension. You want your squares to be even and not too tight or too loose. Consistent tension ensures your square granny purse hand bag looks polished and professional once assembled.
Once you’ve completed one square, repeat the process to make additional squares. For most purses, you’ll need at least four squares—two for the front and back of the bag, and two for the sides. However, feel free to get creative with the number of squares, depending on how big or small you want your purse to be.
After you’ve crocheted all your squares, weave in any loose ends and block the squares if necessary. Blocking helps your granny squares hold their shape and makes assembly easier. Now that you have your finished granny squares, you’re ready to put your square granny purse hand bag together!
3. Assembling the Purse
Now that your granny squares are ready, it’s time to assemble your square granny purse hand bag. This step involves joining the squares together to create the main body of the purse, as well as adding any finishing touches.
Begin by laying out your granny squares in the desired configuration. Typically, you’ll want two squares for the front and back, and one square for each side. You can join the squares using a slip stitch or single crochet for a visible seam, or use a whipstitch for an invisible join. Whichever method you choose, be sure to stitch the squares together securely so that your bag holds up to regular use.
After joining the squares, it’s time to create the bottom of the bag. You can either crochet a solid bottom using the same yarn or use additional granny squares to form the base. A solid bottom may provide more structure, while additional granny squares will give your square granny purse hand bag a cohesive look.
Once the body of the bag is assembled, it’s time to add a lining. Cut a piece of fabric that matches the size of your assembled squares, leaving a small seam allowance. Sew the lining together and insert it into the bag. Use a needle and thread to hand-stitch the lining to the inside of your purse, making sure the seams are hidden.
Now that your bag is assembled and lined, the last step is to attach the handles. Whether you’re using store-bought handles or making your own, be sure to secure them firmly to the bag. With your handles attached, your square granny purse hand bag is now ready for use!
4. Adding Personal Touches and Customizations
One of the best things about crafting your own square granny purse hand bag is that you can add personal touches and customizations to make it truly one-of-a-kind. In this final step of the tutorial, we’ll explore some creative ways to customize your purse.
First, consider adding a button or zipper closure to the top of your bag. A closure will help keep your belongings secure and add a professional touch. You can find a variety of decorative buttons or zippers at craft stores to match the style of your purse.
Next, think about embellishing your granny squares with embroidery or appliqué. Embroidery can add intricate details and pops of color to your purse, while appliqué allows you to sew on additional shapes or designs. Both techniques are easy to learn and can be used to reflect your personal style.
If you want to make your purse more functional, consider adding pockets to the inside lining. Pockets are great for keeping small items organized and within easy reach. You can sew in a simple fabric pocket or crochet one that matches the granny squares.
Another fun idea is to experiment with different yarn textures and colors. Use multicolored yarn for a vibrant, eye-catching bag, or try mixing yarns with different textures for added interest. The possibilities are endless when it comes to making your square granny purse hand bag unique.
Finally, don’t forget about the handles! You can get creative with different handle materials, such as leather, metal, or even braided yarn. Personalizing the handles is a great way to give your purse a polished, professional look.
With these customizations, your square granny purse hand bag will not only be stylish and practical but also a reflection of your creativity and personality.
FAQ
1. What is a granny square purse?
A granny square purse is a handmade bag crafted using crocheted granny squares. These iconic squares are typically crocheted using clusters of double crochets in a repeating pattern, forming the structure of the bag.
2. What yarn is best for a square granny purse?
Cotton yarn is an excellent choice for a square granny purse hand bag, as it provides durability and structure while being soft to the touch. You can also use a cotton blend or acrylic yarn, depending on your preference.
3. Can beginners make a square granny purse?
Yes! The square granny purse hand bag is a great project for beginners. Granny squares are simple to crochet, and assembling the bag is straightforward. Plus, you can customize the purse to your skill level.
4. How many granny squares do I need to make a purse?
For most purses, you’ll need at least four granny squares—two for the front and back, and two for the sides. However, you can adjust the number of squares depending on the size of the purse you want to create.
5. How do I attach a lining to my granny square purse?
To attach a lining, cut fabric to the size of your assembled granny squares, sew it into a pouch, and insert it into the purse. Hand-stitch the lining along the inside edge of the purse to secure it.
6. Can I add a zipper or button to my granny purse?
Yes! Adding a zipper or button closure is a great way to secure the contents of your purse and give it a professional finish. You can sew the closure directly onto the top of the bag.
Join our VIP broadcast list and gain access to exclusive patterns, all for free. As a VIP member, you’ll receive the best patterns daily, delivered directly to your device. ✨📱 It’s a unique opportunity to stay up-to-date with the latest trends and designs, curated just for you. Don’t miss out on enhancing your projects and discovering new inspirations with the best patterns every day! 🎨🔝
Conclusion
This Square Granny Purse Hand Bag – Tutorial has guided you through every step of creating a stylish and functional accessory. From gathering materials and crocheting granny squares to assembling the bag and adding custom touches, this project is both enjoyable and practical. The square granny purse is perfect for everyday use or as a handmade gift, and you can personalize it to suit your style.
We hope this tutorial has inspired you to create your own square granny purse hand bag. If you have any feedback or suggestions for future projects, please leave a comment below. We’d love to hear from you and see your finished creations!

