If you’re a fan of adorable crochet creations, the Minion Bob and Bear Tim by AradiyaToys – Tutorial is a must-try project. This pattern brings to life the loveable Minion Bob along with his teddy bear, Tim.
With easy-to-follow steps, even beginners can enjoy crocheting these iconic characters. The Minion Bob and Bear Tim by AradiyaToys – Tutorial has become popular among crafters, offering a fun and rewarding crochet experience.
Whether you’re making it for yourself or as a gift for a Minions fan, this pattern is not only engaging but also incredibly charming.
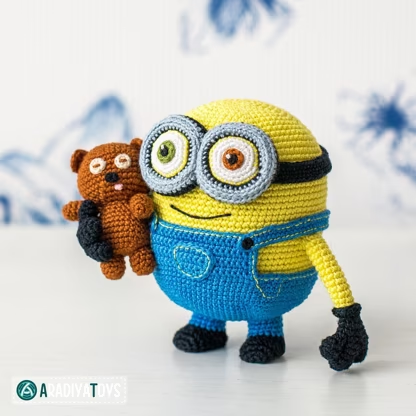
The Minion Bob and Bear Tim by AradiyaToys – Tutorial provides detailed instructions that help you navigate each part of the project with ease. From creating Bob’s cute yellow body to crafting Tim the Bear, the steps are simple yet produce impressive results.
In this article, we’ll walk you through the key aspects of the Minion Bob and Bear Tim by AradiyaToys – Tutorial, provide helpful tips, and answer common questions about this crochet pattern. Whether you’re new to crocheting or experienced, you’ll find this guide useful and inspiring as you embark on your own crochet adventure.
1. Getting Started with Minion Bob and Bear Tim
The first step in the Minion Bob and Bear Tim by AradiyaToys – Tutorial is gathering the right materials. You’ll need to have your crochet hooks, yarn, and other essential tools ready before diving into the pattern.
- For Minion Bob, opt for bright yellow yarn to match the classic Minion look. You’ll also need some black, blue, and white yarn for the signature overalls and goggles.
- Tim the Bear requires brown and beige yarn for his teddy bear body, along with a little black for his nose and eyes.
- It’s important to choose the right hook size as recommended by the pattern to ensure your crochet work doesn’t come out too tight or too loose.
- Keep a stitch marker handy, especially if you’re new to crochet patterns. This will help you keep track of your rounds more easily.
- Finally, a yarn needle will be necessary for stitching the various parts of your Minion and bear together.
Don’t rush the preparation phase! Ensuring that you have all the materials in advance will make the entire process smoother and more enjoyable.
2. Crocheting the Body of Minion Bob
Once your materials are gathered, the next part of the Minion Bob and Bear Tim by AradiyaToys – Tutorial focuses on crocheting Minion Bob’s body.
- Begin by crocheting the head and torso together in a seamless style. This reduces the number of parts you need to sew later.
- The head is shaped into a sphere, while the body is more cylindrical. You can use stuffing to ensure the Minion holds its shape.
- Adding Bob’s goggles is a fun detail. Use white for the eyes and black for the goggle straps. Make sure to leave space between the eyes to capture Bob’s iconic look.
- Don’t forget the small black gloves and shoes! These parts can be crocheted separately and then sewn onto Bob’s arms and legs.
- Once the body is assembled, it’s time to create the iconic Minion overalls. Using blue yarn, crochet the overall pants directly onto Bob’s body.
- Finally, make sure to crochet the overall straps and stitch them to the back of the overalls to complete the look.
With patience, Bob’s body will quickly start to take form, and you’ll soon see the recognizable Minion character emerge!
3. Crafting Tim the Bear
After Bob is assembled, it’s time to work on Bear Tim.
- Tim the Bear is smaller than Bob and uses basic crochet techniques like single crochet, increasing, and decreasing to shape his body and limbs.
- Begin by crocheting the body in a round shape, starting from the bottom and working your way up. Add stuffing as you go to give him a cute, plush appearance.
- Once the body is complete, move on to the arms and legs. These are crocheted separately and attached to the body afterward.
- Don’t forget Tim’s ears! These small details are crucial for giving the bear his adorable look. They are easy to crochet and sew onto the top of the head.
- For the face, use a combination of black and beige yarn to create the nose and eyes. These features bring Tim to life and give him his unique character.
- Finally, stitch Tim’s arms and legs onto the body, ensuring they’re securely attached but still soft and flexible for posing.
Crafting Tim is a quick and enjoyable process, providing the perfect complement to your Minion Bob.
4. Final Assembly and Finishing Touches
Now that both Minion Bob and Bear Tim are completed, it’s time to bring them together with some final touches.
- Start by attaching the arms and legs to Bob’s body. Make sure everything is symmetrical so Bob looks balanced when standing or sitting.
- Once Bob is fully assembled, check to see if you need to add more stuffing to ensure his shape is firm and plush.
- Next, place Tim in Bob’s arms. You can either attach Tim permanently with some stitches or leave him removable for added flexibility in display or play.
- Double-check all seams and stitching to ensure everything is secure. You don’t want any loose parts, especially if the toy will be handled frequently.
- Add any final details, such as additional facial embroidery or accents to the overalls. Personalizing the project adds a unique touch.
- Finally, give your creation a thorough once-over to make sure everything is perfect before displaying or gifting it.
With these final steps, your Minion Bob and Bear Tim by AradiyaToys – Tutorial project will be complete!
FAQ
1. Is this pattern suitable for beginners?
Yes, the Minion Bob and Bear Tim by AradiyaToys – Tutorial is designed to be beginner-friendly, though some basic crochet knowledge is recommended.
2. What size crochet hook should I use?
The recommended hook size is typically 2.5mm or 3.0mm, depending on your tension. Refer to the pattern for exact details.
3. How long does it take to complete this project?
On average, it can take between 10 to 15 hours, depending on your skill level and speed.
4. Can I substitute yarn types?
Yes, but ensure the yarn thickness matches the pattern’s gauge to maintain the correct proportions for both Bob and Tim.
5. What kind of stuffing should I use?
Polyester fiberfill is ideal for stuffing these crochet toys. It’s soft, durable, and easy to work with.
6. How do I maintain the crocheted toys?
To clean, gently hand wash the toys in cold water and allow them to air dry to avoid damaging the yarn.
Join our VIP broadcast list and gain access to exclusive patterns, all for free. As a VIP member, you’ll receive the best patterns daily, delivered directly to your device. ✨📱 It’s a unique opportunity to stay up-to-date with the latest trends and designs, curated just for you. Don’t miss out on enhancing your projects and discovering new inspirations with the best patterns every day! 🎨🔝
Conclusion
The Minion Bob and Bear Tim by AradiyaToys – Tutorial offers a delightful and rewarding experience for crafters of all skill levels. By following the steps outlined, you’ll create an adorable crochet duo that will surely bring smiles to anyone who sees them. Whether you’re keeping them for yourself or gifting them to a loved one, these characters are sure to be a hit.
We hope this tutorial has helped you on your crochet journey! Please feel free to leave a comment with your thoughts, opinions, or suggestions on this pattern. We’d love to hear your feedback!