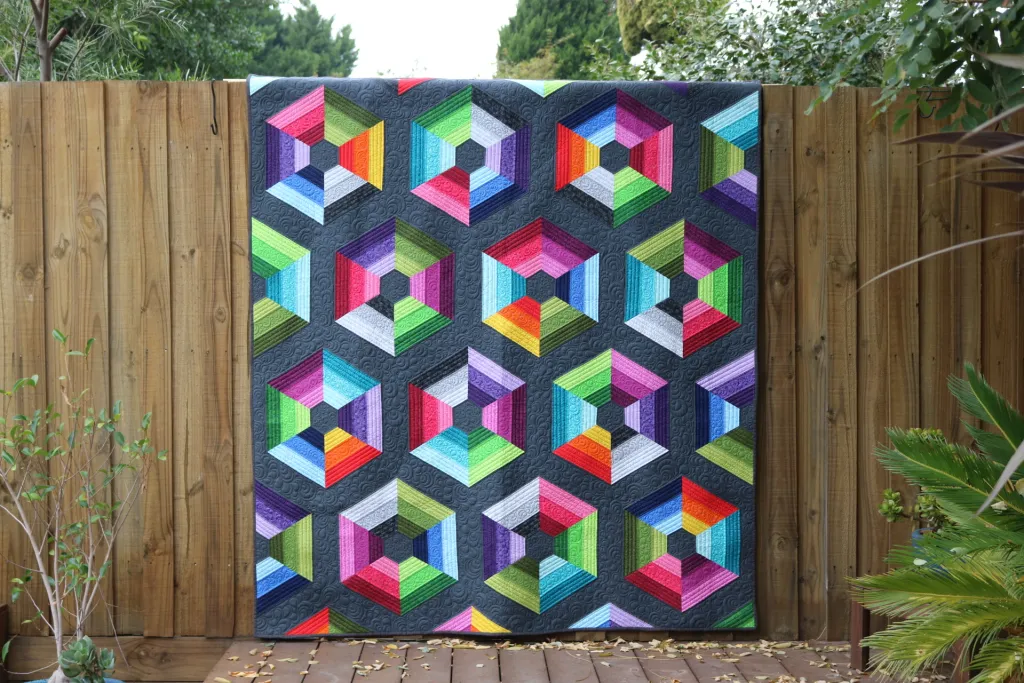
If you are looking for a project that is both visually stunning and fun to make, the Calippo Quilt Pattern might be just what you need.
This tutorial will guide you through each step of the process to create your own version of the Calippo quilt pattern, an intricate design perfect for quilters of all levels.
Whether you are an experienced quilter or just starting out, this guide will help you create a beautiful, functional quilt that you’ll be proud to display or gift.
Throughout this article, we will use the Calippo quilt pattern as our focus to ensure clarity and consistency, and optimize it for SEO to make it easy for readers to follow.
In this tutorial, we will cover the materials needed, the cutting and piecing process, assembly, and finishing touches.
Each section will be detailed to ensure you have all the knowledge to complete your project successfully. By the end, you will be able to tackle the Calippo quilt pattern with confidence.
Let’s get started and explore the world of quilting with the Calippo quilt pattern!
1. Materials You Will Need for the Calippo Quilt Pattern
Before starting your Calippo quilt pattern project, it’s important to gather all necessary materials. Having everything ready will make the process smoother and more enjoyable. Here’s a breakdown of what you’ll need:
- Fabric Selection: The beauty of the Calippo quilt pattern lies in its vibrant design, so choose fabrics that complement each other. You’ll need several different prints and solids to create the unique geometric patterns.
- Cutting Tools: A rotary cutter, quilting ruler, and cutting mat are essential for precision. Accurate cuts are crucial in ensuring that the Calippo quilt pattern comes together seamlessly.
- Thread: Choose a high-quality thread that matches or complements your fabric selection. Polyester or cotton threads work well for quilting.
- Batting: The batting adds warmth and depth to your quilt. Opt for cotton batting if you prefer a natural feel, or go with polyester for a lighter, fluffier quilt.
- Sewing Machine: While it’s possible to sew a quilt by hand, a reliable sewing machine will speed up the process and give you cleaner lines.
- Quilting Pins and Clips: These tools will help hold your layers together as you piece together the Calippo quilt pattern.
- Backing Fabric: This will be the back of your quilt, so select a fabric that complements the front design.
Once all materials are prepared, you can confidently begin working on your Calippo quilt pattern.
2. Cutting and Piecing the Calippo Quilt Pattern
Now that you have all your materials ready, it’s time to start cutting and piecing your fabrics. Accuracy in cutting is essential for the Calippo quilt pattern, as this pattern relies on geometric shapes that need to fit together precisely.
- Step 1: Cutting the Fabrics: Using your quilting ruler and rotary cutter, carefully cut your fabrics into the required shapes. The Calippo quilt pattern typically involves triangles, squares, and rectangles, so refer to your pattern instructions for exact measurements.
- Step 2: Organizing the Pieces: Once your fabrics are cut, lay them out in the order they’ll be sewn together. This allows you to visualize how the colors and patterns will work together in the Calippo quilt pattern.
- Step 3: Piecing the Fabric: Begin sewing the fabric pieces together, starting with smaller sections and working your way toward larger blocks. The key to a successful Calippo quilt pattern is to maintain even seam allowances, usually 1/4 inch, to ensure a snug fit when assembling the quilt.
- Step 4: Pressing Seams: After sewing each piece, press the seams with an iron. Pressing the seams flat helps create a professional finish and ensures your pieces align perfectly when assembling the Calippo quilt pattern.
- Step 5: Sewing the Quilt Blocks Together: Once your pieces are sewn and pressed, begin stitching the blocks together. Take your time to ensure the points and edges line up cleanly.
- Step 6: Completing the Quilt Top: After all the blocks are assembled, sew them together to form the complete quilt top. Congratulations, the hardest part of the Calippo quilt pattern is done!
3. Assembling the Quilt Sandwich
Now that the quilt top is complete, it’s time to create what quilters call a “quilt sandwich.” This step involves layering the quilt top, batting, and backing fabric together.
- Step 1: Preparing the Backing Fabric: Lay the backing fabric flat on a clean surface, with the right side facing down. Smooth out any wrinkles, as these will affect the final look of your Calippo quilt pattern.
- Step 2: Adding the Batting: Place the batting on top of the backing fabric. Make sure the batting is slightly larger than the quilt top so that you can trim it down later.
- Step 3: Placing the Quilt Top: Finally, place your quilt top on the batting, aligning it carefully. This is the visible part of the Calippo quilt pattern, so take your time to smooth it out and ensure it’s centered.
- Step 4: Securing the Layers: Use quilting pins or clips to secure all three layers together. The pins should be evenly spaced to keep the layers from shifting as you sew.
- Step 5: Basting the Quilt: Basting is an optional step, but it helps keep everything in place. You can baste by hand using long, temporary stitches or use spray adhesive.
- Step 6: Preparing for Quilting: Now your quilt sandwich is ready for quilting! Whether you choose to hand-quilt or use a sewing machine, the next step will be stitching the layers together to finalize the Calippo quilt pattern.
4. Quilting and Binding the Calippo Quilt
With your quilt sandwich ready, it’s time to quilt and bind the Calippo quilt pattern. This step is crucial for durability and aesthetic appeal.
- Step 1: Quilting the Layers: Start quilting by stitching through all three layers of the quilt. You can follow the geometric shapes of the Calippo quilt pattern for a cohesive look or opt for free-motion quilting to add a personalized touch.
- Step 2: Choosing Your Quilting Style: There are several quilting styles to choose from, such as straight-line quilting, free-motion quilting, or echo quilting. The choice depends on your skill level and the look you want to achieve with your Calippo quilt pattern.
- Step 3: Quilting the Borders: Once the main body of the quilt is done, quilt the borders. This adds structure and helps frame the Calippo quilt pattern beautifully.
- Step 4: Trimming the Excess: After quilting, trim the excess batting and backing fabric, leaving an even edge around the quilt top.
- Step 5: Binding the Quilt: To finish the edges, sew binding strips around the quilt. Fold the binding over the edges and stitch it down, creating a neat and professional finish for your Calippo quilt pattern.
- Step 6: Final Touches: Give your quilt a final press and inspect it for any loose threads or unfinished areas. Congratulations, you’ve completed the Calippo quilt pattern!
Frequently Asked Questions (FAQ)
Q1: What is the difficulty level of the Calippo quilt pattern?
The Calippo quilt pattern is suitable for intermediate quilters due to its precise geometric designs. However, with patience and attention to detail, beginners can also enjoy the challenge.
Q2: How much fabric do I need for the Calippo quilt pattern?
The amount of fabric depends on the size of your quilt. Typically, a throw-size quilt requires around 3-4 yards of fabric for the top and additional yardage for backing and binding.
Q3: Can I hand-quilt the Calippo quilt pattern?
Yes, the Calippo quilt pattern can be hand-quilted, although it will take more time compared to using a sewing machine.
Q4: What is the best batting for this pattern?
Cotton batting is a popular choice for the Calippo quilt pattern as it provides a soft, natural feel. Polyester batting is also an option if you prefer a lighter quilt.
Q5: How long does it take to complete the Calippo quilt pattern?
The time to complete the Calippo quilt pattern varies based on experience and available time. On average, it can take a few weeks to a month.
Q6: Can I customize the colors in the Calippo quilt pattern?
Absolutely! One of the joys of quilting is choosing fabrics that reflect your personal style. Feel free to experiment with different color combinations to make the Calippo quilt pattern uniquely yours.
Conclusion
In this tutorial, we’ve walked through the essential steps to create a beautiful Calippo quilt pattern, from gathering materials to quilting and binding. This versatile pattern allows for endless creativity with fabric choices and quilting techniques, making it a rewarding project for both beginners and experienced quilters.
We hope this guide has been helpful in demystifying the Calippo quilt pattern and giving you the confidence to start your own quilt. We’d love to hear your thoughts and suggestions—please leave a comment with your feedback and share your experiences. Happy quilting!

