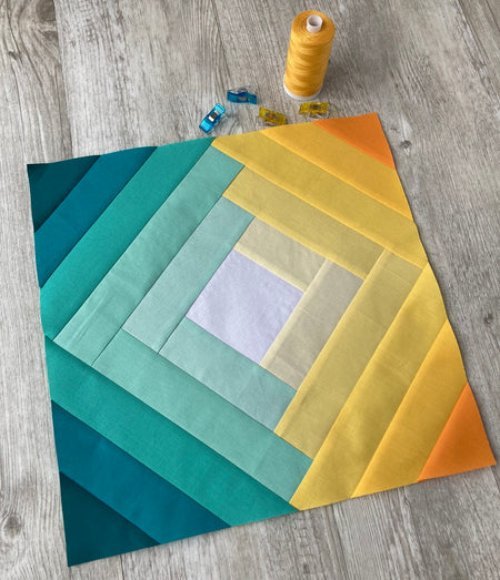
The Twisted Log Cabin Quilt Block is a captivating variation of the traditional log cabin design, adding a unique twist to your quilting projects.
This tutorial will guide you through the steps needed to create this eye-catching pattern, from fabric selection to final assembly. Whether you’re a beginner or an experienced quilter, this project will inspire creativity while offering a fresh take on a classic design.
In this article, we’ll dive deep into the process of making a Twisted Log Cabin Quilt Block, breaking down the essential steps and providing useful tips along the way.
With its twisted appearance, this quilt block is perfect for adding depth and movement to your quilts. You’ll also find answers to common questions in the FAQ section and a thorough conclusion to wrap everything up.
Ready to get started? Let’s explore how to create the Twisted Log Cabin Quilt Block with ease!
1. Choosing the Right Fabric for Your Twisted Log Cabin Quilt Block
The fabric you choose plays a critical role in how your Twisted Log Cabin Quilt Block turns out. The colors, textures, and patterns of the fabric will highlight the block’s twist effect, making it stand out in your finished quilt.
- Color Contrast: When selecting fabric, aim for high contrast between your light and dark fabrics. This contrast will enhance the twisting motion of the block. The classic log cabin style benefits from alternating light and dark fabrics, and the same applies to the twisted version.
- Patterned Fabrics: You can also experiment with patterned fabrics. Stripes or geometric prints can add a unique flair to your Twisted Log Cabin Quilt Block, creating interesting effects as they bend and twist along the seams.
- Fabric Quality: Always opt for high-quality cotton fabrics. The structure and precision of your Twisted Log Cabin Quilt Block depend on the fabric holding its shape, and high-quality cotton is known for its stability and durability.
- Pre-cut Fabric: If you’re looking to save time, pre-cut fabric strips or a jelly roll can be an excellent choice. These fabric bundles come pre-measured, making the cutting process quicker and easier, ensuring uniformity in your quilt block.
- Mix and Match: Feel free to mix and match different fabric styles for a more eclectic look. The twist effect in the block will allow for creative expression, letting you combine modern and traditional designs within the same quilt.
- Bold Colors: Consider using bold, solid colors to bring out the sharpness of the twists. This can make each segment of your Twisted Log Cabin Quilt Block stand out more clearly, giving the block a more defined structure.
2. Cutting and Assembling Your Twisted Log Cabin Quilt Block
Once your fabric is selected, the next step is cutting and assembling the pieces for your Twisted Log Cabin Quilt Block. The process may seem intricate, but with proper guidance, it becomes straightforward.
- Precision in Cutting: Accurate cutting is essential in creating a clean and neat Twisted Log Cabin Quilt Block. Each strip of fabric needs to be cut with precision. The standard size for strips is around 2.5 inches, but you can adjust based on your design preferences.
- Twisting Effect: The twisting illusion in the block comes from alternating the lengths of the fabric strips. Instead of the typical uniform cuts seen in traditional log cabin blocks, the Twisted Log Cabin requires slight variations in length to achieve that spiral look.
- Assembly Order: Begin by assembling the central square, then work outward by attaching the strips one by one. The key to creating the twist lies in the careful placement of each strip. Be mindful of the color placement to maintain the light-to-dark contrast that emphasizes the twist.
- Seam Allowance: A standard seam allowance of 1/4 inch is typically used. Maintaining a consistent seam allowance is crucial for ensuring that your Twisted Log Cabin Quilt Block lies flat and doesn’t warp.
- Pressing the Seams: After sewing each strip, press the seams carefully. This step helps ensure that your quilt block remains flat and crisp, and it will make the final assembly of your quilt easier.
- Repeating the Process: To create a full quilt, you’ll repeat this process multiple times, building as many Twisted Log Cabin Quilt Blocks as needed for your desired quilt size.
3. Techniques for Perfecting the Twisted Log Cabin Look
Achieving the perfect twist in your Twisted Log Cabin Quilt Block can be tricky, but with the right techniques, you’ll create blocks that stand out in any quilt.
- Symmetry and Balance: Pay attention to the balance and symmetry of your block. Although the twist creates an asymmetrical look, maintaining consistency in strip placement will prevent the block from looking uneven.
- Twist Direction: Decide whether you want your twists to rotate in the same direction throughout the quilt or alternate. Both approaches work, but alternating twists can add more visual interest to the final quilt.
- Stitching Accuracy: Precision in stitching is key to a flawless Twisted Log Cabin Quilt Block. Use a sewing machine with a 1/4-inch foot to ensure that your seams are consistent and straight.
- Chain Piecing: If you’re making multiple blocks, try chain piecing. This technique allows you to sew one piece after another without cutting the thread, saving time and keeping your strips in the correct order.
- Block Squaring: After completing each Twisted Log Cabin Quilt Block, square the block to ensure that all sides are even. This step is essential for achieving a smooth, uniform quilt when piecing the blocks together.
- Use of Templates: If you’re struggling with precision, consider using a Twisted Log Cabin template. Templates ensure that your strips are the correct length and angle, taking the guesswork out of the process.
4. Piecing the Twisted Log Cabin Quilt Together
Once you’ve created your blocks, it’s time to assemble the entire quilt. Piecing your Twisted Log Cabin Quilt together requires careful planning and attention to detail.
- Layout Design: Before sewing the blocks together, lay them out on a large surface to visualize the final design. Try different arrangements, especially if you’re alternating the twist directions or using various fabric patterns.
- Joining the Blocks: Begin by sewing the blocks into rows, then join the rows to complete the quilt top. Be mindful of the seams, aligning them properly so that the twists flow smoothly across the quilt.
- Borders and Sashing: Adding a border or sashing between the blocks can help frame the Twisted Log Cabin Quilt Blocks and enhance the overall design. A solid border can create a nice contrast between the intricate blocks and the quilt’s edge.
- Backing and Batting: Select a backing fabric and batting that complement the front of the quilt. For a cohesive look, choose a backing fabric that echoes the colors or patterns used in the Twisted Log Cabin Quilt Block.
- Quilting the Layers: Once the quilt top, batting, and backing are layered, you can quilt the layers together. Straight-line quilting or stitching in the ditch (along the seams) are popular options for a Twisted Log Cabin Quilt.
- Binding the Quilt: Finish the quilt by adding a binding around the edges. This final touch secures the quilt layers and gives your project a professional look.
FAQ About the Twisted Log Cabin Quilt Block
What makes the Twisted Log Cabin Quilt Block different from the traditional log cabin block?
The Twisted Log Cabin Quilt Block uses strips of varying lengths to create a twisting illusion, unlike the traditional block that uses uniform strips.
Can beginners make a Twisted Log Cabin Quilt Block?
Yes, with careful attention to detail and patience, even beginners can successfully make a Twisted Log Cabin Quilt Block by following a step-by-step guide.
How do I keep my block from becoming warped?
Ensure accurate cutting, consistent seam allowances, and careful pressing after each strip is sewn. Squaring the block at the end also helps maintain the correct shape.
What size should my fabric strips be?
Typically, strips are around 2.5 inches wide, but you can adjust the size depending on the look you want for your Twisted Log Cabin Quilt Block.
Can I use scraps to make this block?
Absolutely! The Twisted Log Cabin Quilt Block is a great way to use up fabric scraps, as long as you maintain color contrast and consistency in fabric quality.
Is there a specific fabric type that works best for this quilt block?
High-quality cotton is the preferred fabric, as it holds its shape well and ensures precision when sewing the strips together.
Join our VIP broadcast list and gain access to exclusive patterns, all for free. As a VIP member, you’ll receive the best patterns daily, delivered directly to your device. ✨📱 It’s a unique opportunity to stay up-to-date with the latest trends and designs, curated just for you. Don’t miss out on enhancing your projects and discovering new inspirations with the best patterns every day! 🎨🔝
Conclusion
The Twisted Log Cabin Quilt Block is a dynamic and visually stunning pattern that adds depth and movement to any quilt. By carefully selecting your fabrics, mastering the assembly process, and perfecting your technique, you can create a quilt that truly stands out. Whether you’re a seasoned quilter or just starting out, this block offers endless possibilities for creativity.
We hope this tutorial has provided you with all the information you need to make your own Twisted Log Cabin Quilt Block. Please leave your thoughts, suggestions, or any additional tips in the comments below—we’d love to hear from you!

