The Whirlwind Quilt Block is a striking and versatile design that has been a favorite among quilters for generations. In this tutorial, we’ll take you through the step-by-step process of creating this stunning block, ensuring even beginners can follow along.
Known for its dynamic, swirling pattern, the Whirlwind Quilt Block is perfect for adding movement and energy to your quilting projects.
Whether you’re making an entire quilt out of Whirlwind Quilt Blocks or just incorporating a few into your designs, this tutorial will provide you with everything you need to get started.
As always, it’s important to gather your materials, prep your fabric, and keep your sewing machine ready for action. Now, let’s dive into the Whirlwind Quilt Block – Tutorial and start crafting!
Understanding how to piece this block together can open the door to a wide range of creative possibilities. This tutorial will guide you from start to finish, covering every aspect of the Whirlwind Quilt Block construction. Ready to get started? Let’s move on to the step-by-step process!
1. Materials You Will Need
Before you begin constructing the Whirlwind Quilt Block, it’s important to gather all the materials required. Here’s what you’ll need:
- Fabric Choices: The Whirlwind Quilt Block works best when you use contrasting fabrics, such as a light fabric against a dark one. The stark contrast helps highlight the swirly design. Consider using two solid colors or mixing a print with a solid.
- Cutting Tools: A sharp rotary cutter, a cutting mat, and quilting rulers are essential. Accurate cutting ensures that your pieces will fit together neatly, making the final block clean and precise.
- Sewing Machine: While you can sew by hand, using a sewing machine will speed up the process and give you consistent results. Ensure your machine is threaded with a color that blends well with your fabric choices.
- Thread: Choose a thread that complements your fabric. Neutral threads often work well with a variety of fabrics, but it’s always a good idea to match the thread to your quilt’s color scheme.
- Iron and Pressing Tools: Pressing is key in quilting. After every seam, it’s important to press your work, keeping everything flat and smooth. This will help the Whirlwind Quilt Block look neat and professional.
- Quilting Pins: These will keep your pieces together while you sew, ensuring everything stays aligned as you work through the block.
2. Cutting the Fabric for Your Whirlwind Quilt Block
Now that you have your materials ready, it’s time to cut your fabric. Accurate cutting is crucial in quilting to ensure that your block pieces fit together perfectly.
- Start with Squares: For the Whirlwind Quilt Block, you’ll need four squares of fabric: two from your main fabric and two from your contrasting fabric. Ensure that these squares are of equal size. A good starting point is 5 inches by 5 inches, but you can adjust based on the size of the block you desire.
- Cutting Half-Square Triangles: Each square will be cut in half diagonally to create triangles. These triangles will be the building blocks of your quilt block, so make sure your cuts are straight and precise.
- Pairing Triangles: Once you’ve cut your triangles, pair one triangle from your main fabric with one from the contrasting fabric. These will form the base of your Whirlwind Quilt Block.
- Sewing the Triangles Together: Place your paired triangles right sides together and sew along the diagonal edge. Press the seam to one side to ensure that the fabric lays flat.
- Trim the Triangles: Once sewn, trim the triangle units so that they are all uniform in size. This will help maintain precision as you assemble your block.
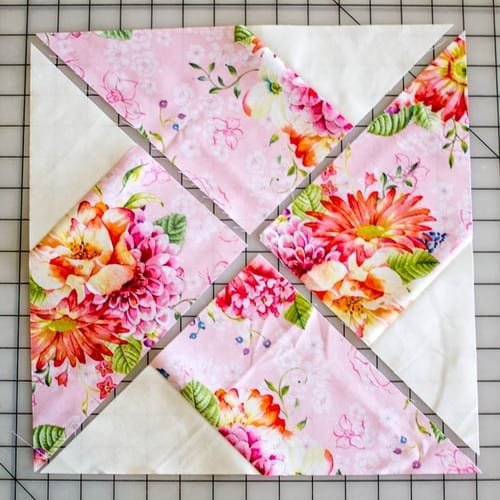
- Arrange Your Triangles: Lay out your sewn triangles in a square, alternating colors to create the whirlwind effect. The placement of each triangle is key to achieving the signature swirl.
3. Piecing Together the Whirlwind Quilt Block
Now that your triangles are sewn and laid out, it’s time to assemble the full Whirlwind Quilt Block.
- Sewing the First Row: Start by sewing two triangle units together to form the top row of your block. Pin the pieces to prevent them from shifting and ensure that the points of the triangles align neatly.
- Sewing the Second Row: Repeat the same process for the bottom row. Make sure that the contrasting colors are opposite one another to create the whirlwind effect.
- Join the Rows: With both rows sewn, it’s time to join them. Carefully align the center seam, ensuring the points of the triangles meet at the center. This is the most important part of the Whirlwind Quilt Block assembly.
- Press the Seams: Once your rows are joined, press the seams to one side. This will help the block lay flat and give it a polished look.
- Check for Accuracy: Take a moment to check that all your points match up and that your block is square. If necessary, trim the edges slightly to ensure everything lines up perfectly.
- Repeat for More Blocks: If you’re making a full quilt, repeat this process to create additional Whirlwind Quilt Blocks. The more blocks you make, the more vibrant and dynamic your quilt will look.
4. Finishing Your Whirlwind Quilt Block Project
After piecing together your Whirlwind Quilt Block, it’s time to focus on finishing touches and assembly into a quilt if you’re making multiple blocks.
- Adding Borders: If you’d like, you can add a border around your Whirlwind Quilt Block to frame the design. A simple solid border can help emphasize the dynamic movement of the block.
- Sashing: When assembling multiple blocks into a quilt, consider adding sashing between each block. This helps separate the blocks and makes the quilt easier to assemble.
- Quilt Layout: Play around with the layout of your blocks. By rotating the Whirlwind Quilt Blocks, you can create different patterns within your quilt. Experiment with different arrangements before settling on the final design.
- Quilting: Once your quilt top is assembled, it’s time to add batting and backing fabric. Choose a quilting design that complements the swirling motion of the Whirlwind Quilt Block. Swirling or wavy quilting lines work well with this design.
- Binding: Finally, bind the edges of your quilt to give it a clean, finished look. Choose a binding fabric that complements the overall color scheme of your quilt.
- Enjoy Your Finished Quilt: Now that your quilt is complete, you can enjoy the fruits of your labor. The Whirlwind Quilt Block is a dynamic and eye-catching design that is sure to impress!
FAQ
1. What is the best fabric to use for the Whirlwind Quilt Block?
It’s recommended to use fabrics with high contrast, such as a dark and light fabric, to make the swirling pattern stand out.
2. How large should I make my Whirlwind Quilt Block?
Typically, quilters use 5-inch squares to start, but you can adjust the size depending on how large you want your final quilt block to be.
3. Is the Whirlwind Quilt Block suitable for beginners?
Yes! While it may look complex, the Whirlwind Quilt Block is quite straightforward and is an excellent project for quilters of all levels.
4. Can I hand sew the Whirlwind Quilt Block?
Yes, although using a sewing machine will provide faster and more consistent results, you can certainly hand sew this block.
5. How can I ensure my points match up in the center?
Careful pinning and pressing will help ensure that your points meet perfectly. Taking your time with alignment is key.
6. Can I use this block in different quilt designs?
Absolutely! The Whirlwind Quilt Block is very versatile and can be used in a variety of quilt layouts, depending on how you rotate the blocks.
Join our VIP broadcast list and gain access to exclusive patterns, all for free. As a VIP member, you’ll receive the best patterns daily, delivered directly to your device. ✨📱 It’s a unique opportunity to stay up-to-date with the latest trends and designs, curated just for you. Don’t miss out on enhancing your projects and discovering new inspirations with the best patterns every day! 🎨🔝
Conclusion
In this tutorial, we’ve covered everything you need to know to create the Whirlwind Quilt Block, from gathering materials to piecing and finishing your block. This timeless design adds a sense of motion and elegance to any quilt, making it a favorite for both beginners and experienced quilters alike.
We hope you enjoyed following along with this tutorial. Feel free to share your experience in the comments, and let us know if you have any tips or suggestions for improving the Whirlwind Quilt Block process!

