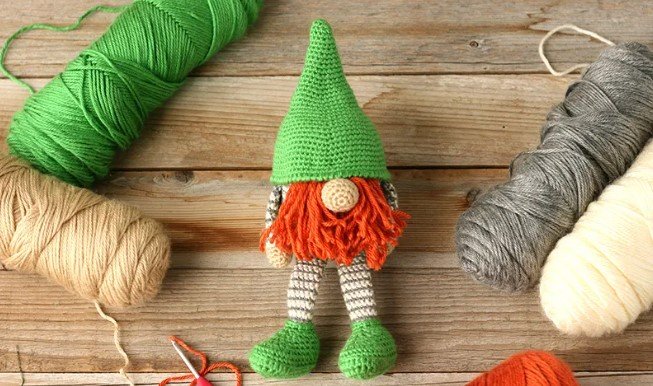
Creating a Crochet Gnome – Free Pattern is a fun and easy project that allows you to explore your creativity while making an adorable decoration. These charming gnomes can be customized with different colors, yarns, and accessories, making them a versatile addition to your crochet repertoire.
Whether you’re an experienced crocheter or a beginner, this free pattern will guide you through the process, step by step. The end result is a cute and whimsical gnome that can brighten any space, especially around the holidays or special occasions.
In this article, we will go through all the necessary steps for making your own Crochet Gnome, including the materials needed, basic techniques, and tips for customizing your gnome to fit your personal style.
You’ll find this project quick and satisfying, perfect for gift-giving or adding a handmade touch to your home decor. This guide will also answer some of the most common questions about crocheting gnomes and offer advice to ensure your project turns out beautifully.
Before diving into the instructions, let’s take a closer look at why crocheted gnomes have become so popular. These little characters have captured the hearts of crafters around the world, thanks to their playful appearance and endless possibilities for personalization.
A Crochet Gnome – Free Pattern is a great way to experiment with different techniques and get creative with colors, textures, and designs.
1. Materials and Tools for Crochet Gnome – Free Pattern
To begin your Crochet Gnome – Free Pattern, you’ll need to gather a few essential materials. Having the right tools will ensure that your gnome looks polished and professional, even if you’re new to crocheting. The materials for this project are easy to find, and you can often use leftover yarn from other projects.
First and foremost, you’ll need yarn. The type of yarn you choose will determine the size and texture of your gnome. Worsted-weight yarn is a great option for this project because it’s easy to work with and provides a sturdy, well-defined finish. You can choose any color that suits your style, but traditional gnome colors like red, green, and white are popular choices.
You’ll also need a crochet hook that matches your yarn weight. For worsted-weight yarn, a 4.0mm or 4.5mm hook is usually ideal. Make sure to check the yarn label for the recommended hook size to ensure your stitches are even and consistent. Other essential tools include a tapestry needle for sewing the pieces together, stitch markers to keep track of your rounds, and stuffing to fill your gnome and give it shape.
In addition to these basic materials, you may want to gather some decorative items to personalize your gnome. Consider using small buttons, beads, or felt pieces for the nose, eyes, and hat embellishments. A bit of faux fur can also make an adorable beard, giving your gnome a whimsical, cozy look.
Finally, before you start crocheting, make sure you have a good work surface with plenty of light. Having all your materials organized and within reach will make the process much smoother and more enjoyable.
2. Basic Stitches and Techniques for Crochet Gnome
Now that you have your materials ready, it’s time to review some basic stitches and techniques that you’ll need for the Crochet Gnome – Free Pattern. Even if you’re a beginner, don’t worry! The stitches required for this pattern are simple and easy to learn. This project is a great opportunity to practice your crochet skills while creating something adorable.
The first stitch you’ll need is the magic ring, which is used to start most crochet projects worked in the round. The magic ring allows you to crochet in a circle without leaving a hole in the center, making it perfect for the gnome’s body, hat, and other rounded parts. If you’re not familiar with this technique, there are many tutorials available online to guide you through it step by step.
Once you’ve mastered the magic ring, the single crochet (sc) is the main stitch used throughout the pattern. Single crochet is a simple, tight stitch that creates a firm fabric, which is perfect for amigurumi projects like the Crochet Gnome. If you’re new to single crochet, you’ll find it easy to learn and use.
Another important technique for this pattern is increasing and decreasing stitches. These techniques are used to shape the gnome’s body, hat, and arms. Increasing stitches (working two stitches into one) helps widen the piece, while decreasing (crocheting two stitches together) narrows it. Both of these techniques are essential for creating the rounded, three-dimensional shape of the gnome.
Finally, you’ll need to know how to sew pieces together. After crocheting the individual parts (body, hat, arms, etc.), you’ll use a tapestry needle and yarn to attach them. Make sure to sew the pieces securely so your gnome stays intact over time. Stuffing the gnome firmly but evenly is also key to achieving a balanced, well-shaped figure.
3. Assembling the Crochet Gnome
After crocheting all the necessary parts, it’s time to assemble your Crochet Gnome – Free Pattern. This step is where your gnome starts to come to life, and it’s important to take your time to ensure everything is sewn together properly. Assembling the gnome involves attaching the body, hat, arms, and any additional decorations like a nose or beard.
Start by stuffing the body of the gnome. Use enough stuffing to give it a firm shape, but be careful not to overstuff, as this can cause the stitches to stretch out. Once the body is stuffed, sew the opening closed using a tapestry needle and yarn. Make sure the stitches are tight and secure to prevent any stuffing from escaping.
Next, attach the hat to the top of the body. The hat is one of the most distinctive features of the Crochet Gnome, so you may want to take extra care in positioning it correctly. You can sew the hat down around the edges, or leave it slightly loose for a more playful, whimsical look.
Once the hat is attached, it’s time to sew on the arms. Position the arms on either side of the body and use a tapestry needle to attach them securely. If your gnome has a beard or other facial features, now is the time to add those as well. For the nose, you can crochet a small ball or use a bead or button, depending on your preference.
Finally, check your gnome for any loose stitches or gaps, and make sure everything is securely attached. Your gnome should be sturdy enough to stand or sit on its own, depending on how you’ve designed it.
4. Customizing Your Crochet Gnome
One of the best things about the Crochet Gnome – Free Pattern is the endless possibilities for customization. By changing the colors, adding embellishments, or experimenting with different yarns, you can create a gnome that reflects your personal style or matches a specific theme or occasion.
Start by choosing a color scheme for your gnome. Traditional gnomes often feature red hats and white beards, but you can get creative with your color choices. Consider making a gnome in bright, bold colors for a fun, modern twist, or use muted tones for a more rustic, vintage feel.
You can also experiment with different types of yarn to change the texture of your gnome. For example, using a fuzzy or chunky yarn for the beard can add extra softness and dimension. Alternatively, you can use glittery or metallic yarn for the hat to give your gnome a festive, holiday-inspired look.
Another way to customize your gnome is by adding accessories. Consider giving your gnome a scarf, mittens, or even a tiny crochet flower to hold. These little details can make your gnome even more special and unique.
Finally, don’t be afraid to experiment with the size of your gnome. By using different yarn weights and hook sizes, you can create gnomes of various sizes, from tiny ornaments to large plush decorations. This flexibility makes the Crochet Gnome – Free Pattern a great project for any occasion.
FAQ
1. What type of yarn should I use for the Crochet Gnome?
Worsted-weight yarn is ideal for this project, as it provides a good balance of durability and ease of use. However, you can experiment with other yarn weights to create gnomes of different sizes.
2. How long does it take to complete a Crochet Gnome?
Depending on your skill level, a gnome can be completed in a few hours to a couple of days. Beginners may take longer, while more experienced crocheters can finish the project relatively quickly.
3. Can I make a larger or smaller Crochet Gnome?
Yes! You can easily adjust the size of your gnome by using a different yarn weight and crochet hook. Thicker yarn and a larger hook will create a bigger gnome, while thinner yarn and a smaller hook will result in a smaller one.
4. What are some good stuffing materials for the Crochet Gnome?
Polyester fiberfill is the most common stuffing material for crochet projects. It’s lightweight, soft, and easy to work with. You can also use cotton stuffing or scrap yarn for a more eco-friendly option.
5. Can I customize my Crochet Gnome?
Absolutely! You can customize your gnome with different colors, yarn textures, and accessories. Add a scarf, change the hat’s shape, or even give your gnome a beard made from faux fur.
6. Is this pattern beginner-friendly?
Yes, the Crochet Gnome – Free Pattern is suitable for beginners, as it uses basic stitches and techniques. However, if you’re new to crochet, it may take some practice to get comfortable with working in the round and assembling the pieces.
Join our VIP broadcast list and gain access to exclusive patterns, all for free. As a VIP member, you’ll receive the best patterns daily, delivered directly to your device. ✨📱 It’s a unique opportunity to stay up-to-date with the latest trends and designs, curated just for you. Don’t miss out on enhancing your projects and discovering new inspirations with the best patterns every day! 🎨🔝
Conclusion
In this guide, we’ve explored how to create your own Crochet Gnome – Free Pattern using simple materials and techniques. From gathering your supplies to customizing your gnome, this project offers endless opportunities for creativity.
We hope you’ve enjoyed following along with this tutorial and are excited to make your own crochet gnome. Please feel free to leave a comment with your thoughts, questions, or suggestions. We’d love to hear how your gnome turned out and any ideas you have for future projects!