Looking to turn your fabric scraps into something beautiful? A Bright Corner: Scrap Bin Geese block tutorial is the perfect project for quilters looking to make the most of their leftover fabrics.
This technique allows you to transform small bits of material into a stunning design, all while refining your quilting skills. Whether you’re a seasoned quilter or a beginner looking for a simple project, this block is both practical and stylish.
In this A Bright Corner: Scrap Bin Geese block tutorial, we’ll guide you through the steps to create a vibrant, geometric block using your fabric scraps.
This project is ideal for those who want to practice their piecing skills without committing to a large quilt. Plus, it’s a fun way to clean up your scrap bin and create something special.
By the end of this tutorial, you’ll not only have learned how to make the Scrap Bin Geese block, but you’ll also gain insights into color coordination and fabric organization. So, grab your scraps, and let’s dive into this exciting quilting adventure!
1. Understanding the Scrap Bin Geese Block
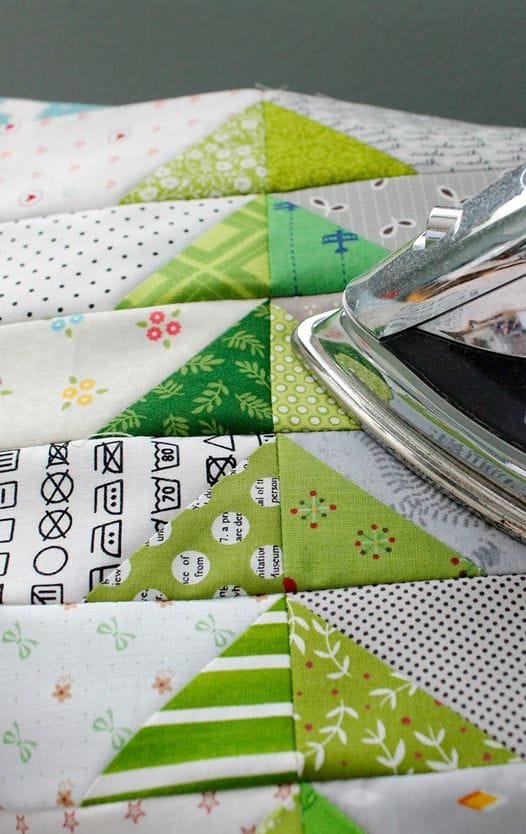
The Scrap Bin Geese block is a variation of the classic Flying Geese pattern, using fabric scraps to create a vibrant, colorful design. Unlike traditional Flying Geese blocks that often rely on larger fabric cuts, this version encourages creativity by using bits of leftover fabric, making it both eco-friendly and resourceful.
What is a Flying Geese Block?
The Flying Geese block is a traditional quilt design composed of one large triangle (the “goose”) in the center and two smaller triangles (the “sky”) on either side. This classic design is often used to create dynamic, directional patterns in quilts.
Why Use Scraps?
Using scraps is a sustainable approach to quilting. Instead of discarding small pieces of fabric, you can repurpose them into something beautiful and functional. The Scrap Bin Geese block allows you to utilize these bits of fabric creatively.
Color Coordination
When working with scraps, it’s essential to consider color coordination. While the blocks may be made from various fabrics, planning the overall color scheme will ensure a cohesive final product.
Fabric Selection Tips
To get the best results, choose a mix of light and dark fabrics from your scrap bin. This will help to create contrast within the block, making the Scrap Bin Geese design stand out more prominently.
Benefits of Making Scrap Bin Geese Blocks
One of the key benefits of creating these blocks is the ability to personalize the design. No two blocks will look the same, giving you a unique quilt every time.
Size Variations
You can adjust the size of the blocks to fit your project. Whether you’re making a full-sized quilt or just a small wall hanging, the flexibility of the Scrap Bin Geese block allows for endless possibilities.
2. How to Make a Scrap Bin Geese Block
Now that you understand the basics of the Scrap Bin Geese block, let’s walk through the process step by step. Gather your fabric scraps, a ruler, and your sewing machine, and let’s get started.
Step 1: Cutting Your Fabric
Begin by cutting your scraps into triangles. The size of the triangles will depend on how large you want your block to be. For beginners, starting with triangles measuring about 3-4 inches on each side is a good option.
Step 2: Arranging the Triangles
Once you’ve cut your triangles, arrange them in the Flying Geese formation. Place the large triangle (goose) in the center and position the two smaller triangles (sky) on either side.
Step 3: Sewing the Pieces Together
Using a 1/4-inch seam allowance, sew the small triangles to the sides of the large triangle. Press the seams toward the smaller triangles to create a smooth finish.
Step 4: Trimming the Block
After sewing, use a ruler and rotary cutter to trim the block to your desired size. Make sure all edges are straight for easier assembly into a quilt.
Step 5: Creating Multiple Blocks
For a full quilt, repeat this process to create multiple Scrap Bin Geese blocks. Experiment with different color combinations to add interest to your quilt design.
Step 6: Assembling the Blocks
Once you have enough blocks, you can begin assembling them into rows and eventually into a quilt top. Align the edges carefully to ensure that the points of the geese align properly.
3. Tips for Success
To make the most of this A Bright Corner: Scrap Bin Geese block tutorial, there are a few tips and tricks that will help ensure your project turns out perfectly.
Use a Consistent Seam Allowance
Maintaining a consistent 1/4-inch seam allowance is crucial in quilting. This will ensure that your blocks are uniform and will fit together correctly when assembling the quilt.
Press Your Seams
Pressing your seams as you sew is an essential step in quilting. It helps to flatten the fabric and creates a cleaner finish. Always press your seams toward the darker fabric to prevent any shadowing on lighter fabrics.
Test Your Color Combinations
Before committing to a full quilt, create a few test blocks with different color combinations. This will help you visualize how the final quilt will look and allow you to adjust the color scheme if needed.
Stay Organized
Keep your scraps organized by size and color. This will make it easier to find the right piece when working on your blocks.
Don’t Be Afraid to Experiment
One of the joys of using scraps is the freedom to experiment. Don’t worry about making each block identical—embrace the variety that comes from using different fabrics.
Take Your Time
Quilting is a process that requires patience. Take your time to ensure that each step is done carefully, from cutting the fabric to sewing and pressing the seams.
4. Frequently Asked Questions (FAQ)
What size should the Scrap Bin Geese blocks be?
The size of the blocks can vary depending on your project. Typically, quilters create blocks that are around 6-12 inches in size, but you can adjust based on your needs.
How many scraps do I need for one block?
The number of scraps required will depend on the size of your block and the size of the triangles. A small block may only need a few fabric pieces, while a larger block will require more.
Can I use fabric strips instead of triangles?
Yes, some quilters prefer to use fabric strips and sew them together before cutting out triangles for the Scrap Bin Geese block. This method can create a more uniform look.
Do I need a special ruler to make Flying Geese blocks?
While a specialized Flying Geese ruler can make the process easier, it’s not necessary. You can use a standard quilting ruler to cut your triangles and square up your blocks.
What kind of fabric works best for Scrap Bin Geese blocks?
Cotton fabric is the most common choice for quilting. It holds its shape well and is easy to work with. However, you can experiment with different fabric types if you’re feeling adventurous.
How do I assemble multiple blocks into a quilt?
After creating your blocks, lay them out in rows and sew them together using a 1/4-inch seam allowance. Make sure to press your seams as you go for a smooth finish.
Join our VIP broadcast list and gain access to exclusive patterns, all for free. As a VIP member, you’ll receive the best patterns daily, delivered directly to your device. ✨📱 It’s a unique opportunity to stay up-to-date with the latest trends and designs, curated just for you. Don’t miss out on enhancing your projects and discovering new inspirations with the best patterns every day! 🎨🔝
Conclusion
In this A Bright Corner: Scrap Bin Geese block tutorial, we’ve explored the process of turning fabric scraps into beautiful quilt blocks. Whether you’re looking to reduce waste or simply add a creative touch to your next project, this block is a fantastic option. With its vibrant patterns and endless possibilities, the Scrap Bin Geese block is a must-try for any quilter.
We hope you found this tutorial helpful! Have you tried making a Scrap Bin Geese block before? Share your experience and any tips you might have in the comments below. We’d love to hear your thoughts and suggestions for future tutorials!

