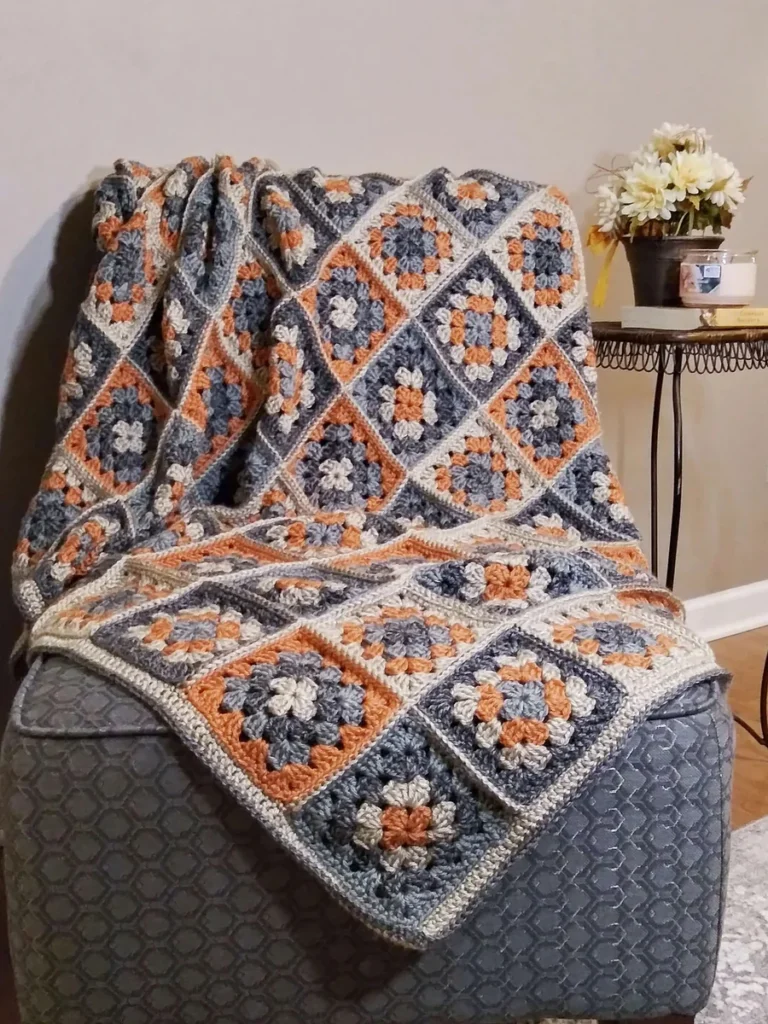
If you’re looking for a fun and versatile crochet project, the Bobby Granny Square Blanket is a fantastic choice. This classic pattern combines traditional granny squares with a modern twist, making it perfect for both beginners and experienced crocheters.
The Bobby Granny Square Blanket – Free Pattern offers a wonderful opportunity to create a cozy and stylish blanket that can be customized to suit any decor.
In this guide, we’ll walk you through everything you need to know to create your own Bobby Granny Square Blanket. From understanding the pattern to choosing the right yarn, we’ve got you covered.
This free pattern includes detailed instructions and helpful tips to ensure that your project turns out beautifully.
Whether you’re crocheting for yourself or as a thoughtful gift, the Bobby Granny Square Blanket will add a touch of charm and warmth to any space. Let’s dive into the details and start creating your new favorite blanket!
1. Materials and Tools Needed
To get started on your Bobby Granny Square Blanket, you’ll need a few essential materials and tools. These include yarn, a crochet hook, and other supplies that will help you complete your project with ease.
For the yarn, choose a high-quality, medium-weight yarn. Acrylic or cotton yarns work well for this project, as they are durable and easy to care for. You’ll need several skeins of yarn in various colors to create the granny squares.
A crochet hook that matches your yarn weight is crucial for achieving the correct gauge and stitch size. Most patterns suggest a hook size of 5mm or 6mm, but you should check the recommended hook size on your yarn label.
Other tools that will be useful include a yarn needle for weaving in ends and a pair of scissors. Additionally, having a ruler or measuring tape on hand will help you ensure that your squares are the right size.
Before you start crocheting, make sure you have all these materials and tools ready. This preparation will help you work efficiently and avoid interruptions during your project.
2. Understanding the Granny Square Pattern
The granny square is a timeless crochet motif that forms the basis of the Bobby Granny Square Blanket. Understanding how to create granny squares is essential for completing this project.
Each granny square consists of a series of rounds that build upon each other. You’ll start with a small circle in the center, then work your way outwards by adding additional rounds of stitches. The most common stitches used are double crochet, chain stitches, and slip stitches.
The beauty of the granny square lies in its versatility. You can experiment with different color combinations and patterns to create a unique look. Some variations include using contrasting colors for the rounds or adding special stitches to enhance the design.
To create your granny squares, follow the pattern instructions carefully. Each round should be worked evenly to ensure that your squares have a consistent shape and size. This will make it easier to join the squares together later on.
By mastering the granny square pattern, you’ll be well on your way to completing your Bobby Granny Square Blanket. Practice making a few squares before starting on your blanket to ensure you’re comfortable with the technique.
3. Assembling Your Blanket
Once you have completed a sufficient number of granny squares, it’s time to assemble them into a blanket. This process involves joining the squares together and adding any additional finishing touches.
To join the squares, use a yarn needle and a whip stitch or slip stitch technique. Align the squares in your desired arrangement and sew them together carefully. It’s helpful to lay out the squares on a flat surface before joining to visualize the final design.
After joining the squares, you may want to add a border to give your blanket a finished look. A simple single crochet border or a more elaborate shell stitch border can enhance the overall appearance of your blanket.
Make sure to weave in any loose ends with a yarn needle to prevent them from unraveling. This step is crucial for ensuring that your blanket is neat and durable.
Assembling your Bobby Granny Square Blanket is an exciting stage in the project. Take your time to ensure that the squares are joined neatly and that the final product is cohesive and well-crafted.
4. Tips and Tricks for Success
To ensure that your Bobby Granny Square Blanket turns out beautifully, here are some tips and tricks to keep in mind:
- Gauge: Always check your gauge before starting your project. This will help you achieve the correct size and fit for your blanket.
- Color Choices: Experiment with different color combinations to create a unique and personalized blanket. Choose colors that complement each other and enhance the overall design.
- Consistency: Work each granny square with consistent tension and stitch size. This will ensure that your squares are uniform and that the finished blanket looks polished.
- Blocking: After completing your squares, consider blocking them to shape and even out any imperfections. This step can make a big difference in the final appearance of your blanket.
- Joining Techniques: Practice different joining techniques to find the one that works best for you. Each method can create a slightly different look and feel for your blanket.
- Care Instructions: Follow the care instructions for your yarn to ensure that your blanket remains in good condition. Wash and dry it according to the yarn label’s recommendations.
By following these tips, you’ll be able to create a beautiful and durable Bobby Granny Square Blanket that you can be proud of.
FAQ
1. What is the best yarn to use for the Bobby Granny Square Blanket?
For the Bobby Granny Square Blanket, medium-weight yarns like acrylic or cotton are ideal. These yarns are durable and easy to work with. Choose yarn in various colors to create a vibrant and unique blanket.
2. How do I adjust the size of my granny squares?
To adjust the size of your granny squares, modify the number of rounds or the stitch count in each round. Ensure that all squares are the same size for a uniform blanket.
3. Can I use a different stitch pattern for the granny squares?
Yes, you can experiment with different stitch patterns for your granny squares. Just make sure to adjust the pattern accordingly to maintain the overall size and shape of the squares.
4. How do I join the granny squares together?
You can join granny squares using various techniques, including whip stitch, slip stitch, or a join-as-you-go method. Choose the technique that you find easiest and that gives you the desired finish.
5. Should I block my granny squares?
Blocking your granny squares can help to shape them and even out any imperfections. It’s a good idea to block the squares before joining them to ensure a neat and consistent final blanket.
6. How do I care for my finished blanket?
Follow the care instructions on your yarn label for washing and drying your blanket. Most yarns can be machine washed on a gentle cycle and tumble dried on low heat.
Join our VIP broadcast list and gain access to exclusive patterns, all for free. As a VIP member, you’ll receive the best patterns daily, delivered directly to your device. ✨📱 It’s a unique opportunity to stay up-to-date with the latest trends and designs, curated just for you. Don’t miss out on enhancing your projects and discovering new inspirations with the best patterns every day! 🎨🔝
Conclusion
In this guide, we explored how to create a stunning Bobby Granny Square Blanket from start to finish. We covered the materials and tools needed, the basics of the granny square pattern, assembling your blanket, and provided helpful tips for success.
Creating this blanket is a rewarding project that allows for creativity and personalization. We hope you find this Bobby Granny Square Blanket – Free Pattern both enjoyable and inspiring.
We’d love to hear your thoughts and suggestions! Please leave a comment with your feedback or any questions you might have. Happy crocheting!

