If you’re passionate about quilting, you’re likely always on the lookout for fresh and inspiring patterns. At the Cross Quilt Pattern – Free Pattern is a fantastic design that has captured the attention of both novice and experienced quilters.
This beautiful pattern is not only aesthetically pleasing but also relatively easy to create, making it a great choice for anyone looking to try their hand at something new.
With its unique blend of intersecting lines and striking geometric shapes, the At the Cross Quilt Pattern – Free Pattern offers endless possibilities for color combinations and fabric choices. Whether you prefer soft pastels or bold, vibrant hues, this pattern can be customized to reflect your personal style. Best of all, it’s available as a free pattern, meaning you can get started right away without any added costs.
In this post, we’ll dive deep into the At the Cross Quilt Pattern – Free Pattern, exploring the materials you’ll need, steps to follow, tips for success, and more. Whether you’re a seasoned quilter or just starting, this guide will give you the confidence to bring this beautiful design to life.
1. What is the At the Cross Quilt Pattern?
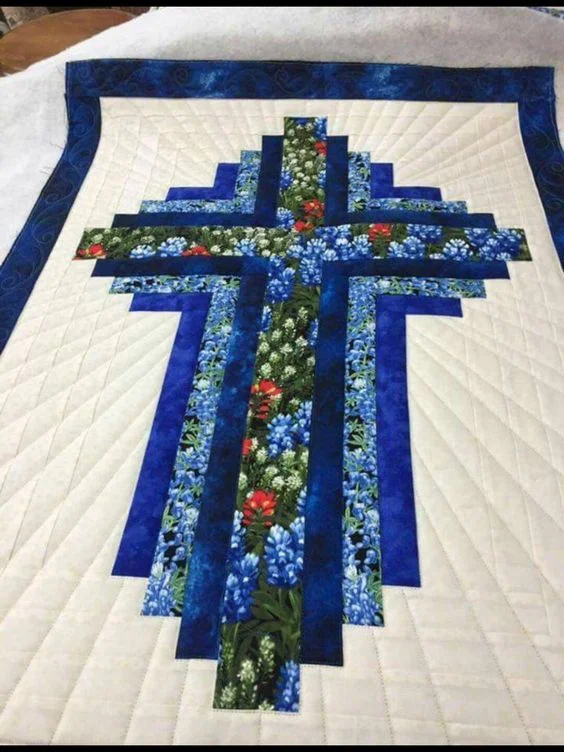
The At the Cross Quilt Pattern is a timeless design characterized by its use of intersecting lines to form crosses throughout the quilt. It’s often considered a modern take on traditional quilt patterns, combining simplicity with elegance. The pattern works well for both large and small quilts, depending on how you scale the design.
One of the best features of the At the Cross Quilt Pattern – Free Pattern is its versatility. You can easily adapt the design to match your aesthetic preferences, using various fabrics and colors to create something truly unique. The crosses can be subtle or bold, depending on the contrast between your chosen materials.
Quilters appreciate this pattern not only for its beauty but also for its ease of assembly. The basic structure consists of straight lines, making it approachable even for beginners. However, experienced quilters can also find creative ways to add complexity, such as incorporating different stitching techniques or fabric textures.
The free pattern aspect is another major appeal. Many quilt patterns come with a price tag, but the availability of this design as a free resource makes it accessible to all. This encourages more people to try their hand at quilting, contributing to the growth of the quilting community.
Whether you’re making a quilt as a gift or for personal use, the At the Cross Quilt Pattern – Free Pattern is a project that can be completed in a relatively short time while still producing a stunning result. It’s an ideal option for anyone looking to complete a quilt quickly without sacrificing quality.
2. Materials Needed for the At the Cross Quilt Pattern
Before you start working on the At the Cross Quilt Pattern – Free Pattern, you’ll need to gather the right materials. Here’s a list of the essentials to ensure your project goes smoothly:
- Fabric: Choose fabrics that work well together. You’ll need at least two contrasting fabrics – one for the crosses and one for the background. Make sure to pre-wash your fabric to avoid shrinking.
- Rotary Cutter: This tool is essential for cutting straight, precise lines. If you don’t have one, a sharp pair of scissors will work, but it may be more time-consuming.
- Cutting Mat: A self-healing cutting mat will protect your workspace and help you achieve clean cuts.
- Sewing Machine: While hand sewing is an option, a sewing machine will speed up the process significantly.
- Thread: Choose a thread color that complements your fabric choices. A neutral color works well for most projects.
- Quilting Ruler: This tool helps ensure your fabric pieces are perfectly measured and aligned.
Each material plays an essential role in bringing the At the Cross Quilt Pattern to life. Choosing high-quality materials is especially important, as they ensure your quilt will last for years to come.
Having the right tools also makes the process more enjoyable. A rotary cutter and cutting mat, for example, can save you a lot of time and frustration. While it might seem tempting to cut corners by using less specialized equipment, investing in proper tools will make a big difference in the overall quality of your quilt.
Don’t forget to iron your fabric before you start cutting. Wrinkled fabric can lead to inaccurate measurements, which could throw off the entire pattern. Taking the time to press your fabric ensures your pieces will fit together neatly and creates a more polished final product.
3. Step-by-Step Guide to Sewing the At the Cross Quilt Pattern
Now that you have your materials ready, it’s time to dive into the actual sewing process for the At the Cross Quilt Pattern – Free Pattern. Follow these steps for a smooth experience:
- Cutting the Fabric: Begin by cutting your fabric into strips. The width of the strips will determine the size of the crosses. Measure carefully, and use your rotary cutter and quilting ruler for precision.
- Assembling the Blocks: The quilt is made up of individual blocks that feature the cross design. Lay out your fabric strips and start sewing them together, alternating between cross and background fabrics.
- Pressing Seams: After sewing each block, press the seams flat with an iron. This will make it easier to assemble the quilt top later on. Pressing as you go ensures a smooth and professional-looking result.
- Sewing the Quilt Top: Once all your blocks are assembled, it’s time to sew them together to create the quilt top. Arrange the blocks in a grid pattern, ensuring the crosses align correctly.
- Adding the Batting: After the quilt top is complete, lay it over a piece of batting. The batting adds warmth and weight to your quilt, making it more comfortable to use.
- Quilting the Layers Together: Finally, sew the quilt top, batting, and backing fabric together. You can either use a quilting machine or hand stitch this part. The choice of stitching pattern is up to you – you can follow the lines of the crosses or choose a more intricate design.
Each step in this process builds on the last, so it’s important to take your time and avoid rushing. By following these instructions carefully, you’ll end up with a quilt that looks professional and polished, even if you’re relatively new to quilting.
4. Tips for Success with the At the Cross Quilt Pattern
Even though the At the Cross Quilt Pattern – Free Pattern is beginner-friendly, there are several tips and tricks you can use to ensure your project is a success:
- Start Small: If this is your first time using the pattern, try making a smaller quilt or even a wall hanging before tackling a full-sized quilt. This will help you get a feel for the process without being overwhelmed.
- Use High-Quality Fabric: The quality of your fabric will make a huge difference in the final product. Opt for quilting cottons or fabrics specifically designed for quilting projects.
- Double-Check Measurements: Accurate cutting and measuring are essential for this pattern. Before making any cuts, measure twice to avoid wasting fabric.
- Practice on Scrap Fabric: If you’re new to using a rotary cutter or sewing machine, practice on some scrap fabric first. This will give you more confidence when working on the actual quilt.
- Stay Organized: Lay out your pieces before sewing to ensure everything is in the right place. This will help you avoid mistakes and make the sewing process more efficient.
- Take Breaks: Quilting can be time-consuming, and taking breaks will help prevent mistakes. Step away from your project if you start to feel tired or frustrated.
These tips will help you avoid common pitfalls and ensure a more enjoyable quilting experience. With a bit of patience and practice, you’ll be able to create a stunning quilt using the At the Cross Quilt Pattern – Free Pattern.
FAQ about At the Cross Quilt Pattern – Free Pattern
Q: Is the At the Cross Quilt Pattern suitable for beginners?
A: Yes, the At the Cross Quilt Pattern – Free Pattern is very beginner-friendly. Its simple design and use of straight lines make it an excellent choice for those new to quilting.
Q: How much fabric do I need to complete the pattern?
A: The amount of fabric depends on the size of the quilt you want to make. For a standard lap quilt, you’ll need about 2 yards of fabric for the background and 1 yard for the crosses.
Q: Can I hand sew this quilt?
A: Absolutely! While using a sewing machine speeds up the process, this pattern can be hand-sewn if you prefer. Just be prepared for a longer completion time.
Q: What is the best fabric for the At the Cross Quilt Pattern?
A: Quilting cotton is the best choice for this pattern, as it’s durable and easy to work with. You can also experiment with other fabrics for a more unique look.
Q: How do I care for my finished quilt?
A: Once completed, you should wash your quilt in cold water on a gentle cycle and tumble dry on low. This will help preserve the fabric and stitching for years to come.
Q: Can I modify the size of the crosses in the pattern?
A: Yes, you can adjust the size of the crosses by changing the width of the fabric strips you cut. This allows for a high degree of customization based on your preferences.
Join our VIP broadcast list and gain access to exclusive patterns, all for free. As a VIP member, you’ll receive the best patterns daily, delivered directly to your device. ✨📱 It’s a unique opportunity to stay up-to-date with the latest trends and designs, curated just for you. Don’t miss out on enhancing your projects and discovering new inspirations with the best patterns every day! 🎨🔝
Conclusion
The At the Cross Quilt Pattern – Free Pattern is a stunning and versatile design that can be customized to suit any quilter’s style. Whether you’re a beginner or an experienced quilter, this pattern offers endless possibilities for creativity.
We hope this guide has given you the confidence to tackle your own At the Cross quilt. Don’t forget to share your thoughts and suggestions in the comments – we’d love to hear about your quilting journey!

