The Star in a Star Quilt Block is not just visually striking but also versatile. It can be used in a variety of quilt layouts, from traditional to modern designs. With its symmetrical and repetitive nature, it lends itself well to creating intricate patterns and stunning effects when combined with other blocks.
This guide will walk you through the steps needed to create this block and provide you with useful tips and tricks to ensure your success.
By following our free pattern and instructions, you will be able to create a quilt block that stands out with its starry design.
We’ll cover everything from choosing the right fabrics to cutting and sewing techniques, ensuring that you have all the information you need to make this block with ease. So, let’s dive into the world of quilting and explore how to make the Star in a Star Quilt Block!
1. Materials and Preparation
Before you start creating the Star in a Star Quilt Block, it’s essential to gather all the necessary materials and prepare them properly. This ensures a smoother quilting process and a better final result.
Firstly, you will need fabric in various colors and patterns. For a classic look, use contrasting fabrics to highlight the star patterns. Cotton fabrics are highly recommended for their ease of handling and durability. You’ll also need a ruler, rotary cutter, cutting mat, and sewing machine.
Make sure to pre-wash your fabrics to prevent any shrinkage after the quilt is completed. Iron your fabrics to remove any wrinkles, which can affect the accuracy of your cutting and sewing. It’s also helpful to organize your materials by laying them out before you start, ensuring you have everything within reach.
Next, familiarize yourself with the free pattern provided. This pattern will guide you through the cutting and sewing process. Take note of the dimensions and cutting instructions to ensure you cut your fabric pieces accurately.
Lastly, it’s a good idea to sew a practice block first. This will give you a feel for the pattern and help you refine your technique before working on the final block. By doing so, you’ll also be able to troubleshoot any issues that might arise.
2. Cutting the Fabric Pieces
The success of your Star in a Star Quilt Block largely depends on how accurately you cut your fabric pieces. Precise cutting ensures that all pieces fit together perfectly and that the star patterns align as intended.
Start by cutting your fabric into the required shapes and sizes as outlined in the free pattern. Typically, this includes squares and triangles in different sizes. Use a rotary cutter and ruler for straight, precise cuts. If you don’t have a rotary cutter, a sharp pair of fabric scissors will also work, though it may take more time.
For the best results, ensure that your cutting mat is clean and your ruler is aligned correctly. Double-check the measurements before making each cut. If you’re cutting multiple pieces, stack the fabric layers to save time, but be careful to cut through all layers evenly.
Label your cut pieces if needed, especially if you’re using multiple fabrics or colors. This will help you keep track of which pieces go where during the assembly process. Keep your fabric pieces organized to avoid confusion later on.
Finally, arrange your cut pieces according to the pattern layout. This will give you a clear picture of how the block will come together and help you spot any potential issues before you start sewing.
3. Assembling the Quilt Block
Assembling the Star in a Star Quilt Block involves piecing together the cut fabric pieces to create the star pattern. This step requires careful attention to detail and accuracy to ensure that the star designs align correctly.
Begin by sewing the fabric pieces together as instructed in the free pattern. Start with the smaller star and work your way outwards. Use a quarter-inch seam allowance, which is standard for quilting. Press your seams open or to one side as directed by the pattern.
When joining pieces, match the seams and points carefully. Pinning or using fabric clips can help keep pieces aligned while sewing. Take your time and sew slowly to ensure accuracy. It’s better to make precise adjustments than to rush and make mistakes.
After sewing the pieces together, press the block to set the seams. This step is crucial for achieving a flat, even block. Use an iron set to the appropriate temperature for your fabric, and be cautious not to stretch the fabric as you press.
Once the block is assembled, check for any misaligned seams or uneven edges. If necessary, trim the block to ensure it meets the dimensions specified in the pattern. A well-finished block will have sharp points and straight edges.
4. Incorporating the Block into a Quilt
After completing your Star in a Star Quilt Block, you can start thinking about how to incorporate it into a quilt. This block can be used in various quilt layouts, from simple grid patterns to more complex arrangements.
Consider the overall design of your quilt and how the Star in a Star Quilt Block will fit into it. You might want to use this block as a central feature or as part of a larger pattern. Arrange your blocks on a design wall or floor to visualize the layout before sewing them together.
When joining multiple blocks, pay attention to matching seams and points to ensure a cohesive look. Use sashing or borders if desired to separate the blocks or enhance the design. Choose fabrics that complement the star block and enhance its visual impact.
If you’re adding borders or additional elements, follow the pattern instructions for cutting and sewing. Make sure to press and trim as needed to keep the quilt top even and flat.
Finally, layer your quilt top with batting and backing fabric, and quilt it as desired. Whether you choose hand quilting or machine quilting, the Star in a Star Quilt Block will shine beautifully in your finished quilt.
FAQ
Q: What is a Star in a Star Quilt Block?
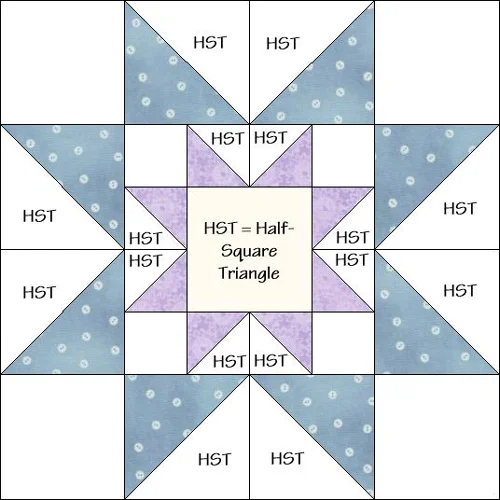
A: A Star in a Star Quilt Block is a quilt design featuring a star pattern inside another star. It creates a layered, dimensional effect that adds visual interest to quilts.
Q: How do I find a free pattern for the Star in a Star Quilt Block?
A: Many quilting websites and blogs offer free patterns for various quilt blocks, including the Star in a Star design. Look for patterns from reputable sources or quilting communities.
Q: What fabrics work best for the Star in a Star Quilt Block?
A: Cotton fabrics are ideal for the Star in a Star Quilt Block due to their durability and ease of handling. Choose contrasting colors and patterns to highlight the star designs.
Q: What tools do I need to make a Star in a Star Quilt Block?
A: Essential tools include a rotary cutter, ruler, cutting mat, sewing machine, and iron. These tools help ensure precise cutting and accurate sewing.
Q: Can I use the Star in a Star block in any quilt layout?
A: Yes, the Star in a Star Quilt Block is versatile and can be used in various quilt layouts, from traditional to modern designs. Experiment with different arrangements to achieve your desired look.
Q: How do I ensure my Star in a Star Quilt Block turns out correctly?
A: Follow the free pattern closely, cut your fabric pieces accurately, and sew with precision. Practice on a sample block if needed, and make adjustments as necessary for a perfect final block.
Join our VIP broadcast list and gain access to exclusive patterns, all for free. As a VIP member, you’ll receive the best patterns daily, delivered directly to your device. ✨📱 It’s a unique opportunity to stay up-to-date with the latest trends and designs, curated just for you. Don’t miss out on enhancing your projects and discovering new inspirations with the best patterns every day! 🎨🔝
Conclusion
In this article, we explored the intricacies of creating a Star in a Star Quilt Block using a free pattern. We covered the essential materials and preparation steps, provided detailed instructions for cutting and assembling the block, and discussed how to incorporate it into a quilt. By following these guidelines, you can create a stunning quilt block that will add elegance and charm to any quilt.
We hope you found this guide helpful and inspiring. If you have any feedback or suggestions, please share them in the comments below. Your input helps us provide even better content for quilting enthusiasts like you. Happy quilting!

