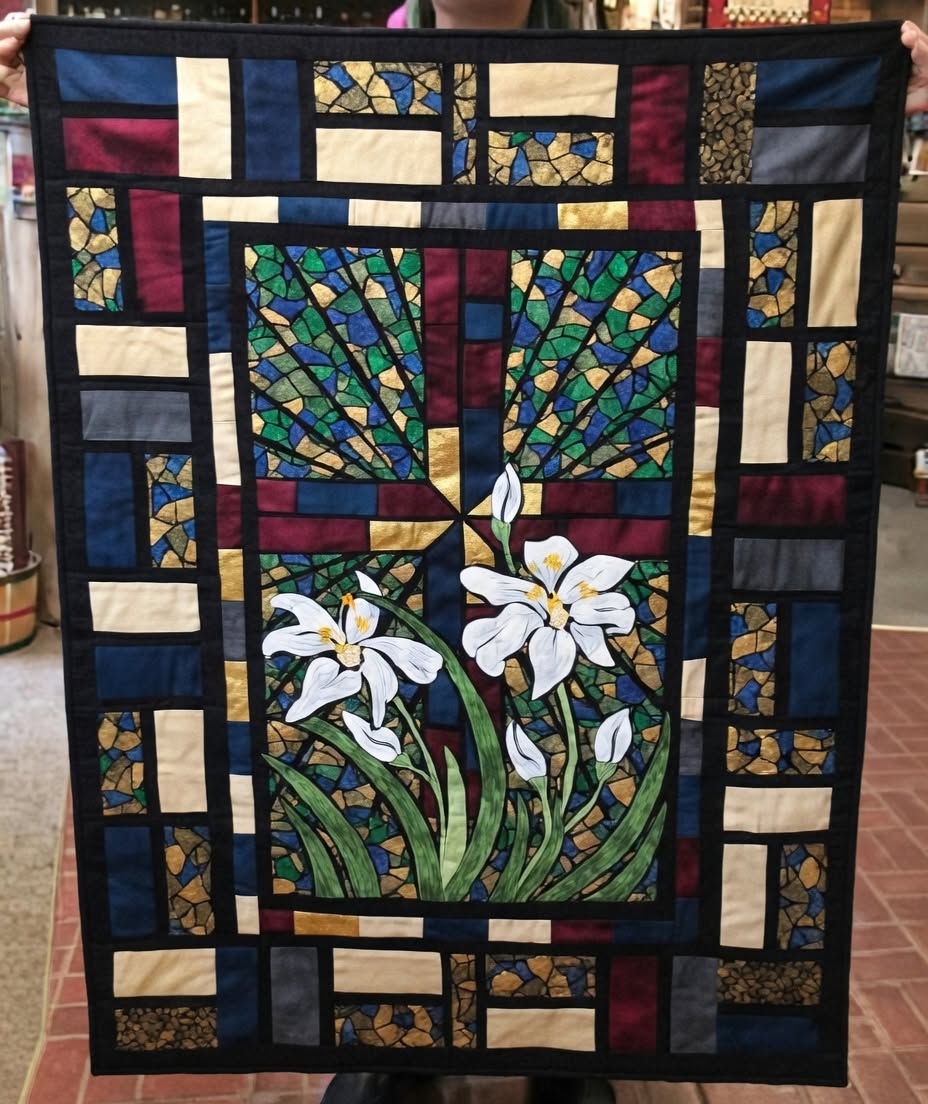
A Stained Glass Lily Quilt Pattern is a beautiful way to combine traditional quilting techniques with the elegance of floral designs. Inspired by the appearance of stained glass windows, this style uses contrasting fabric pieces and dark outlines to create a striking visual effect.
One of the most appealing features of a stained glass lily quilt is the opportunity to experiment with color, shape, and fabric texture. Whether you prefer bold colors or softer shades, this quilting project allows you to express your creativity while developing useful sewing skills.
Creating a Stained Glass Lily Quilt Pattern can also be a rewarding experience for quilters who enjoy working with detailed designs. Careful fabric placement, accurate cutting, and consistent stitching all contribute to the final appearance.
Materials and Fabric Selection for a Stained Glass Lily Quilt Pattern
Choosing the right fabric is an important first step when making a Stained Glass Lily Quilt Pattern. Quilting cotton is a popular option because it is easy to cut, sew, and press. Selecting fabrics with compatible weights helps the different sections fit together neatly and creates a more consistent finished surface.
Color contrast is essential for achieving the stained glass effect. Choose fabrics for the lily petals that stand out against the background, and consider green shades for the leaves and stems. Dark fabric strips or outlines can help define the individual shapes and create the appearance of leading between pieces of colored glass.
You will also need basic quilting supplies, including a rotary cutter, cutting mat, ruler, sewing machine, thread, pins or clips, and an iron. Depending on the pattern, fusible web or other appliqué materials may be useful. Preparing your supplies in advance can make the process more organized and reduce interruptions while working.
Construction Techniques and Floral Design Details
The construction of a stained glass lily quilt pattern often involves arranging fabric shapes to create a recognizable floral image. Some designs use appliqué techniques, while others incorporate pieced sections and contrasting strips. Review the instructions carefully to understand how the petals, leaves, and background are assembled.
Accurate cutting is especially important when working with curved petals and narrow outlines. Prepare a template if your pattern includes unusual shapes, and label each fabric section before sewing. Taking time to organize the pieces helps maintain the intended design and reduces the chance of placing a shape incorrectly.
The stained glass effect depends on clearly defined boundaries between the colored sections. Dark outlines can be added according to the chosen pattern, creating contrast and emphasizing the lily’s shape. Pressing seams carefully and maintaining consistent stitching can improve the overall appearance and help the quilt lie flat.
Creative Variations and Customization Ideas
A Stained Glass Lily Quilt Pattern offers many opportunities for personalization. You can choose a single large lily as the main focal point or arrange several flowers across the quilt top. A symmetrical layout creates a traditional appearance, while an asymmetrical composition can produce a more contemporary design.
Color combinations can dramatically change the mood of your stained glass floral quilt. Rich reds, purples, and golds create a bold effect, while pale pinks, creams, and soft greens offer a gentler look. Choosing a consistent palette helps the finished quilt feel balanced and allows the lily motif to stand out.
You can also adjust the quilt’s dimensions to suit your intended use. A small wall hanging may be ideal for displaying the floral design, while a larger quilt can become a decorative bed covering or sofa accent. Consider the placement of the finished piece before cutting fabric, and make sure any resizing follows the pattern’s proportions.
Finishing, Quilting, and Caring for Your Floral Quilt
Finishing a Stained Glass Lily Quilt Pattern involves assembling the quilt top, batting, and backing before quilting the layers together. Carefully smooth each layer to reduce wrinkles and shifting. Basting the quilt securely before stitching can help maintain alignment throughout the quilting process.
Quilting stitches can enhance the floral design by adding texture and definition. You may choose simple straight lines, gentle curves, or stitching that follows the shape of the petals and leaves. Consider how the quilting will interact with the dark outlines and colorful fabric sections before deciding on the final design.
Proper care helps preserve the colors and structure of your stained glass lily quilt. Follow the care instructions for the fabrics and batting, wash gently when appropriate, and avoid excessive heat. Store the quilt in a clean, dry place when it is not being displayed, and inspect the seams periodically for signs of wear.
FAQ About Stained Glass Lily Quilt Pattern
What is a Stained Glass Lily Quilt Pattern?
A Stained Glass Lily Quilt Pattern is a quilting design inspired by stained glass artwork, using contrasting fabric sections and defined outlines to create a floral image featuring lilies.
Is this quilt pattern suitable for beginners?
It depends on the construction method. Simple appliqué versions may be approachable for confident beginners, while intricate curves and narrow outlines may require more quilting experience.
Which fabrics work best for a stained glass quilt?
Quilting cotton is a common choice because it is easy to handle and available in many colors. Using fabrics of similar weight helps create a consistent quilt top.
How can I create the stained glass effect?
The effect is generally created through strong color contrast and clearly defined boundaries between fabric sections. Follow the pattern’s instructions for adding outlines or dark connecting strips.
Can I change the colors of the lily design?
Yes. You can choose different shades for the petals, leaves, and background to match your decorating preferences. Maintaining sufficient contrast helps the floral image remain recognizable.
How do I keep the quilt from becoming uneven?
Measure carefully, cut accurately, press seams as instructed, and secure the layers before quilting. Checking the quilt top regularly helps identify alignment problems early.
Additional Tips for a Successful Lily Quilt Project
Planning your Stained Glass Lily Quilt Pattern before cutting the fabric can save time and reduce waste. Review the instructions, prepare templates, and arrange your selected fabrics to see how the colors work together. Taking a photograph of the layout can help you remember the placement of each piece during assembly.
If the design contains complex curves or narrow outlines, practice on fabric scraps before working on the main quilt. This allows you to become familiar with the construction method and adjust your sewing technique as needed. Testing the process first can make the project feel more manageable.
Keeping your workspace organized is also helpful. Label fabric sections, store small pieces together, and check your measurements regularly. These simple habits can reduce confusion and make detailed quilting projects more enjoyable.
Common Mistakes to Avoid When Making a Stained Glass Lily Quilt
One common mistake is choosing colors that do not provide enough contrast. If the petals, leaves, background, and outlines blend together, the stained glass effect may become less visible. Lay the fabrics next to one another before cutting to evaluate how clearly the different sections stand out.
Another issue is inaccurate cutting or inconsistent seam allowances. Small differences can affect the alignment of the lily petals and make the quilt top appear uneven. Use appropriate cutting tools and follow the pattern measurements carefully throughout the project.
Finally, avoid rushing the finishing process. Poorly aligned layers, loose threads, or uneven quilting can affect the final appearance. Take time to check the quilt top, secure the layers, and finish the edges neatly for a more polished result.
Conclusion
A Stained Glass Lily Quilt Pattern combines floral beauty, creative color placement, and traditional quilting techniques to produce a distinctive handmade textile. By choosing suitable fabrics, preparing the shapes carefully, and paying attention to contrast and construction, you can create a quilt that highlights the elegance of the lily motif.
Whether you prefer a small decorative wall hanging or a larger floral quilt, this project offers many opportunities for personalization. With thoughtful planning, careful stitching, and appropriate maintenance, your finished quilt can become a treasured addition to your home or a meaningful handmade gift.
Have you ever created a floral quilt, or are you planning to try a stained glass design for the first time? Share your honest opinion, favorite fabric combinations, and suggestions in the comments. Your ideas may inspire other quilting enthusiasts to explore new possibilities in handmade textile art.