Crochet Hexagon Bag Tutorial is an excellent starting point for anyone who wants to create a stylish, practical, and handmade accessory. A crochet hexagon bag combines traditional crochet techniques with a modern geometric design, making it suitable for beginners and experienced crocheters alike.
One of the most appealing features of a handmade crochet bag is the freedom to customize its appearance. You can choose neutral shades for a minimalist style, bright colors for a playful design, or multiple yarn colors for a more decorative finish.
In this Crochet Hexagon Bag Tutorial, you will learn how to select suitable yarn, choose the right crochet hook, create two hexagonal panels, assemble the bag, and attach comfortable handles.
Materials and Basic Stitches for a Crochet Hexagon Bag
Before beginning your crochet hexagon bag pattern, prepare all the necessary materials. Having everything within reach makes the project more enjoyable and helps you maintain a consistent rhythm while crocheting. Fortunately, this design does not require an extensive collection of tools, making it an accessible option for beginners who want to develop their skills while creating something useful.
The first essential material is yarn for a crochet bag. Cotton yarn is a popular choice because it generally offers clear stitch definition and creates a relatively firm fabric. Cotton blends can provide a different balance of softness and durability, while acrylic yarn may be suitable for lightweight decorative bags. Consider how you intend to use your finished bag before choosing a material. A small accessory bag may require less structure than a larger bag intended for everyday errands.
Choosing the right yarn weight also affects the final appearance. Medium-weight yarn is a practical option for many beginners because it is comfortable to handle and allows individual stitches to remain visible. Smooth yarn is especially helpful when working around the corners of a hexagon, where stitch placement is important. If you want to create a colorful design, choose two or three complementary shades before starting so that the color changes look intentional and balanced.
How to Crochet the Hexagon Panels Step by Step
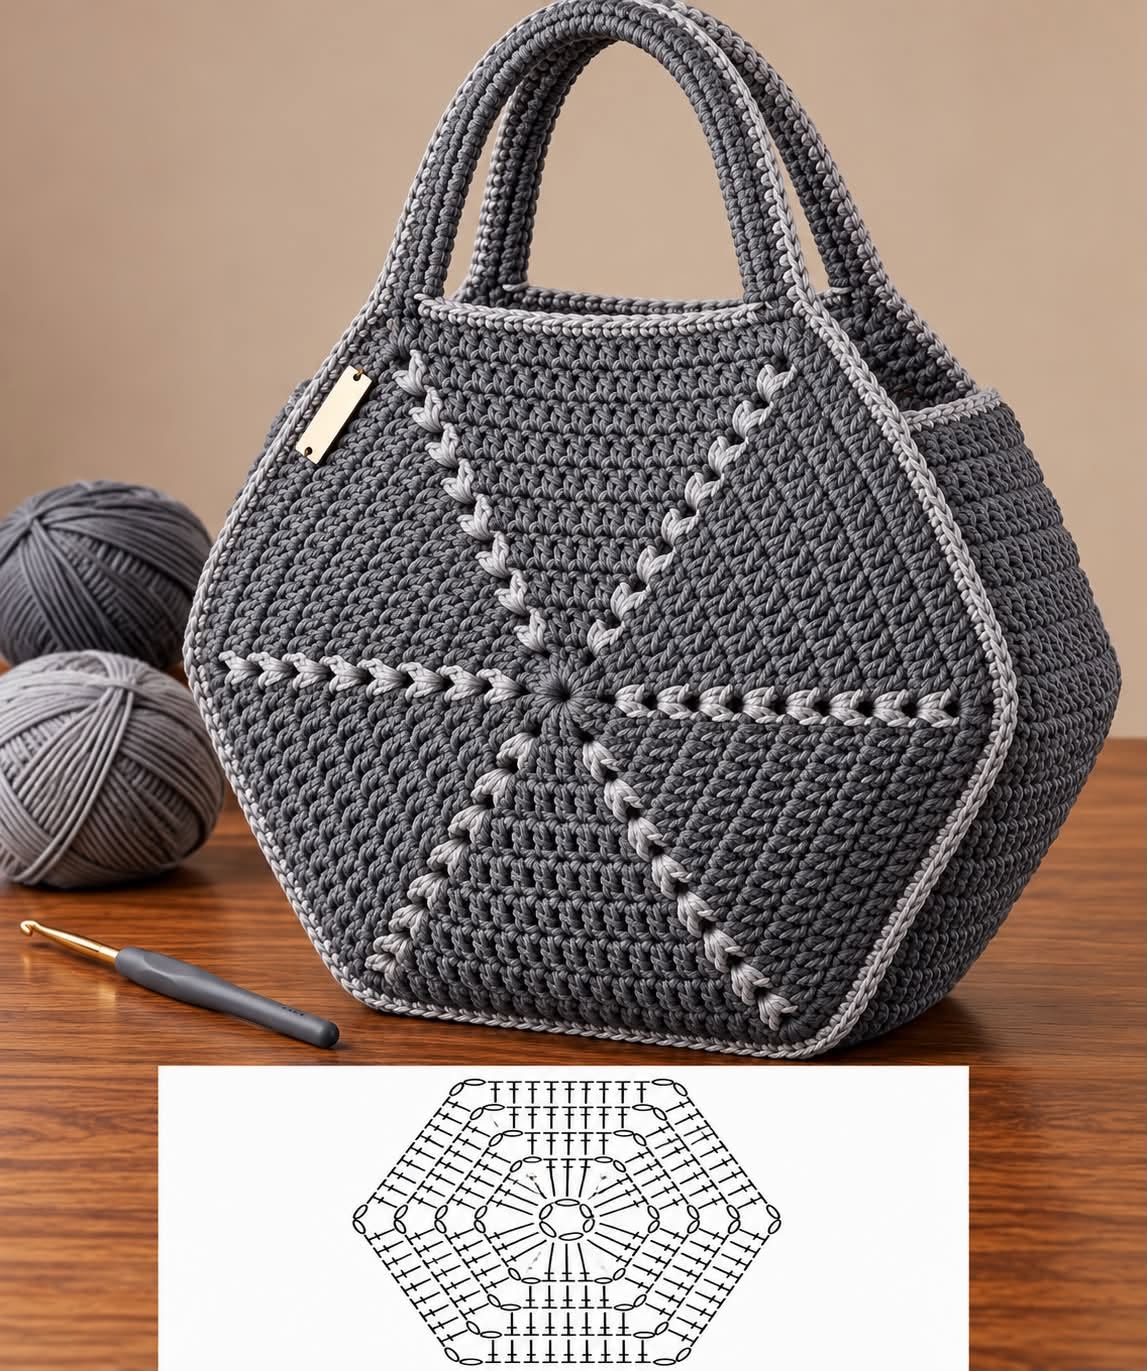
The central part of this Crochet Hexagon Bag Tutorial is creating two matching hexagonal panels. These pieces form the front and back of the bag, so their dimensions determine the approximate size of the finished accessory. You can make smaller panels for a compact purse or larger panels for a roomier shoulder bag. The important thing is to use the same stitch pattern and measurements for both pieces.
Begin by creating a starting ring using a magic ring or a short chain joined with a slip stitch. A magic ring allows you to tighten the center after completing the first round, creating a neat beginning. If you prefer a simpler method, a chain ring can also work. Whichever method you choose, use the same technique for both panels so that their centers look similar.
For the first round, work the stitches specified by your chosen pattern into the ring. Arrange the stitches into six groups or sections that establish the hexagon’s corners. Many crochet hexagon patterns use double crochet clusters separated by chain spaces, but other stitch combinations can produce a similar shape. Count the groups carefully because the placement of the six corners determines whether the piece develops into a hexagon rather than a circle.
Assembling the Bag and Adding Handles
Once both panels are complete, the next stage is assembling your handmade crochet hexagon bag. This step transforms two individual pieces into a practical accessory. Careful joining creates a neat outline, while the handles and finishing details influence the bag’s comfort, durability, and overall appearance.
Start by placing the two hexagons together with the sides you want to display facing outward. Align the edges and decide which sections will form the sides and bottom of the bag. Leave an opening at the top so that you can access the interior. Temporarily securing the edges with stitch markers or clips can prevent the panels from shifting while you work.
You can join the panels using slip stitches, single crochet, or a yarn needle. A slip-stitch seam creates a defined edge, while single crochet can produce a slightly thicker border. Sewing with a yarn needle offers greater control over the appearance of the seam. Whichever method you choose, maintain even tension and check the alignment periodically to prevent the edges from becoming uneven.
Customization, Care Tips, and Common Crochet Bag Problems
One of the best features of a crochet hexagon bag pattern is how easily it can be customized. Once you understand the basic construction, you can experiment with different colors, stitch textures, and finishing techniques. Small changes can transform the same design into a casual summer bag, a minimalist accessory, or a colorful handmade gift.
Color selection is an easy way to personalize your project. Neutral shades such as cream, beige, gray, and brown create a timeless appearance, while brighter colors can make the hexagonal panels stand out. You can alternate colors between rounds, create a contrasting border, or use leftover yarn to produce a multicolored design. Planning the color combinations before you begin helps the finished bag look coordinated.
Another customization option is adding a fabric lining. A lining can make the interior more practical, particularly when the crochet stitches leave small openings. Choose a fabric that complements the yarn and cut it to fit the inside of the assembled bag. Sew it securely in place without pulling the crochet fabric out of shape. If you prefer a simpler project, you can leave the bag unlined and use it for items that do not require a fully enclosed interior.
Frequently Asked Questions About Crochet Hexagon Bags
1. Is a crochet hexagon bag suitable for beginners?
Yes. A crochet hexagon bag can be a good beginner project if you know basic stitches such as chains, slip stitches, single crochet, and double crochet. The construction also provides useful practice with increases and stitch counting. Beginners may find it easier to start with a simple pattern and medium-weight yarn before trying decorative stitches or complex color changes.
2. How much yarn do I need for a crochet hexagon bag?
The amount depends on the size of the panels, yarn weight, stitch pattern, handles, and additional details. A small bag generally requires less yarn than a large tote. Check the estimated yarn requirements of your chosen pattern and consider keeping some extra yarn for finishing or repairs. A small sample can help you estimate your project’s material needs.
3. What is the best yarn for a crochet hexagon bag?
Cotton yarn is a popular choice because it offers clear stitch definition and can create a relatively firm fabric. Cotton blends and some acrylic yarns can also work well. Choose a material that suits your preferred appearance, care requirements, and intended use. For a bag that will carry everyday items, consider how the fabric behaves under weight.
4. How do I make my crochet hexagon bag larger or smaller?
Adjust the number of rounds worked on each hexagon. More rounds generally create larger panels, while fewer rounds produce a smaller bag. Keep both panels consistent and remember that changing the yarn weight or hook size will also affect the finished dimensions. Measure the panels before assembly to ensure that they match.
5. Why is my crochet hexagon curling or becoming wavy?
Curling may indicate tight tension or insufficient increases, while wavy edges can result from adding too many stitches. Check the stitch count at each corner and review the pattern instructions. If necessary, experiment with a different hook size and make a small test panel before continuing with the full project.
6. How can I prevent crochet bag handles from stretching?
Use a firm stitch pattern, choose appropriate yarn, and reinforce the points where the handles attach to the bag. A suitable lining or additional support may help distribute the load. Test the bag with light items before carrying heavier belongings, and remember that all crochet fabric can stretch to some extent.
7. Do I need to add a lining to my crochet hexagon bag?
No. A lining is optional. However, it can help prevent small objects from slipping through the stitches, improve the bag’s structure, and create a more finished interior. If your crochet fabric is tightly stitched and you intend to carry only a few larger items, you may prefer to leave it unlined.
8. Can I customize the shape and colors of my crochet hexagon bag?
Absolutely. You can change the yarn colors, add contrasting borders, experiment with different stitch textures, and choose from several handle styles. You can also adjust the number of rounds to change the size. For the best results, plan your colors and finishing details before assembly so that the entire design looks cohesive.
Conclusion
This Crochet Hexagon Bag Tutorial demonstrates how a simple geometric design can become a stylish and practical handmade accessory. By choosing suitable yarn and a crochet hook, creating two consistent hexagonal panels, and joining them carefully, you can make a bag that reflects your personal taste. Sturdy handles, thoughtful finishing details, and optional lining can improve both its appearance and everyday usability.
Now that you have completed this Crochet Hexagon Bag Tutorial, we would love to hear your honest opinion. Have you made a crochet bag before, or are you planning to create your first one? Share your favorite colors, materials, experiences, and suggestions in the comments. Your feedback may inspire other readers to explore crochet and create their own unique handmade accessories.