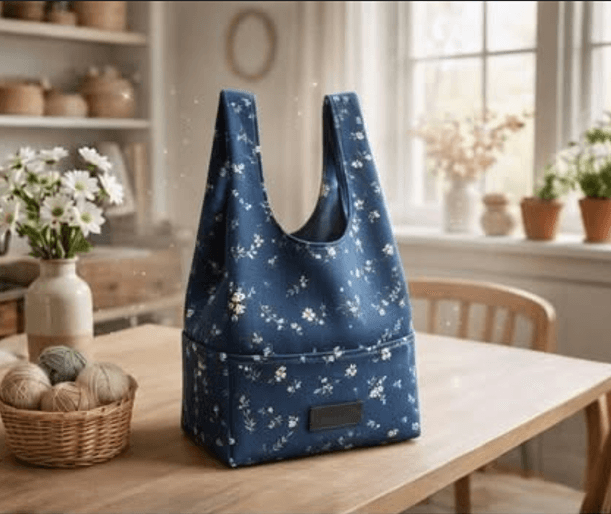
Fabric Tote Bag Pattern is a practical and attractive sewing project for anyone who enjoys creating useful handmade accessories. The bag shown in the reference image has a clean, structured shape, a comfortable pair of handles, a lined interior, and a front pocket that adds both function and visual interest.
What makes this Fabric Tote Bag Pattern especially interesting is the simplicity of its construction. The pattern uses a large main fabric piece with extended handle sections, allowing the handles and body to be cut as part of the same overall shape.
The measurements shown in the reference provide a useful starting point for recreating the project. The main body is approximately 30 cm wide and 30 cm high, while the handle sections extend outward by approximately 25 cm. The diagram also includes several 4 cm markings that help define the transitions around the handles and lower edges.
Materials and Fabric Preparation
To begin this Fabric Tote Bag Pattern, choose a woven fabric with enough body to support the shape of the bag. Cotton, canvas, quilting cotton with interfacing, or another stable woven material can work well depending on the desired result. A floral cotton similar to the reference gives the project a charming decorative appearance.
The pattern indicates cutting two pieces from the outer fabric and two pieces from the lining. The lining can be made from cotton, linen, or another lightweight woven fabric. Choosing a lining that contrasts slightly with the exterior can make the inside of the bag more visually appealing.
Before cutting, wash and dry your fabric according to its care instructions if appropriate. Pre-shrinking woven fabric can help reduce the chance of significant dimensional changes after the bag has been completed.
Press the fabric carefully before placing the pattern. A smooth surface makes it much easier to transfer the measurements accurately and helps prevent small distortions during cutting.
The diagram shows a main body measuring approximately 30 cm by 30 cm. The handle extensions measure approximately 25 cm along their longer sections. The repeated 4 cm measurements indicate smaller sections around the upper and lower transitions of the pattern.
Because seam allowances are not clearly identified in every portion of the reference diagram, treat the illustrated measurements as the finished pattern dimensions and add your preferred seam allowance consistently before cutting, unless you are following a separately specified sewing pattern.
Mark the center and important corners on the fabric using a removable fabric marker or another appropriate marking method. Accurate markings are particularly helpful around the handle curves and pocket placement.
If you want a more structured tote, lightweight interfacing can be added to the outer fabric. This can help the bag stand more upright and give the handles additional stability.
Cutting the Fabric Tote Bag Pattern
The next step in the Fabric Tote Bag Pattern is transferring the shape from the diagram onto your fabric. Place the outer fabric with the correct grain direction and carefully mark the main rectangular body.
According to the reference, the central body is approximately 30 cm wide and 30 cm tall. From this central section, the handle shapes extend toward the sides. Each handle section includes a long horizontal portion of approximately 25 cm.
The handle openings should be marked carefully. The reference shows rounded transitions connecting the handle areas to the central body, creating a comfortable U-shaped opening for the hand.
Cut two matching pieces from the outer fabric. If your fabric has a directional floral print, pay close attention to how the flowers will appear when the bag is assembled.
Next, transfer the same general shape to the lining fabric and cut two matching lining pieces. The lining should correspond closely to the outer pieces so that the finished bag can be assembled cleanly.
If you are adding interfacing, cut it according to the outer pieces and apply it following the manufacturer’s instructions. Keep the handle areas especially stable because they will carry the weight of the bag.
For the front pocket, prepare a separate rectangular piece of fabric according to your preferred size. The reference image shows a practical front pocket positioned near the bottom of the bag.
Press the pocket piece and fold its edges inward to create a clean finished edge. This simple preparation will make it easier to attach the pocket neatly to the exterior.
Before sewing, arrange all pieces on your work surface and compare them with the reference. Check that the two outer pieces are mirrored correctly and that the lining pieces correspond to the same shape.
Sewing and Assembling the Tote Bag
Once the Fabric Tote Bag Pattern has been cut, begin by preparing the pocket. Position it on the intended exterior panel and make sure it is centered and level.
Sew along the pocket’s sides and lower edge while leaving the upper edge open. Reinforce the upper corners with a few additional stitches because this is an area that may receive frequent use.
Next, place the two outer fabric pieces together with their right sides facing each other. Pin or clip around the sides and lower portion of the bag.
Sew the main seams using a consistent seam allowance. Take your time around the curved handle transitions because smooth stitching will help create a more professional finish.
Repeat the process with the lining pieces. Keep the lining’s right sides together and sew the corresponding seams while leaving the appropriate opening needed for turning the finished bag.
Press the seams carefully after sewing. Pressing at each stage can make a significant difference in the final appearance, especially when working with a structured tote.
Turn the outer bag right side out and keep the lining in its sewn position. The next stage is joining the lining and exterior around the upper handle and opening areas.
Place the outer bag and lining together according to their corresponding edges. Match the handle curves, side points, and upper sections carefully.
Sew around the upper opening, taking care not to twist the handles. This is an important stage because an incorrectly positioned handle can cause the bag to sit unevenly.
After sewing, turn the bag right side out through the opening left in the lining. Gently push out the corners and curves using a suitable blunt turning tool.
Press the entire bag carefully. Pay particular attention to the handle edges and the top opening so that the finished tote develops a clean, professional shape.
Finishing the Fabric Tote Bag
The final stage of the Fabric Tote Bag Pattern involves closing the lining and refining the details. Once the bag has been turned, check the seams from both the outside and inside.
Close the opening in the lining using a neat machine stitch or a suitable hand-sewing technique. Trim excess threads and make sure the seam is secure.
Topstitching can be added around the upper edges and handles. This creates a decorative line while also helping keep the layers in place.
The reference bag has a structured appearance, so pressing the handles carefully is particularly important. Make sure both handles are symmetrical and lie flat.
If desired, you can reinforce the handle attachment points with additional stitching. A small rectangular reinforcement or crossed stitching can increase durability while adding a subtle design detail.
The front pocket can be divided into sections if you want separate spaces for small items. A vertical line of stitching through the pocket can create two compartments without significantly changing the original design.
You can also customize the pocket with a decorative label, small fabric patch, embroidery, or contrasting trim. These details allow the same Fabric Tote Bag Pattern to become more personal.
For a stronger everyday bag, consider using a slightly heavier exterior fabric or adding interfacing. For a lightweight summer tote, cotton or linen can create a softer result.
Before using the finished bag, inspect all seams and handle connections. Make sure there are no loose threads or unfinished edges that could unravel during normal use.
Your completed Fabric Tote Bag Pattern can now be used as a reusable shopping bag, craft bag, library tote, project bag, or everyday carryall. Its simple construction also makes it easy to reproduce in several different fabrics.
FAQ About the Fabric Tote Bag Pattern
What is a Fabric Tote Bag Pattern?
A Fabric Tote Bag Pattern is a template used to cut and sew fabric into a reusable bag. The design shown here includes a main body, integrated handle sections, lining, and a front pocket.
What size is the bag in the reference?
The central body shown in the diagram is approximately 30 cm wide by 30 cm high. The extended handle portions include sections measuring approximately 25 cm, with several smaller 4 cm measurements defining the transitions.
How much fabric do I need?
The exact fabric requirement depends on the width of your fabric and how you arrange the pattern pieces. The reference indicates two outer pieces and two lining pieces, so calculate the yardage or meterage based on your chosen fabric width and seam allowances.
Can beginners sew this tote bag?
Yes. The project uses fundamental sewing techniques such as cutting, pinning, straight stitching, pressing, turning, and topstitching. The curved handle areas may require a little extra patience.
What fabric is best for a tote bag?
Stable woven fabrics are generally suitable. Cotton, canvas, linen blends, and quilting cotton can all be considered depending on the desired weight and structure.
Do I need interfacing?
Interfacing is optional, but it can add structure and stability. It is particularly useful when working with lightweight fabrics.
Can I make the tote bag larger?
Yes. The dimensions can be enlarged proportionally, but remember that larger bags may need stronger fabric and reinforced handle construction.
Can I make the bag smaller?
Yes. A scaled-down version can work well as a small project bag or compact everyday tote. Maintain the proportions of the handles and body when resizing.
Does the pattern include a lining?
Yes. The reference specifically indicates cutting two pieces from the lining fabric, allowing the finished tote to have a neat interior.
Can I add more pockets?
Absolutely. Additional interior or exterior pockets can be added depending on how you plan to use the bag.
How do I make the handles stronger?
Use interfacing, stable fabric, reinforced stitching, and careful seam construction. Additional stitching at the handle attachment areas can also improve durability.
Why should I press the fabric while sewing?
Pressing helps flatten seams, shape curves, and create cleaner edges. It is one of the simplest ways to improve the appearance of a handmade bag.
Can I use different fabrics for the exterior and lining?
Yes. Mixing fabrics can create an attractive contrast. A patterned outer fabric combined with a plain lining is an especially easy combination.
Can I add a zipper?
Yes, although a zipper changes the construction from the reference design. A zipper can be added to the top opening or to a separate pocket depending on your sewing experience.
Can the front pocket be made larger?
Yes. The pocket dimensions can be customized according to the items you want to carry. Remember to maintain enough clearance around the seams and lower edge.
How do I keep the handles symmetrical?
Transfer the pattern carefully, use the same seam allowance on both sides, and match the handle edges before sewing. Pressing both handles in the same direction can also help them look more uniform.
Can I use a floral fabric like the one shown?
Yes. Floral cotton creates a soft decorative appearance similar to the reference. Directional prints should be positioned carefully during cutting.
Is this bag suitable for everyday use?
It can be, especially when constructed from durable woven fabric and reinforced appropriately. The final strength depends on the materials, stitching, and intended load.
Can I personalize the tote?
Definitely. You can change the fabric, add embroidery, modify the pocket, introduce contrasting handles, or add decorative labels and patches.
What is the most important part of making this pattern?
Accurate cutting and careful handle construction are especially important. If the pieces are symmetrical and the curved sections are sewn smoothly, the final tote will have a much cleaner appearance.
Conclusion
The Fabric Tote Bag Pattern shown in the reference is a practical sewing project with a simple but attractive construction. The approximately 30 cm square body, extended 25 cm handle sections, lining, and front pocket combine to create a useful handmade tote that can be adapted for many purposes.
The process begins with selecting stable woven fabric and preparing the outer and lining pieces. From there, the pattern is transferred carefully, the pocket is attached, and the main body is sewn. After the lining is assembled, the two layers are joined, turned, pressed, and finished with optional topstitching.
If you make your own Fabric Tote Bag Pattern, leave your honest opinion and suggestions about the project. Your ideas about fabric choices, pocket designs, sizes, and finishing details can help inspire other sewing enthusiasts who want to create their own handmade tote.