Upcycling Shirt to Embroidered Plaid Apron Pattern is a creative and highly practical sewing project for anyone who loves transforming old clothing into something useful, charming, and full of personality. If you enjoy sewing projects that teach useful skills while giving new life to old fabric, this is a wonderful pattern to explore.
One of the biggest reasons an Upcycling Shirt to Embroidered Plaid Apron Pattern is so appealing is because it takes a familiar garment and turns it into something completely fresh and functional. That makes the project not only creative, but also very satisfying from a practical point of view.
Another reason this pattern is so rewarding is that it helps build multiple sewing and embellishment skills at once. These are all valuable techniques that can also help with tote bags, kitchen linens, patchwork pieces, organizer projects, and other upcycled sewing ideas.
This type of apron project is also especially enjoyable because plaid fabric already brings visual interest to the final result. The pattern and structure of plaid can make even a simple apron look carefully designed, while embroidery adds softness, personality, and a more handcrafted finish.
Another lovely advantage of an Upcycling Shirt to Embroidered Plaid Apron Pattern is that it can be customized in many different ways. Depending on the shirt fabric, embroidery tools, and sewing supplies you choose, the finished apron can look rustic, vintage-inspired, farmhouse-style, cozy, modern, or sweetly decorative.
If you want to create something useful, beautiful, and resourceful, this Upcycling Shirt to Embroidered Plaid Apron Pattern – Best Fabrics, Embroidery Tools, and Sewing Supplies for a Practical Finish is a fantastic sewing project to learn and enjoy in detail.
How the Upcycling Shirt to Embroidered Plaid Apron Pattern Is Structured
Before starting your Upcycling Shirt to Embroidered Plaid Apron Pattern, it helps to understand how this kind of project is usually built. Even though it may seem simple at first, the structure matters a lot because it determines both comfort and practicality.
The project usually begins with the shirt body, which becomes the main source of fabric for the apron. Depending on the shirt size and the style of apron you want, the front or back panels can be reused for the main apron body.
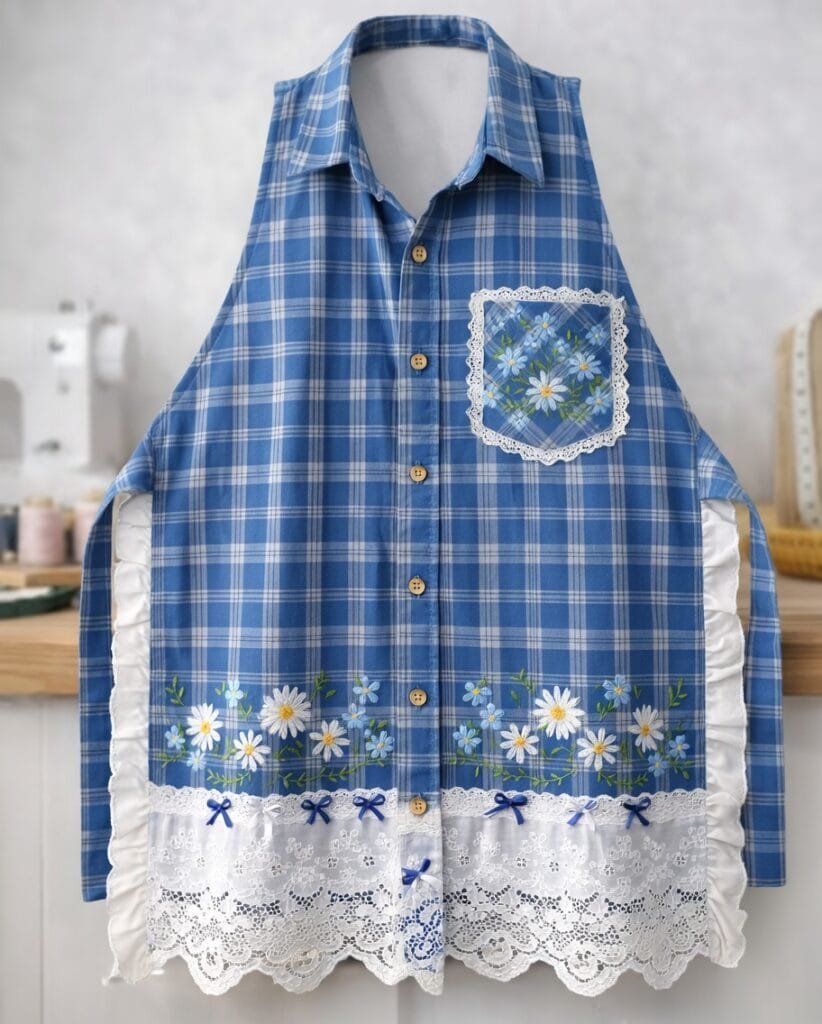
One of the most important parts of this project is the apron shape itself. Some versions are more rectangular and simple, while others include a shaped upper bib section for a more classic apron silhouette.
The strap system is another key part of the construction. Depending on the pattern, you may create neck straps, waist ties, or use existing shirt elements such as button plackets, sleeves, or cuffs in creative ways.
A Upcycling Shirt to Embroidered Plaid Apron Pattern often includes decorative or functional pockets, which can be reused from the original shirt or added separately for extra usefulness.
The embroidery area is also an important design feature. This can be a small floral accent, a simple stitched motif, a name detail, a border embellishment, or a decorative focal point that gives the apron more handmade charm.
Because this is a wearable and functional sewing project, the balance between fit, fabric weight, durability, and comfort matters a lot. Understanding the structure first helps you make better decisions and gives the finished apron a much cleaner and more practical result.
Best Fabrics for a Strong and Comfortable Upcycled Apron
Choosing the right fabric source is one of the most important parts of making a successful Upcycling Shirt to Embroidered Plaid Apron Pattern.
Because this project starts with a shirt, your first fabric decision is really about choosing the best shirt to upcycle. The ideal shirt should be comfortable, reasonably durable, and stable enough to hold up well as an apron. Cotton is often recommended for aprons because it is breathable, washable, and comfortable for regular wear, especially in home kitchen or craft settings.
A cotton plaid shirt is often one of the best choices for this type of project because it is easy to sew, easy to press, and visually attractive. Plaid also helps create a naturally decorative finish without requiring complicated patchwork or heavy embellishment.
A cotton flannel plaid shirt can work beautifully if you want a softer, cozier, and more rustic apron, especially for decorative kitchen use or seasonal projects. However, for heavier daily use, a sturdier woven plaid cotton may feel more durable over time.
A lightweight woven plaid shirt can also work well if you reinforce key areas properly and keep the project relatively simple.
It is usually best to avoid shirts that are too stretchy, too slippery, too thin, or too worn out in high-stress areas. If the original shirt fabric is weak, the apron may not hold up as well with regular use.
If the shirt has worn elbows or faded sleeve sections, that does not necessarily mean it cannot be used. In fact, many upcycling projects work best when you selectively reuse the best fabric areas and avoid the sections that are too thin or damaged.
If you want extra support in certain parts of the apron, you can also combine the shirt with a small amount of reinforcing fabric in areas like the bib, ties, or pockets.
The right fabric choice can make your Upcycling Shirt to Embroidered Plaid Apron Pattern feel more comfortable, stronger, and much more polished in the final result.
Best Embroidery Tools for Decorative Detail That Stays Neat
The right embroidery tools can make a very big difference in how refined and attractive your Upcycling Shirt to Embroidered Plaid Apron Pattern looks.
Because plaid fabric already has visual structure, embroidery often works best when it adds thoughtful detail without making the apron look too crowded. That means precision and neat finishing are especially important.
A good embroidery needle is one of the most essential tools for this project. You want a needle that passes smoothly through woven shirt fabric without damaging the fibers or making the stitches look bulky.
A small embroidery hoop can also be very helpful, especially if you are adding decorative details to the bib area, pocket, or lower apron section. A hoop helps keep the fabric stable and allows your stitches to look more even and controlled.
A water-soluble fabric marker is another very useful tool because it helps you lightly sketch embroidery placement, small motifs, or guide lines without leaving permanent marks behind.
Sharp embroidery scissors are also important because clean trimming helps the back and front of the embroidery look much neater.
If your plaid shirt fabric is lightweight or slightly soft, using a stabilizing support under the embroidery area can also help prevent puckering and improve stitch clarity.
The right embroidery tools can make your Upcycling Shirt to Embroidered Plaid Apron Pattern look more decorative, more balanced, and much more beautifully handmade.
Best Sewing Supplies for Better Construction and Durability
The right sewing supplies can make your Upcycling Shirt to Embroidered Plaid Apron Pattern much easier to assemble and much more durable in everyday use.
A strong polyester thread is often one of the best choices for apron construction because it helps the seams hold securely, especially in areas like straps, ties, pockets, and side seams.
A fabric ruler or measuring tape is especially important in this project because shirt-based upcycling often requires careful planning to make the most of limited fabric sections.
A rotary cutter or sharp fabric scissors can make a big difference when cutting plaid fabric, especially if you want cleaner lines and better alignment.
A medium-weight interfacing can also be very useful in this type of project, particularly if you want to strengthen the bib area, support reused pockets, or stabilize straps and ties. Options such as Pellon Featherweight Fusible Interfacing or Vlieseline Iron-On Woven Interlining Medium are examples of supplies that fit this kind of structured sewing need.
Pins or clips are also especially helpful when working with plaid because they allow you to keep the pattern aligned more accurately while sewing.
An iron is one of the most important tools in the entire process. Pressing seams, hems, folds, straps, and embroidery areas can dramatically improve the final look and make the apron feel much more polished and wearable.
If you plan to add decorative embroidery, tools such as a washable marker like Marcador Apagável em Água Fine Clover Ref.515 or a hoop like Paraffle Wooden Embroidery Hoop can also be especially useful for a cleaner result.
The right sewing supplies can make your Upcycling Shirt to Embroidered Plaid Apron Pattern feel stronger, easier to construct, and much more satisfying to complete.
How to Make the Finished Apron More Practical and Professional
A few thoughtful sewing habits can make your Upcycling Shirt to Embroidered Plaid Apron Pattern look much more polished and function much better in everyday use.
Start by deciding which parts of the shirt should be featured. A centered button placket, a plaid pocket, or a balanced embroidered bib can all become attractive design features when planned intentionally.
If you are using existing shirt elements like pockets, buttons, or cuffs, make sure they are positioned in a way that still feels practical for apron use.
Take extra care with the straps and ties, since these are some of the most important functional parts of the apron. They should feel secure, comfortable, and proportionate to the overall apron size.
If your plaid has strong lines, try to keep those lines as straight and balanced as possible. Even small improvements in plaid alignment can make the final apron look much cleaner and more professional.
When adding embroidery, it is usually best to keep it balanced and intentional. A small decorative accent often looks more polished than too many scattered motifs.
Topstitching can also make a very big difference. It helps reinforce edges, flatten seams, and give the apron a much cleaner finished appearance.
Finally, always press the apron well after construction. A carefully pressed apron instantly looks more structured, more wearable, and more beautifully handmade.
These small but important finishing habits can make your Upcycling Shirt to Embroidered Plaid Apron Pattern look stronger, neater, and much more professional.
FAQ – Frequently Asked Questions
1. Is an Upcycling Shirt to Embroidered Plaid Apron Pattern beginner-friendly?
Yes, many versions are beginner-friendly, especially if you are comfortable with basic sewing, hemming, and simple shaping.
2. What kind of shirt works best for this project?
A woven cotton plaid shirt is often one of the best choices because it is easy to sew, comfortable to wear, and visually attractive.
3. Do I need embroidery experience?
Not necessarily. Even simple embroidery details can add charm and personality to the apron.
4. Can I reuse the shirt pockets?
Yes, reusing original shirt pockets is one of the most practical and attractive parts of this type of upcycling project.
5. Why does my apron feel too soft or floppy?
This usually happens when the shirt fabric is too lightweight or when certain sections need extra support or reinforcement.
6. What makes the apron more durable?
Stronger seams, reinforced ties, careful topstitching, and stable fabric choices all help improve durability.
7. Can I customize the embroidery style?
Absolutely. You can keep it simple and rustic or make it more decorative depending on the overall look you want.
Before reaching the final stage of your Upcycling Shirt to Embroidered Plaid Apron Pattern, take a moment to review the shape, strap balance, plaid alignment, embroidery placement, and overall structure. Small refinements at this stage can make a very big difference in how practical and polished the finished apron looks. These final adjustments help transform a reused shirt into a beautiful and functional handmade piece you can enjoy for a long time.
Conclusion
Creating an Upcycling Shirt to Embroidered Plaid Apron Pattern – Best Fabrics, Embroidery Tools, and Sewing Supplies for a Practical Finish is a wonderful way to combine creative reuse, decorative stitching, and functional sewing in one rewarding project. Throughout this guide, you learned how the apron is structured, which fabrics work best, how the right embroidery tools improve detail, which sewing supplies help create stronger construction, and how to make the final apron look cleaner, sturdier, and more beautifully finished.
This is the kind of sewing project that teaches much more than simple assembly. It helps you improve fabric reuse, garment transformation, decorative embroidery placement, practical construction, and functional finishing while allowing you to create something useful and attractive by hand. With the right fabric, thoughtful embroidery tools, and reliable sewing supplies, your apron can become a charming handmade piece full of usefulness, creativity, and everyday value.
If this article helped you, feel free to leave your honest opinion and suggestions. Your feedback can inspire future sewing ideas, better tutorials, and even more creative handmade projects to explore.

