Little Hanging Puppy Organizer Pattern – Essential Tools for Better Results is a delightful and practical sewing project that combines creativity with everyday organization. The Little Hanging Puppy Organizer Pattern is perfect for adding a playful touch to your space while keeping small items neatly stored.
Whether used in a child’s room, craft area, or entryway, this project offers both charm and functionality. Working on a Little Hanging Puppy Organizer Pattern – Essential Tools for Better Results allows you to improve your sewing skills while creating something useful.
Many crafters find that success in projects like this depends not only on the pattern itself but also on the tools used. Having the essential tools for better results can make the process smoother, faster, and more enjoyable.
In this complete guide to Little Hanging Puppy Organizer Pattern – Essential Tools for Better Results, you’ll learn how the pattern works, how to prepare your materials, follow step-by-step instructions, and finally discover the tools that can elevate your sewing results.
Understanding the Little Hanging Puppy Organizer Pattern
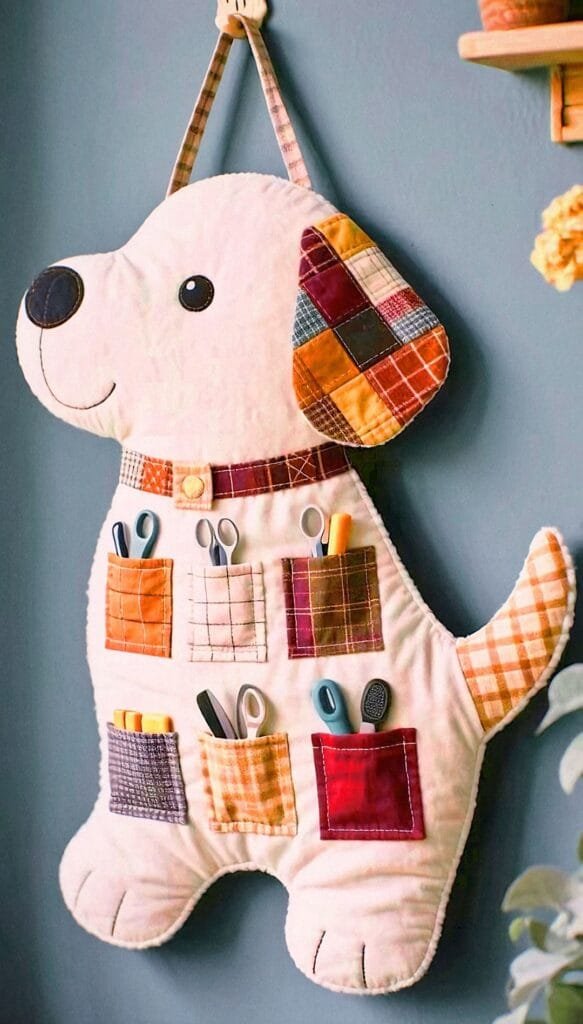
Before starting your Little Hanging Puppy Organizer Pattern – Essential Tools for Better Results, it’s important to understand how the design is structured. This organizer typically features a soft, padded base shaped like a puppy, with pockets attached to hold small items.
The main body forms the puppy’s head and sometimes part of the torso. This base is usually reinforced with padding or interfacing to give it structure and durability. The shape includes features like floppy ears and a rounded face, which give the organizer its playful look.
Pockets are sewn onto the front of the base. These can vary in size depending on your needs and are perfect for storing items like accessories, stationery, or small toys. Their placement should be balanced to maintain the overall design.
Decorative elements such as eyes, nose, and mouth bring the puppy to life. These details are often embroidered for safety and durability, especially if the organizer is used in a child’s room.
A hanging mechanism is essential for functionality. This can include fabric loops, a rod pocket, or reinforced tabs that allow the organizer to be securely mounted on a wall.
Understanding these elements helps you confidently follow your Little Hanging Puppy Organizer Pattern – Essential Tools for Better Results.
Materials and Preparation for the Project
Proper preparation is key to success when working on a Little Hanging Puppy Organizer Pattern – Essential Tools for Better Results.
Start by selecting a durable base fabric such as cotton or canvas. These materials provide strength and help the organizer maintain its shape over time. For decorative elements, you can use softer or patterned fabrics to add personality.
Padding material such as quilt batting or foam interfacing is necessary to give the organizer structure. This layer also enhances the overall appearance by creating a soft, padded effect.
Choose high-quality thread that complements your fabric colors. Strong thread ensures that seams hold up well with regular use.
Prepare your pattern template carefully. Trace all pieces onto your fabric, including the main body, ears, pockets, and decorative features. Accuracy at this stage is essential for a clean result.
Iron your fabric before cutting to remove wrinkles. Smooth fabric improves precision and makes sewing easier.
Having everything ready in advance makes your Little Hanging Puppy Organizer Pattern – Essential Tools for Better Results project more efficient and enjoyable.
Step-by-Step Instructions to Create the Organizer
Following a structured process is essential when working on your Little Hanging Puppy Organizer Pattern – Essential Tools for Better Results.
Begin by cutting all fabric pieces according to your pattern. Make sure to include seam allowances for proper assembly.
Next, attach decorative elements such as the puppy’s face and ears to the front piece. This step is easier to complete before assembling the layers.
Sew the pockets onto the front panel. Reinforce the edges to ensure they can hold items without tearing.
Layer the front fabric, padding, and back fabric together. Pin securely to keep everything aligned during sewing.
Sew around the edges, making sure all layers are properly joined. Add extra stitching to areas that will bear weight.
Attach the hanging mechanism at the top. Reinforce this section to ensure it can support the organizer when filled.
Finish by trimming loose threads and pressing the organizer if needed. Your Little Hanging Puppy Organizer Pattern – Essential Tools for Better Results is now complete.
Creative Customization Ideas
Customizing your Little Hanging Puppy Organizer Pattern – Essential Tools for Better Results allows you to create a unique and personalized piece.
Experiment with different fabric colors and patterns to match your room’s decor. Soft pastels create a gentle look, while bold colors add energy.
Adjust the size and number of pockets to suit your needs. Larger pockets can hold bigger items, while smaller ones are perfect for accessories.
Add embroidered names or labels to personalize the organizer. This is especially useful in shared spaces or children’s rooms.
You can also vary the puppy design by changing ear shapes, facial expressions, or adding accessories like bows or scarves.
Using contrasting fabrics for different parts of the design can enhance visual appeal and make the organizer stand out.
These ideas help you transform your Little Hanging Puppy Organizer Pattern – Essential Tools for Better Results into a truly unique creation.
Essential Tools for Better Results
Using the right essential tools for better results can significantly improve your experience with the Little Hanging Puppy Organizer Pattern.
A high-quality pair of fabric scissors is crucial for clean and precise cuts. This ensures all pieces fit together correctly.
A sewing machine is highly recommended for strong and consistent stitching. It also speeds up the process compared to hand sewing.
Pins or fabric clips help hold layers in place while sewing. This improves accuracy and prevents shifting.
A measuring tape ensures proper sizing and alignment of all components. Accurate measurements lead to a balanced final product.
A seam ripper is an important tool for correcting mistakes. It allows you to fix errors without damaging the fabric.
An iron is essential for pressing fabric and seams. This step improves the overall appearance and gives your project a professional finish.
Using these essential tools for better results alongside your Little Hanging Puppy Organizer Pattern – Essential Tools for Better Results will elevate both your process and final outcome.
FAQ – Frequently Asked Questions
1. Is this pattern suitable for beginners?
Yes, it is beginner-friendly with basic sewing skills.
2. What fabric is best for durability?
Cotton or canvas works best for long-lasting results.
3. Can I sew this without a machine?
Yes, but a sewing machine makes the process faster and stronger.
4. How do I hang the organizer safely?
Use reinforced loops or hooks to ensure secure mounting.
5. Can I wash the organizer?
Yes, but hand washing is recommended to maintain its shape.
6. Can I customize the design?
Absolutely, you can adjust colors, pockets, and decorative details.
7. What tools are most important?
Scissors, sewing machine, pins, measuring tape, and an iron are essential.
Conclusion
Creating a Little Hanging Puppy Organizer Pattern – Essential Tools for Better Results project is a fun and practical way to combine creativity with organization. You’ve learned how to understand the pattern, prepare materials, follow step-by-step instructions, and use the right tools to achieve better results.
With practice, you can refine your technique and create even more detailed and personalized organizers. This project is perfect for adding charm and functionality to any space.
If you found this guide helpful, feel free to share your honest opinion and suggestions. Your feedback is always valuable and helps improve future content.

