Cat Wrist Pouch – Mini Zipped Bag Pattern is a charming and practical sewing project that combines cute design with everyday functionality. The Cat Wrist Pouch – Mini Zipped Bag Pattern allows crafters to create a small, convenient pouch that can be worn on the wrist.
Many sewing enthusiasts enjoy the Cat Wrist Pouch – Mini Zipped Bag Pattern because it is a beginner-friendly project that still offers plenty of room for creativity. The design typically includes a compact pouch body, a zipper for safe storage, and a small wrist strap that allows the pouch to be easily carried.
The addition of cat-themed details like ears, whiskers, or embroidered eyes gives the pouch a fun and unique personality. Another advantage of the Cat Wrist Pouch – Mini Zipped Bag Pattern is that it can be made using small pieces of fabric, making it a great project for using leftover materials from other sewing projects.
Cotton, canvas, denim, or even quilted fabric can work beautifully for this type of mini bag. In this guide, you will learn the materials needed, the sewing techniques involved, the step-by-step process, and creative ways to personalize your Cat Wrist Pouch – Mini Zipped Bag Pattern.
Materials Needed for a Cat Wrist Pouch – Mini Zipped Bag Pattern
Before beginning the Cat Wrist Pouch – Mini Zipped Bag Pattern, it is important to gather all the materials required for the project. Choosing the right supplies helps ensure that the finished pouch is both durable and visually appealing.
The main material is fabric for the outer layer. Cotton fabric is a popular choice for the Cat Wrist Pouch – Mini Zipped Bag Pattern because it is easy to sew and available in many colors and prints. Canvas or denim can also be used if you want a sturdier pouch.
You will also need lining fabric. Adding lining to the Cat Wrist Pouch – Mini Zipped Bag Pattern gives the pouch a professional finish and helps protect the seams inside the bag.
A zipper is another essential component. A zipper measuring around 6 to 8 inches usually works well for a small pouch like this. The zipper ensures that items inside the Cat Wrist Pouch – Mini Zipped Bag Pattern remain secure.
Basic sewing tools are also necessary. These include scissors or a rotary cutter, thread, pins or clips, and a sewing machine.
Optional materials such as interfacing can help reinforce the pouch. Interfacing adds structure to the Cat Wrist Pouch – Mini Zipped Bag Pattern, allowing it to keep its shape better.
Designing the Cat-Themed Pouch
One of the most enjoyable parts of creating the Cat Wrist Pouch – Mini Zipped Bag Pattern is designing the cat-inspired details. These decorative elements transform a simple pouch into an adorable handmade accessory.
A common design feature is adding small cat ears at the top of the pouch. These ears are usually sewn into the seam near the zipper to create the recognizable silhouette of a cat.
Some crafters also add embroidered or appliqué details such as eyes, a nose, and whiskers. These small touches give personality to the Cat Wrist Pouch – Mini Zipped Bag Pattern.
Another creative option is using fabric with cat-themed prints. This can simplify the design while still maintaining the playful theme.
Color choices can also influence the final appearance. Neutral colors like black, gray, or beige can create a realistic cat look, while bright colors can give the Cat Wrist Pouch – Mini Zipped Bag Pattern a fun and whimsical style.
Designing the pouch before sewing helps ensure that all decorative elements are placed correctly.
Step-by-Step Guide to Sewing the Mini Zipped Bag
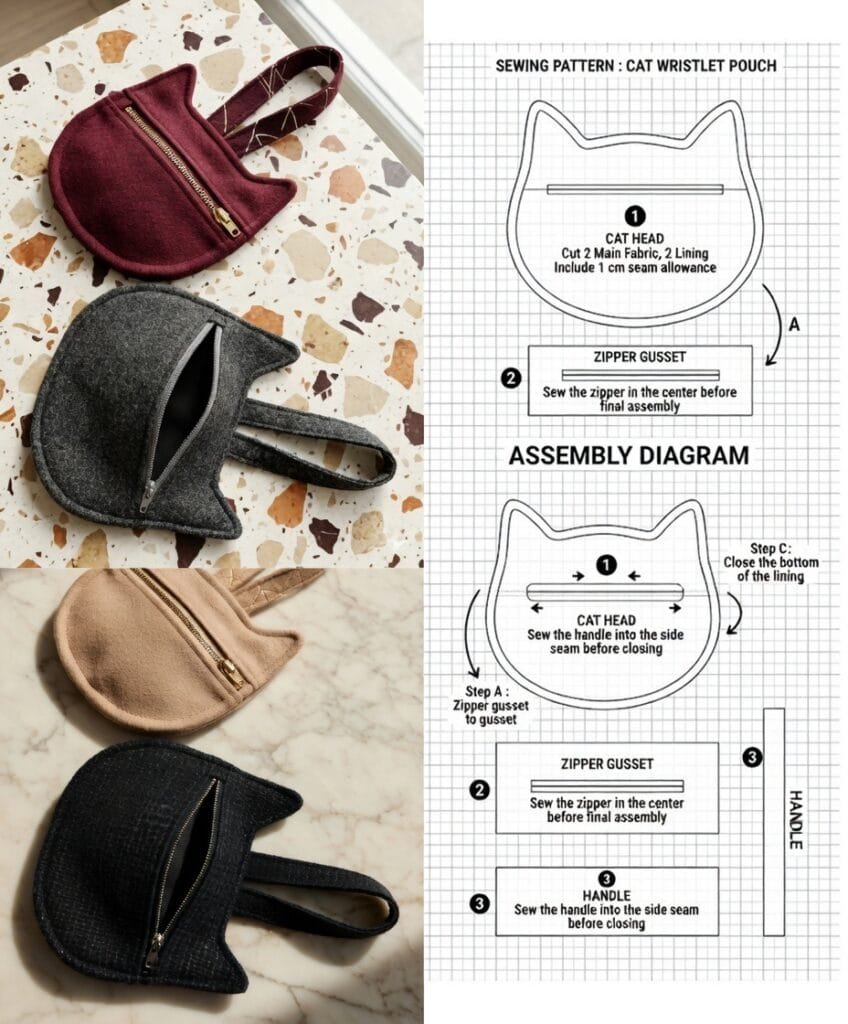
The first step in making the Cat Wrist Pouch – Mini Zipped Bag Pattern is cutting the fabric pieces. Typically, you will cut two outer fabric pieces and two lining pieces based on your chosen pouch size.
Next, prepare the zipper. Place the zipper between the outer fabric and lining pieces, aligning the edges carefully before sewing. This step forms the opening of the Cat Wrist Pouch – Mini Zipped Bag Pattern.
After attaching the zipper, sew the outer pieces together and the lining pieces together, leaving a small opening in the lining for turning the pouch right side out.
At this stage, you can also attach the wrist strap. The strap is usually made from a small strip of fabric that is folded and stitched for strength before being inserted into the side seam of the Cat Wrist Pouch – Mini Zipped Bag Pattern.
Once the seams are complete, turn the pouch through the opening in the lining and press it gently with an iron to smooth the fabric.
Finally, close the lining opening with a small seam. Your Cat Wrist Pouch – Mini Zipped Bag Pattern is now ready to use.
Creative Ways to Personalize Your Wrist Pouch
Customizing the Cat Wrist Pouch – Mini Zipped Bag Pattern is a great way to make the project truly unique. Small creative choices can give each pouch its own personality.
One popular option is quilting the outer fabric. Quilting lines or patterns can add texture and structure to the Cat Wrist Pouch – Mini Zipped Bag Pattern.
Decorative embroidery is another great idea. Adding embroidered whiskers, eyelashes, or paw prints can make the pouch even more charming.
You can also experiment with different zipper colors. A bright zipper can add contrast and make the Cat Wrist Pouch – Mini Zipped Bag Pattern stand out.
Adding small embellishments such as buttons or fabric bows can also enhance the design.
Some crafters like to make matching sets using the same fabric. For example, a Cat Wrist Pouch – Mini Zipped Bag Pattern can be paired with a larger tote or cosmetic pouch.
These customization ideas allow you to create a mini bag that perfectly matches your style.
FAQ About Cat Wrist Pouch – Mini Zipped Bag Pattern
Is the Cat Wrist Pouch – Mini Zipped Bag Pattern suitable for beginners?
Yes, the Cat Wrist Pouch – Mini Zipped Bag Pattern is beginner-friendly, especially for those who want to practice sewing zippers.
What size zipper should I use?
A zipper between 6 and 8 inches usually works well for a Cat Wrist Pouch – Mini Zipped Bag Pattern.
Can I sew this pouch without a sewing machine?
While it is possible to hand sew the Cat Wrist Pouch – Mini Zipped Bag Pattern, using a sewing machine makes the process faster and more durable.
What fabric works best for this pouch?
Cotton, canvas, and denim are commonly used for the Cat Wrist Pouch – Mini Zipped Bag Pattern.
Can I sell pouches made from this pattern?
Many crafters sell handmade items based on a Cat Wrist Pouch – Mini Zipped Bag Pattern, especially at craft fairs or online shops.
How long does it take to make one pouch?
Most Cat Wrist Pouch – Mini Zipped Bag Pattern projects can be completed in about one hour once you are familiar with the steps.
Conclusion
The Cat Wrist Pouch – Mini Zipped Bag Pattern is a fun and practical sewing project that combines creativity with everyday usefulness. In this guide, we explored the materials needed, the design ideas, and the step-by-step sewing process for creating this adorable mini bag.
One of the best things about the Cat Wrist Pouch – Mini Zipped Bag Pattern is how customizable it is. By choosing different fabrics, colors, and decorative details, you can create a pouch that reflects your personal style.
VIDEO TUTORIAL
With a little practice and imagination, anyone can create a beautiful Cat Wrist Pouch – Mini Zipped Bag Pattern that is both functional and charming. If you enjoyed this tutorial, feel free to leave your honest opinion and share suggestions. Your feedback can help inspire more creative sewing projects in the future.

