Crochet Turtle Coaster Pattern is a delightful and creative project that combines functionality with charming handmade design. Learning a Crochet Turtle Coaster Pattern allows crochet lovers to create adorable drink coasters shaped like turtles, adding personality and warmth to any table setting.
These small projects are perfect for beginners as well as experienced crocheters who enjoy quick and satisfying crafts. Handmade coasters are popular because they protect surfaces while adding decorative style to the home.
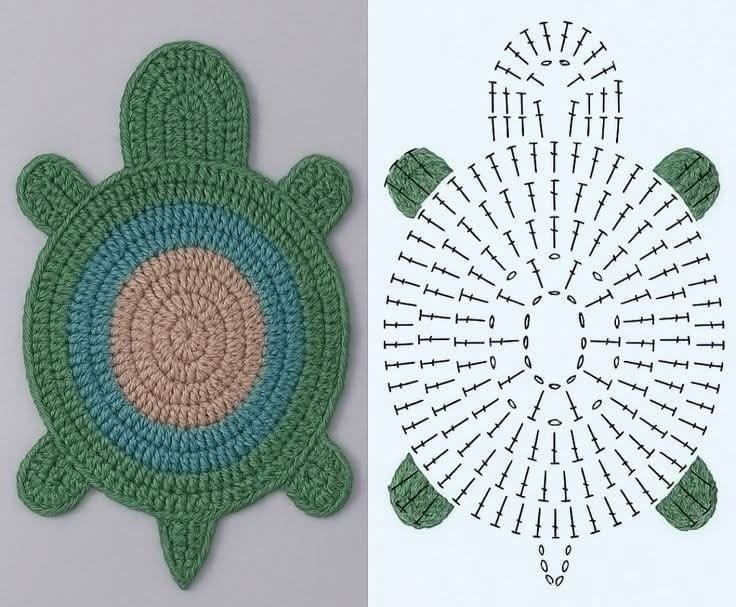
A Crochet Turtle Coaster Pattern stands out thanks to its playful design, featuring a rounded turtle shell and small flippers that create a fun, eye-catching shape. These coasters are not only practical but also make excellent gifts for friends, family members, or anyone who enjoys handmade items.
Another reason many crafters enjoy making a Crochet Turtle Coaster Pattern is that it requires only small amounts of yarn and basic crochet stitches. This makes it a great project for using leftover yarn from larger crochet creations.
In this guide, you will learn the materials needed, step-by-step instructions, helpful crafting tips, creative variations, and answers to frequently asked questions so you can confidently create your own turtle coasters.
Materials Needed for a Crochet Turtle Coaster Pattern
Before beginning a Crochet Turtle Coaster Pattern, it is important to gather the correct materials to ensure durability and an attractive finished result.
Cotton yarn is the most recommended material for crochet coasters. Cotton absorbs moisture well and holds its shape even after frequent use. Green yarn is often used for the turtle body, while brown or darker green tones work beautifully for the shell.
A crochet hook between 3.5 mm and 4.5 mm usually works well depending on the yarn thickness. Choosing the right hook size helps maintain even stitches and ensures the coaster lies flat.
You will also need scissors and a yarn needle to weave in the yarn ends. Clean finishing makes the coaster stronger and prevents unraveling over time.
Stitch markers can be helpful when working in rounds, especially when shaping the turtle shell and body sections.
Optional materials such as embroidery thread or small decorative stitches can be used to create shell patterns and add visual texture to the Crochet Turtle Coaster Pattern.
Step-by-Step Instructions for a Crochet Turtle Coaster Pattern
Understanding the structure is essential when creating a Crochet Turtle Coaster Pattern.
Begin by crocheting the turtle shell, which is typically a circular piece worked in rounds. Start with a magic ring or small chain loop and crochet several stitches into the center to form the base.
Increase stitches gradually in each round so the circle expands evenly and remains flat. This forms the shell area where cups or glasses will rest.
Next, crochet the turtle’s head, legs, and tail as small separate pieces or as extensions added to the shell edge. These details give the coaster its distinctive turtle shape.
Attach the small pieces securely using slip stitches or sewing with a yarn needle. Positioning them evenly helps maintain balance in the final design.
Finally, weave in all loose yarn ends carefully and flatten the coaster gently to ensure it sits properly on the table surface.
Tips for a Durable Crochet Turtle Coaster Pattern
When making a Crochet Turtle Coaster Pattern, paying attention to small details can improve both durability and appearance.
Maintain consistent tension throughout the project to keep the coaster flat and evenly shaped.
Choose tight stitches so the coaster remains sturdy and supports cups without stretching too much.
Blocking the finished coaster lightly can help smooth the edges and create a more polished shape.
If the coaster curls slightly, adjusting the hook size or adding an extra round of stitches may help balance the shape.
Reinforcing the small turtle parts with secure stitching ensures they remain firmly attached during use.
Finally, consider making multiple coasters to create a matching set for your dining or coffee table.
Creative Variations of a Crochet Turtle Coaster Pattern
Once you become comfortable with the Crochet Turtle Coaster Pattern, there are many creative ways to customize your design.
Experiment with different shell colors such as teal, beige, or variegated yarn for a unique effect.
Add textured stitches like popcorn or puff stitches to mimic the natural pattern of a turtle shell.
Create matching coaster sets using slightly different shades of green for variety.
You can also crochet larger versions to use as small placemats for mugs or bowls.
Adding embroidered shell lines can enhance the turtle appearance while keeping the coaster functional.
Another fun idea is to make themed color sets for seasonal table decorations.
FAQ About Crochet Turtle Coaster Pattern
Is this pattern beginner-friendly?
Yes, the Crochet Turtle Coaster Pattern uses simple stitches and is suitable for beginners with basic crochet knowledge.
How long does it take to make one coaster?
Most crocheters can complete one turtle coaster in about 30 to 45 minutes.
What yarn works best for coasters?
Cotton yarn is the best choice because it absorbs moisture and holds its shape well.
Can the coaster be washed?
Yes, cotton crochet coasters can usually be hand washed and air dried.
Will the turtle parts affect stability?
No, as long as the shell remains flat and the decorative parts are positioned around the edges.
Can I sell handmade turtle coasters?
Yes, if the pattern allows commercial use or if you design your own variation.
Conclusion
Creating a Crochet Turtle Coaster Pattern is a fun and practical crochet project that combines creativity with everyday usefulness. From crocheting the circular shell to attaching the small turtle features, every step contributes to a charming handmade coaster that protects your surfaces while adding personality to your home.
This project is also a great way to practice crochet techniques and experiment with colors, textures, and decorative details. With just a small amount of yarn and a little creativity, you can create a beautiful set of turtle coasters that brighten any table.
If you enjoyed learning about the Crochet Turtle Coaster Pattern, feel free to share your honest opinion and suggestions. Your feedback helps inspire more creative crochet tutorials and craft ideas for the community.
One of the most enjoyable aspects of working on a Crochet Turtle Coaster Pattern is the relaxing and mindful nature of the process. Small crochet projects like this allow crafters to slow down, focus on each stitch, and enjoy the rhythm of creating something by hand. Because the pattern is compact and relatively quick to complete, it offers a satisfying sense of accomplishment in a short amount of time. Many crocheters also use projects like these to practice stitch consistency and improve tension control. Over time, making several turtle coasters can help build stronger crochet skills while also producing a charming set of handmade pieces.
Another wonderful benefit of making a Crochet Turtle Coaster Pattern is the opportunity to create thoughtful handmade gifts that people truly appreciate. A set of crochet coasters can be a perfect present for housewarmings, birthdays, or holiday celebrations. Because each piece is handmade, it carries a unique personal touch that store-bought items often lack. You can customize the colors to match the recipient’s home décor or create themed sets for special occasions.
This small project also allows you to experiment with different yarn textures and decorative details, turning each coaster into a unique creation that reflects your creativity and craftsmanship.

