Owl-shaped fabric holder for remote control Pattern is a creative and practical sewing project that combines organization with charming home décor. Learning an Owl-shaped fabric holder for remote control Pattern allows you to craft a functional item that keeps your remote controls neatly stored while adding personality to your living space.
This project is ideal for beginners and experienced crafters who enjoy making decorative yet useful items for the home. Many households struggle with misplaced remote controls, especially in busy living rooms where multiple devices are used daily.
Owl-shaped fabric holder for remote control Pattern solves this problem by offering a designated and visually appealing place to keep remotes organized. Instead of cluttering coffee tables or sofa cushions, the holder can be hung on a chair arm, wall hook, or placed beside the sofa for easy access.
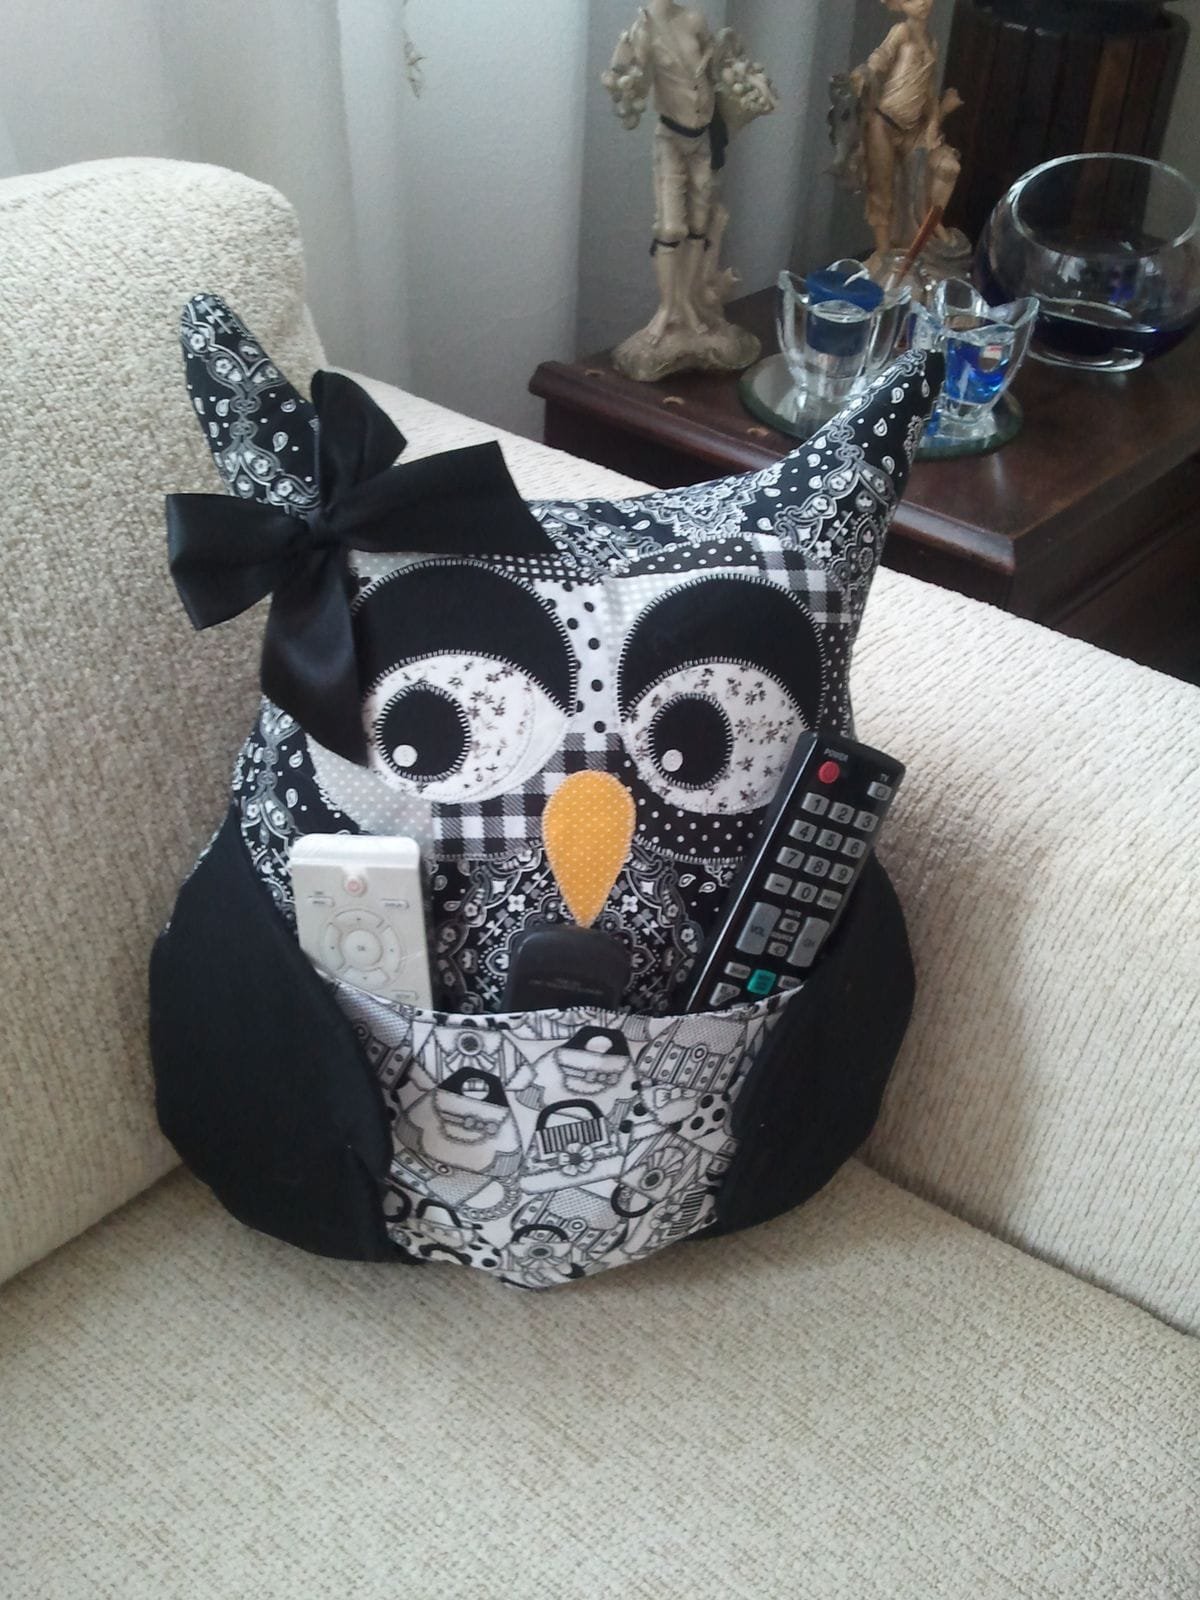
Another reason why many sewing enthusiasts love creating an Owl-shaped fabric holder for remote control Pattern is its versatility. The owl design adds a playful touch while the storage pockets provide functionality.
In this guide, you will learn about the materials needed, step-by-step instructions, useful sewing tips, creative customization ideas, and answers to common questions so you can successfully create your own owl remote holder.
Materials Needed for an Owl-Shaped Fabric Holder for Remote Control Pattern
Before starting an Owl-shaped fabric holder for remote control Pattern, gathering the correct materials will make the sewing process smoother and help achieve a durable finished piece.
Choose medium-weight cotton fabric for the main body of the owl. Cotton is easy to sew, durable, and holds its shape well. You can select patterned fabric for the body and contrasting colors for the wings and pocket details.
You will also need fabric for the inner lining. A lining strengthens the holder and gives it a neat, professional finish. Using complementary colors enhances the visual appeal of the owl design.
Basic sewing tools such as scissors, pins, thread, and a sewing machine are essential. If you prefer hand sewing, it is still possible, but a sewing machine will speed up the process.
Soft batting or lightweight interfacing is recommended to give the owl structure. This helps the holder keep its shape while supporting the weight of remote controls.
Optional decorative elements such as buttons, felt pieces, or embroidery thread can be used to create the owl’s eyes, beak, and wing details.
Step-by-Step Instructions for an Owl-Shaped Fabric Holder for Remote Control Pattern
To begin the Owl-shaped fabric holder for remote control Pattern, start by preparing your pattern pieces. Draw or print an owl shape that includes the body, wings, and pocket area where the remote controls will be stored.
Cut two large owl body pieces from your main fabric and two matching pieces from the lining fabric. Also cut pocket pieces that will form the front storage compartment.
Attach batting or interfacing to the back of the outer body pieces. This step provides stability and ensures the holder keeps its shape when filled.
Next, sew the pocket onto the front owl body piece. Make sure the pocket is deep enough to hold remote controls securely while still allowing easy access.
Sew the decorative features such as eyes, wings, and beak onto the front panel. Appliqué stitching or simple topstitching works well for this step.
Finally, sew the front and back body pieces together with the lining, leaving a small opening to turn the project right side out. Close the opening with a neat stitch and add a small hanging loop if desired.
Tips for a Durable Owl-Shaped Fabric Holder for Remote Control Pattern
Maintaining strong construction is important when making an Owl-shaped fabric holder for remote control Pattern.
Use reinforced stitching along the pocket edges since these areas experience the most tension when inserting and removing remotes.
Choose fabrics that are thick enough to support weight but still flexible for sewing. Quilting cotton works particularly well.
Ensure the pocket opening is slightly angled or curved. This makes accessing remote controls easier without stretching the fabric.
Press seams with an iron during each step. Pressing improves accuracy and results in cleaner, more professional seams.
If the holder will hang on furniture, reinforce the hanging loop with extra stitching to prevent tearing.
Finally, test the pocket size with your remote controls before finishing the project to ensure a comfortable fit.
Creative Variations of an Owl-Shaped Fabric Holder for Remote Control Pattern
Once you learn the basic Owl-shaped fabric holder for remote control Pattern, you can personalize the design in many creative ways.
Try patchwork fabric for the owl body to create a colorful and textured appearance. This also allows you to use leftover fabric scraps.
Add multiple pockets to store additional items such as glasses, pens, or small notebooks.
Use embroidery to create expressive owl eyes or decorative patterns on the wings.
Experiment with seasonal fabrics. For example, warm autumn colors create a cozy home décor accent.
You can also enlarge the pattern to create a wall organizer that stores magazines, tablets, or mail.
FAQ About Owl-Shaped Fabric Holder for Remote Control Pattern
Is this project suitable for beginners?
Yes, the Owl-shaped fabric holder for remote control Pattern is beginner-friendly and uses basic sewing techniques.
How long does it take to make?
Most crafters can complete this project in two to three hours depending on experience.
What fabric works best?
Medium-weight cotton or quilting fabric works best because it is durable and easy to sew.
Can I wash the finished holder?
Yes, gentle washing and air drying are recommended to maintain its shape.
How many remotes can it hold?
Depending on pocket size, it can usually hold two to four remote controls.
Can I sell handmade holders?
Yes, as long as you create them using your own pattern or one that allows commercial use.
Conclusion
Creating an Owl-shaped fabric holder for remote control Pattern is a fun and practical sewing project that helps keep your living space organized while adding a decorative handmade touch. From selecting fabrics to assembling pockets and decorative details, each step contributes to a functional and charming piece.
This project is also highly customizable, allowing you to experiment with colors, textures, and embellishments that match your home décor. With a little creativity and careful stitching, your owl holder can become both a helpful organizer and a delightful decorative item.
If you enjoyed learning about the Owl-shaped fabric holder for remote control Pattern, feel free to share your honest opinion and suggestions. Your feedback helps inspire more creative craft ideas and improvements for future tutorials.
Creating an Owl-shaped fabric holder for remote control Pattern can also be a wonderful opportunity to practice sewing skills while making something useful for everyday life. Projects like this help improve precision in cutting, stitching, and assembling fabric pieces. Over time, these small sewing projects build confidence and allow crafters to experiment with new fabrics, textures, and decorative techniques.
Another advantage of making an Owl-shaped fabric holder for remote control Pattern is the possibility of turning it into a thoughtful handmade gift.
VIDEO TUTORIAL
Many people appreciate practical items that also bring charm and personality into their homes. By choosing fabrics that match the recipient’s style and adding small personalized details, you can create a unique and memorable handmade piece.

