How to make a Fabric Bunnies Pattern is a delightful question for anyone who loves sewing soft toys and handmade decorations. Learning how to make a Fabric Bunnies Pattern allows you to create charming stuffed bunnies that can be used as nursery décor, seasonal ornaments, thoughtful gifts, or cuddly companions for children.
This timeless sewing project combines creativity, basic pattern drafting, and simple stitching techniques into one rewarding experience. Fabric bunnies have remained popular for generations because of their sweet shape and versatility.
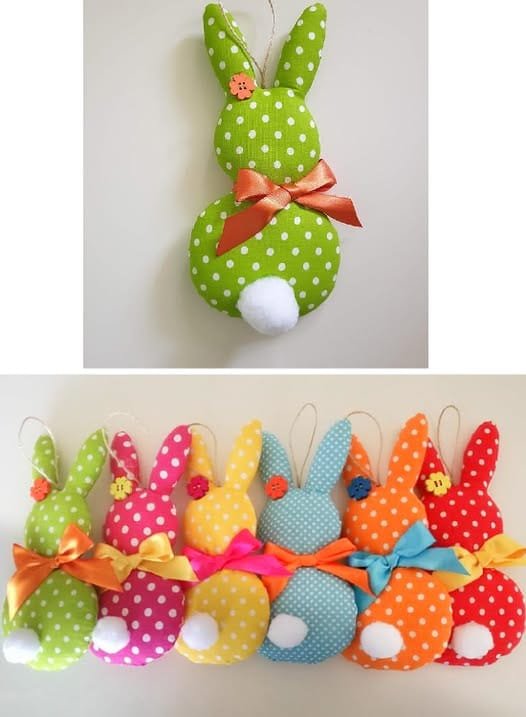
A well-designed Fabric Bunnies Pattern can be adapted for different sizes, fabrics, and decorative styles. Whether you prefer a minimalist modern bunny or a vintage-inspired plush with floral prints, the foundation remains simple and beginner-friendly.
Another reason so many crafters search for how to make a Fabric Bunnies Pattern is that it requires minimal materials while offering endless customization. With just a few sewing supplies and soft fabric, you can create a beautiful handmade bunny.
In this complete guide, you will learn the materials needed, step-by-step instructions, professional sewing tips, creative variations, and answers to frequently asked questions to help you confidently complete your project.
Materials Needed for a Fabric Bunnies Pattern
Before starting how to make a Fabric Bunnies Pattern, gathering the right materials ensures a smooth and enjoyable sewing process. Choosing quality supplies improves durability and gives your bunny a professional finish.
Soft cotton fabric is one of the best options for beginners. It is easy to cut, sew, and press. You may also choose linen for a rustic look or soft fleece for a plush, cuddly feel. Selecting gentle, breathable fabrics is especially important if the bunny is intended for children.
You will need matching thread, sharp fabric scissors, sewing pins or clips, and a measuring tape. A sewing machine makes construction faster, but hand sewing is also possible with patience and strong stitching.
Polyester fiberfill stuffing gives the bunny its shape and softness. Add stuffing gradually to achieve even distribution and avoid lumps.
Optional materials include embroidery thread for facial features, small ribbons for bows, or fabric scraps for decorative patches. Once these materials are ready, you can confidently begin learning how to make a Fabric Bunnies Pattern.
Step-by-Step Instructions on How to Make a Fabric Bunnies Pattern
Understanding the construction process is key when learning how to make a Fabric Bunnies Pattern. The design typically consists of two main body pieces shaped like a bunny silhouette.
Begin by drawing your bunny pattern on paper. Sketch a simple shape with rounded body edges and long ears. Fold the paper in half while drawing to ensure symmetry.
Place the pattern onto folded fabric and cut two identical pieces. Add a seam allowance of about ¼ to ½ inch around the edges to allow room for stitching.
Pin the two fabric pieces right sides together. Sew around the edges, leaving a small opening at the bottom or side for turning and stuffing.
Carefully trim excess fabric around curves and clip small notches along rounded edges. This helps the bunny lie flat when turned right side out.
Turn the bunny inside out through the opening. Use a blunt tool to gently push out the ears and curves for a smooth shape.
Stuff the bunny gradually with fiberfill until it feels soft but structured. Close the opening using a ladder stitch or small hand stitches for an invisible finish.
Sewing Tips for a Professional Fabric Bunnies Pattern
When mastering how to make a Fabric Bunnies Pattern, small details can elevate your final result significantly.
Press your fabric before cutting to ensure smooth edges and accurate measurements. Wrinkled fabric can distort pattern shapes.
Use small, consistent stitches when sewing curves. Shorter stitch lengths provide better control and prevent puckering along rounded areas.
Clip seam allowances around tight curves to reduce bulk. This helps the bunny maintain its natural shape when turned right side out.
For facial features, embroidery is often safer and more durable than plastic pieces. Simple stitched eyes and a tiny nose create a soft, timeless expression.
Avoid overstuffing. While firmness adds structure, too much stuffing can strain seams and distort the bunny’s silhouette.
Finally, take your time closing the opening neatly. An invisible ladder stitch creates a seamless and polished finish for your Fabric Bunnies Pattern.
Creative Variations of a Fabric Bunnies Pattern
One of the best aspects of learning how to make a Fabric Bunnies Pattern is the opportunity to customize the design in countless ways.
Use floral or pastel fabrics for a spring-inspired bunny. These are perfect for seasonal décor or baby gifts.
Create miniature bunnies to use as ornaments or gift toppers. Smaller versions require less fabric and are quick to complete.
Add a ruffled collar or small bow around the bunny’s neck for extra charm. Decorative touches make each bunny unique.
For a vintage look, choose neutral linen fabric and embroider simple facial details. Soft, muted colors enhance the timeless appeal.
Make reversible flat bunnies without stuffing for wall decorations or garlands. These lightweight versions are perfect for festive displays.
You can also sew clothing accessories like tiny dresses or scarves to personalize your Fabric Bunnies Pattern further.
FAQ About How to Make a Fabric Bunnies Pattern
Is this project beginner-friendly?
Yes, the basic bunny silhouette is simple and suitable for beginners with basic sewing skills.
What fabric works best?
Cotton is ideal for beginners, while fleece offers a softer plush texture.
How long does it take to make one bunny?
Most fabric bunnies can be completed in two to four hours, depending on size and detail.
Is it safe for children?
Yes, especially if you use embroidered facial features and secure all stitching properly.
Can I wash the finished bunny?
Hand washing is recommended to preserve shape and stitching.
Can I sell handmade fabric bunnies?
Yes, if you create your own pattern or use one that allows commercial use, you can responsibly sell finished items.
Conclusion
Learning how to make a Fabric Bunnies Pattern is a rewarding sewing project that combines creativity, practicality, and timeless charm. From drafting the bunny silhouette to stuffing and adding delicate details, each step contributes to a beautiful handmade creation.
The Fabric Bunnies Pattern is versatile, beginner-friendly, and adaptable for different styles and occasions. With careful stitching, quality materials, and thoughtful finishing touches, your fabric bunny can become a cherished keepsake or heartfelt gift.
If you found this guide helpful, please share your honest opinion and suggestions. Your feedback supports future sewing tutorials and inspires continued creativity.
Creating your own Fabric Bunnies Pattern also helps you build confidence in pattern drafting and curved seam sewing. As you practice, you’ll notice improvements in symmetry, stitch precision, and finishing techniques. Small projects like this are perfect for refining your skills while producing something meaningful and charming that can be treasured for years to come.
In addition, handmade fabric bunnies carry sentimental value that store-bought items simply cannot match. Each stitch reflects care, creativity, and personal attention to detail. Whether displayed as décor, gifted to loved ones, or kept as a keepsake, your completed Fabric Bunnies Pattern project becomes a lasting symbol of craftsmanship and heartfelt effort.
VIDEO TUTORIAL
Over time, experimenting with different fabrics, sizes, and decorative elements will make your Fabric Bunnies Pattern even more unique and personal. Each new version offers an opportunity to explore creativity while strengthening your sewing skills.

