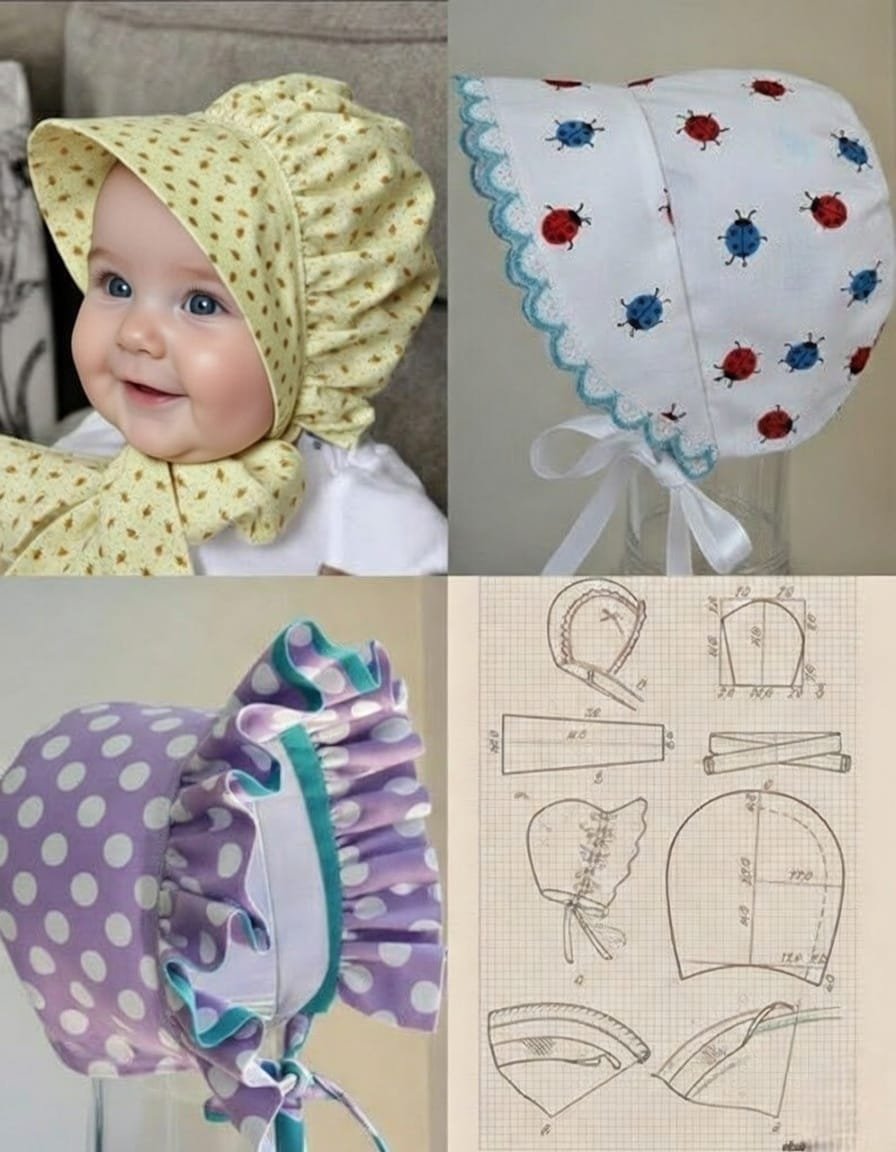
How to make a Fabric Baby Bonnet Pattern is a question many sewing enthusiasts ask when looking to create a timeless, delicate, and practical accessory for little ones. Learning how to make a Fabric Baby Bonnet Pattern allows you to combine soft fabrics, gentle stitching, and classic design into a beautiful handmade piece that is both functional and adorable.
Whether you are sewing for a baby shower gift, a photography prop, or everyday wear, this project offers simplicity and charm in equal measure. The Fabric Baby Bonnet Pattern has remained popular for generations because of its elegant shape and protective coverage.
Bonnet designs shield delicate skin from sunlight and light breezes while adding a vintage-inspired touch to any outfit. With the right measurements and fabric choices, you can create a bonnet that is comfortable, breathable, and safe for babies.
If you’re ready to explore how to make a Fabric Baby Bonnet Pattern, this detailed guide will walk you through materials, measurements, step-by-step construction, professional sewing tips, creative variations, and common questions.
Even beginners with basic sewing skills can complete this project successfully by following clear instructions and working carefully.
Materials and Fabric Selection for a Fabric Baby Bonnet Pattern
Choosing the right materials is the first and most important step in learning how to make a Fabric Baby Bonnet Pattern. Babies have sensitive skin, so fabric softness and breathability should always be a priority.
Lightweight cotton is one of the best fabric choices. It is soft, breathable, and easy to sew. Muslin, quilting cotton, or organic cotton are excellent options for comfort and durability. For special occasions, lightweight linen can add a refined look while still maintaining breathability.
You will also need matching thread, sharp fabric scissors, pins or clips, and a measuring tape. A sewing machine simplifies construction, but hand sewing is possible if done carefully and securely.
Interfacing may be added lightly to the brim if you want extra structure. However, keep it soft and flexible to ensure the bonnet remains comfortable against the baby’s head.
Ribbon or fabric ties are essential for securing the bonnet under the chin. Choose soft, smooth ribbon or create fabric ties from the same material as the bonnet for a cohesive appearance.
Before cutting, always prewash and iron your fabric. This prevents shrinkage after sewing and ensures accurate measurements for your Fabric Baby Bonnet Pattern.
Step-by-Step Instructions on How to Make a Fabric Baby Bonnet Pattern
Understanding the construction process is key when learning how to make a Fabric Baby Bonnet Pattern. The design typically includes three main pieces: the crown, the brim, and the back panel.
Begin by measuring the baby’s head circumference. Accurate measurements ensure a comfortable and secure fit. Most newborn head circumferences range between 13 and 14 inches, but always measure when possible.
Draft your pattern on paper first. The crown piece is often shaped like a rounded rectangle, while the back panel forms the curved section that cups the head. The brim extends forward to provide gentle shade.
Cut your fabric pieces according to the drafted pattern, adding a seam allowance of about ¼ to ½ inch. Precision during cutting ensures smooth alignment when sewing.
Sew the back panel to the crown using a curved seam. Take your time and stitch slowly to maintain even spacing. Curved seams require careful guiding but become easier with practice.
Next, attach the brim to the front edge of the crown. Pin carefully before stitching to prevent shifting. Press seams gently with an iron to create a clean, professional look.
Finally, add ties to each side of the bonnet. Secure them firmly with reinforced stitching to ensure durability. Turn the bonnet right side out, press lightly, and your Fabric Baby Bonnet Pattern is complete.
Sewing Tips for a Professional-Looking Fabric Baby Bonnet Pattern
Even simple projects benefit from attention to detail. When mastering how to make a Fabric Baby Bonnet Pattern, small refinements can elevate the finished result.
Always press seams after sewing. Pressing flattens fabric and improves structure. It also gives your bonnet a polished appearance.
Topstitching around the brim adds both strength and style. This extra row of stitching keeps the brim in place and enhances durability.
Use small, consistent stitches for curved seams. Shorter stitch lengths help maintain control and prevent puckering along rounded edges.
Choose soft thread that complements your fabric. Neutral tones work well for most designs, but matching thread creates a seamless finish.
Avoid bulky seams by trimming excess fabric along curves. Clipping seam allowances carefully helps the bonnet lie flat when turned right side out.
Finally, test the fit gently before finalizing. Ensure ties are secure but not tight, prioritizing comfort and safety above all else in your Fabric Baby Bonnet Pattern.
Creative Variations of a Fabric Baby Bonnet Pattern
One of the joys of learning how to make a Fabric Baby Bonnet Pattern is personalizing the design to suit different occasions and styles.
Floral prints create a soft, vintage look perfect for spring and summer. Pastel tones enhance the delicate appearance of the bonnet.
Adding lace trim along the brim introduces a classic touch. Keep embellishments lightweight and securely stitched for safety.
Ruffled edges can add playful charm. Attach a gentle gathered strip of fabric around the brim for added texture and dimension.
Seasonal fabrics allow creative expression. Choose lightweight prints for warm weather and slightly heavier cotton blends for cooler months.
You can also make reversible bonnets by using two coordinating fabrics. This doubles versatility and offers two looks in one piece.
Monogramming or small embroidered initials add a personal touch, especially for gifts. Keep embroidery soft and smooth on the inside to avoid irritation.
FAQ About How to Make a Fabric Baby Bonnet Pattern
Is this project suitable for beginners?
Yes, confident beginners with basic sewing knowledge can complete this project. Curved seams require patience but are manageable with practice.
What fabric is safest for babies?
Soft, breathable cotton is the safest and most comfortable choice. Organic cotton is especially gentle on sensitive skin.
How do I determine the correct size?
Measure the baby’s head circumference and compare it with standard sizing charts. Always prioritize a slightly roomy but secure fit.
Can I wash the bonnet?
Yes, most cotton bonnets are machine washable on gentle cycles. Air drying helps maintain shape.
Are ties necessary?
Ties are recommended to keep the bonnet secure. Ensure they are soft and properly stitched to prevent detachment.
Can I sell bonnets made from my own pattern?
Yes, if you draft your own pattern or use one with commercial permission, you can sell finished bonnets responsibly.
Conclusion
Learning how to make a Fabric Baby Bonnet Pattern is a rewarding sewing experience that blends practicality with timeless beauty. From selecting soft cotton fabrics to carefully sewing curved seams and adding delicate finishing touches, each step contributes to a charming and functional accessory.
The Fabric Baby Bonnet Pattern remains a beloved project because it is adaptable, beginner-friendly, and perfect for meaningful handmade gifts. With careful measurement, quality materials, and attention to detail, you can create a bonnet that is both safe and stylish.
VIDEO TUTORIAL
If this guide was helpful, please leave your honest opinion and suggestions. Your feedback encourages continued creativity and helps improve future sewing tutorials.

