How to Make a Butterfly Quilt Block Pattern is one of the most inspiring questions for quilters who love combining delicate design with structured technique. Learning how to make a Butterfly Quilt Block Pattern allows you to create a symbol of transformation, beauty, and creativity using fabric and thread.
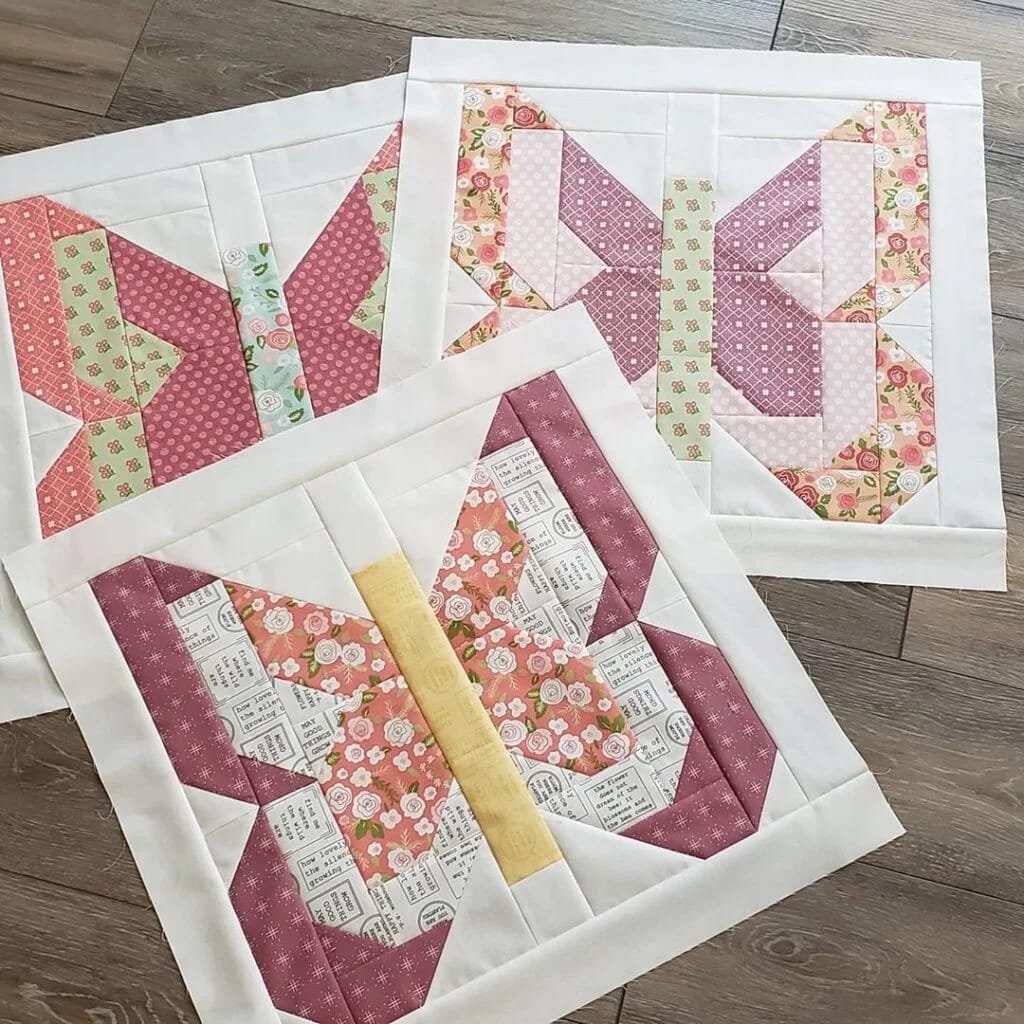
The Butterfly Quilt Block Pattern is popular because it blends geometric precision with soft, organic shapes. Depending on the style you choose, the butterfly can be created using half-square triangles, simple squares, or appliqué techniques. This versatility makes it ideal for baby quilts, spring-themed décor, or even larger statement quilts filled with colorful butterfly blocks.
If you’ve been searching for a complete, well-structured guide on how to make a Butterfly Quilt Block Pattern, this detailed tutorial will walk you through every stage. From selecting fabrics and cutting accurately to assembling and finishing your quilt block, you’ll learn practical techniques that ensure professional results.
Materials and Fabric Selection for a Butterfly Quilt Block Pattern
Choosing the right materials is the first step in mastering how to make a Butterfly Quilt Block Pattern. Fabric quality and color coordination directly impact the final look of your butterfly design. Taking time to prepare your materials ensures a smoother sewing experience.
High-quality quilting cotton is the best option for this project. Cotton is easy to cut, sew, and press, making it ideal for precise quilt blocks. Select vibrant prints or solids for the butterfly wings to create contrast and visual interest.
For the butterfly body, darker fabrics such as black, navy, or deep brown work well. This contrast helps define the shape and gives the block a balanced appearance. If you prefer a softer look, choose a complementary tone rather than a stark contrast.
Essential tools include a rotary cutter, self-healing cutting mat, quilting ruler, sewing machine, pins, and thread that matches your fabric. Accurate cutting is crucial when learning how to make a Butterfly Quilt Block Pattern, especially if you are using half-square triangles.
Background fabric plays a major role in highlighting your butterfly. Neutral shades like white, cream, or light gray allow the wings to stand out. Alternatively, soft pastel backgrounds create a gentle, spring-inspired aesthetic.
Finally, keep an iron nearby for pressing seams. Proper pressing improves accuracy and ensures your butterfly block lays flat. With the right tools and fabrics prepared, you are ready to begin construction.
Step-by-Step Instructions on How to Make a Butterfly Quilt Block Pattern
Understanding the assembly process is essential when learning how to make a Butterfly Quilt Block Pattern. While designs vary, many traditional butterfly blocks rely on half-square triangles and simple piecing techniques.
Start by cutting squares for the wings and background. To create half-square triangles, place two contrasting squares right sides together. Draw a diagonal line across one square, stitch along both sides of the line, and cut along the marked line. Press the triangles open.
Arrange your half-square triangles and squares on a flat surface to form the butterfly shape. This layout step is crucial because it allows you to confirm placement before stitching permanently.
Next, sew the pieces together in rows. Keep seam allowances consistent—typically ¼ inch—to maintain block accuracy. Press seams carefully after each row to reduce bulk and improve alignment.
After sewing rows, join them to complete the butterfly block. Match seams precisely to keep wing edges crisp and symmetrical. Taking time during this step ensures a professional finish.
For appliqué-style butterfly blocks, instead of piecing triangles, you can cut wing shapes from fabric and stitch them onto a background square. This method allows for curved wings and more artistic expression.
Once completed, measure your block to confirm correct sizing. Trim edges if necessary to square the block. This final step is important for assembling multiple blocks into a larger quilt.
Design Tips for a Stunning Butterfly Quilt Block Pattern
Design decisions can elevate your Butterfly Quilt Block Pattern from simple to extraordinary. Thoughtful color placement and layout planning create a visually appealing result.
Use contrasting fabrics for wings to make the butterfly stand out. Pair bold prints with solid backgrounds for a balanced design. Strong contrast enhances visibility and definition.
Consider symmetry when arranging wing pieces. Equal placement on both sides of the body creates harmony. If you prefer a playful style, experiment with asymmetrical fabric prints while maintaining structural balance.
Mixing textures adds dimension. Combining floral prints with subtle polka dots or tone-on-tone fabrics creates depth without overwhelming the design.
When making multiple butterfly blocks, vary wing colors for a garden-inspired quilt. A collection of butterflies in different hues adds movement and charm to the overall layout.
Quilting stitches can enhance the butterfly effect. Echo quilting around the wings highlights their shape, while decorative stitching along the body adds detail.
Adding embroidery for antennae gives the butterfly personality. Simple stitched lines complete the look without complicating the construction process.
Creative Variations of the Butterfly Quilt Block Pattern
One of the most enjoyable aspects of learning how to make a Butterfly Quilt Block Pattern is experimenting with creative variations. This block adapts easily to different projects and styles.
Mini butterfly blocks are perfect for baby quilts or wall hangings. Smaller blocks allow you to showcase multiple butterflies within one quilt.
A butterfly-themed table runner brightens dining spaces during spring and summer. Combining several coordinated blocks creates a cheerful seasonal accent.
Pillow covers featuring a single large butterfly block make beautiful home décor pieces. This design works well in bedrooms, living rooms, or nurseries.
Scrap quilting is another wonderful option. Use leftover fabric pieces to create colorful, eco-friendly butterflies. The mix of patterns adds character and uniqueness.
Modern variations may include negative space backgrounds, oversized butterfly shapes, or minimalist color palettes for contemporary appeal.
For heirloom projects, consider hand quilting for added texture and tradition. Hand-stitched details enhance craftsmanship and sentimental value.
FAQ About How to Make a Butterfly Quilt Block Pattern
Is the Butterfly Quilt Block Pattern suitable for beginners?
Yes, many butterfly blocks use simple piecing techniques like half-square triangles, making them beginner-friendly with basic quilting knowledge.
What size should a butterfly quilt block be?
Common sizes range from 8 to 12 inches square, but you can adjust dimensions depending on your quilt design.
Do I need special templates?
Most butterfly blocks do not require special templates unless you choose an appliqué design with curved wings.
How do I keep my block square?
Use consistent seam allowances, press carefully, and trim edges after assembly to maintain accuracy.
Can I hand sew this block?
Yes, hand sewing is possible, though machine sewing speeds up the process and ensures even seams.
What fabrics work best for butterfly wings?
Bright solids, floral prints, or patterned cotton fabrics work beautifully to highlight the wings.
Conclusion
Learning how to make a Butterfly Quilt Block Pattern is a rewarding experience that blends creativity with technical skill. From selecting vibrant fabrics and cutting precise shapes to assembling balanced wings and adding finishing touches, each step contributes to a beautiful handmade design.
The Butterfly Quilt Block Pattern offers flexibility, allowing you to create traditional, modern, or seasonal variations. With practice and thoughtful design choices, you can craft stunning butterfly blocks that brighten any quilt project.
VIDEO TUTORIAL
If you found this guide helpful, please share your honest opinion and suggestions. Your feedback encourages continued creativity and supports future quilting tutorials.

