How to Make a Flower Quilt Block Pattern is a timeless quilting technique that blends creativity, structure, and precision into one beautiful design. Learning How to Make a Flower Quilt Block Pattern allows you to transform simple fabric squares into stunning floral motifs that can be used in quilts, table runners, wall hangings, pillows, and even seasonal decorations.
When you understand how to make a Flower Quilt Block Pattern, you unlock endless possibilities for customization. From classic appliqué blossoms to modern pieced petals, flower blocks can reflect any aesthetic, whether vintage, contemporary, minimalist, or bold.
The key lies in accurate cutting, consistent seam allowances, balanced color contrast, and thoughtful layout planning. This guide will walk you step-by-step through materials, construction methods, design variations, and finishing techniques to help you create a professional-quality block.
Beyond its visual appeal, mastering a Flower Quilt Block Pattern strengthens essential quilting skills. You will practice quarter-inch seam precision, pressing techniques, fabric alignment, and block squaring.
These foundational techniques ensure that your quilt blocks align perfectly when assembled into a larger quilt top. With patience and careful execution, your flower block will lie flat, maintain symmetry, and showcase clean lines.
Choosing Fabrics and Preparing Your Materials
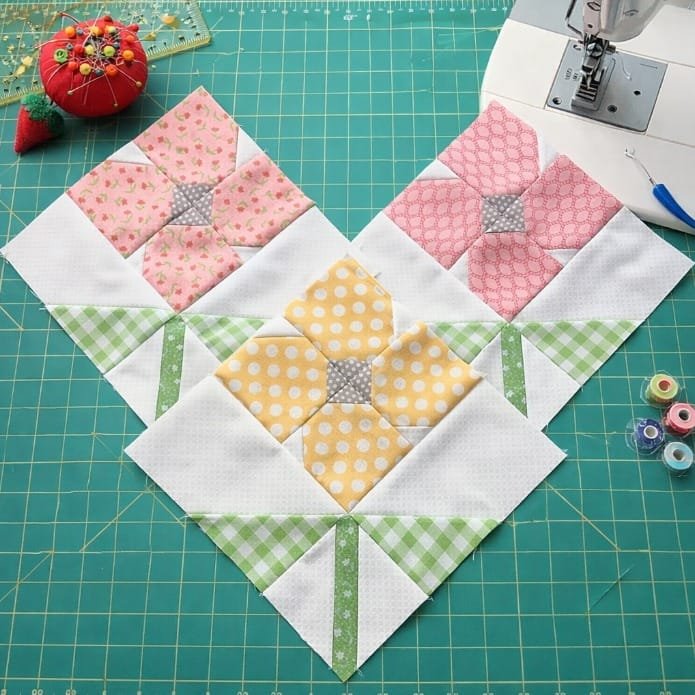
Selecting the right fabrics is the first critical step in How to Make a Flower Quilt Block Pattern successfully. Cotton quilting fabric is highly recommended because it is stable, easy to press, and durable. Choose one fabric for the flower center, one or more coordinating prints for petals, and a contrasting or complementary fabric for the background. High contrast between petals and background helps the floral shape stand out clearly.
Before cutting, wash and press your fabrics to remove shrinkage and wrinkles. Accurate pressing ensures that measurements remain consistent. Use a rotary cutter, self-healing cutting mat, and quilting ruler to cut precise squares and rectangles. Precision at this stage directly affects the symmetry of your finished flower block.
Most traditional flower quilt blocks finish at sizes such as 8, 10, or 12 inches. Decide your finished size before cutting. Remember to account for seam allowances, typically ¼ inch per side. For example, a 12-inch finished block will require slightly larger cut pieces to allow for seam construction.
Color placement planning is equally important. Lay out your cut pieces on a flat surface before sewing. This allows you to visualize petal positioning and ensure color balance. Taking time to plan reduces mistakes and improves overall design cohesion.
Constructing the Flower Center and Petals
The flower center forms the focal point of your Flower Quilt Block Pattern. Start by cutting a square that will serve as the center. This square is usually positioned in the middle of the block layout grid. Sew background squares or petal units around it, depending on your chosen design.
There are two primary methods to create petals: piecing or appliqué. Pieced petals involve sewing triangular or diamond-shaped fabric units around the center square. This method produces a geometric flower appearance and is ideal for traditional quilt styles.
Appliqué petals, on the other hand, allow for curved shapes. Cut petal shapes from fabric and attach them to a background square using either machine stitching or hand stitching. This method creates softer, more organic floral designs. Both techniques are effective; your choice depends on personal style preference.
If using piecing, construct petal units by sewing half-square triangles or flying geese blocks. Press seams carefully after each step. Always press to one side rather than ironing back and forth, as this prevents fabric stretching.
After assembling individual units, sew rows together. Maintain a consistent ¼ inch seam allowance. Align seams carefully and use pins to prevent shifting. Accurate seam alignment ensures the flower appears centered and symmetrical.
Assembling and Squaring the Quilt Block
Once petals and center units are complete, it is time to assemble the full Flower Quilt Block Pattern. Lay out all pieces according to your planned design. Double-check orientation before sewing. Small rotation errors can disrupt the entire pattern.
Sew pieces into horizontal rows first. Press seams in alternating directions between rows to reduce bulk when joining them together. This nesting technique helps seams lock together neatly.
After joining rows, press the entire block flat. Use a ruler to measure the unfinished size. If necessary, trim edges carefully to square the block. Squaring ensures that all blocks will align properly when assembling the full quilt top.
Precision during this stage directly impacts the overall quilt quality. Even minor measurement inconsistencies can cause distortion in larger quilt layouts. Taking time to square each block improves final results significantly.
If you plan to make multiple flower blocks, consistency is key. Repeat cutting and sewing methods exactly for each block to maintain uniformity across the quilt.
Creative Variations and Design Ideas
One of the most exciting aspects of How to Make a Flower Quilt Block Pattern is the variety of design possibilities. You can create daisy-inspired blocks with simple white petals and yellow centers, or bold modern blooms using bright geometric prints.
Layered flower blocks add depth by combining multiple petal layers. This can be achieved through layered appliqué techniques or by constructing additional pieced petal rounds around the center.
You may also experiment with negative space. Instead of filling the entire block with petals, leave more background fabric visible for a minimalist floral look. This approach works well in contemporary quilt designs.
Scrap fabric flower blocks are another popular option. Mixing leftover fabrics into petal sections creates a vibrant, textured appearance. This method is budget-friendly and visually dynamic.
Seasonal themes are also easy to incorporate. Soft pastels create spring-inspired flower blocks, while warm reds and oranges work beautifully for autumn quilts.
FAQ
What is the easiest method for beginners learning How to Make a Flower Quilt Block Pattern?
Pieced flower blocks using half-square triangles are generally easier for beginners because they rely on straight seams and geometric shapes rather than curved appliqué stitching.
What size should a Flower Quilt Block Pattern be?
Common finished sizes include 8, 10, or 12 inches. The size depends on your overall quilt layout and desired design scale.
Can I use scrap fabric for a Flower Quilt Block Pattern?
Yes, scrap fabric works wonderfully for petal sections and adds visual interest to the final design.
How do I ensure my flower block stays square?
Maintain a consistent ¼ inch seam allowance, press seams properly, and trim edges carefully using a quilting ruler.
Is appliqué better than piecing for flower blocks?
Both methods are effective. Appliqué allows curved shapes, while piecing creates structured geometric petals.
Conclusion
Learning How to Make a Flower Quilt Block Pattern opens the door to countless quilting possibilities. From fabric selection and careful cutting to petal construction and final assembly, each step builds essential quilting skills. With patience, precision, and creativity, you can craft stunning floral quilt blocks that elevate any quilting project. If this guide helped you understand the process, please share your honest thoughts and suggestions. Your feedback helps improve future tutorials and supports a growing community of passionate quilters.

