How to Make a Fabric Fish Pattern is a delightful sewing project that combines creativity, practicality, and beginner-friendly techniques into one rewarding experience. Learning how to make a Fabric Fish Pattern allows you to craft decorative pieces perfect for nurseries, beach-themed rooms, educational toys, or handmade gifts.
Fabric fish can be made in various sizes and styles, ranging from simple flat ornaments to softly stuffed plush decorations. With thoughtful fabric selection and careful stitching, this project transforms basic sewing materials into charming handmade creations.
Understanding how to make a Fabric Fish Pattern also opens the door to customization and artistic expression. You can experiment with bold prints, textured fabrics, embroidery details, or appliqué techniques to create unique fish designs.
Whether you prefer realistic ocean-inspired tones or playful rainbow colors, the flexibility of this pattern makes it suitable for all ages and décor themes. The process is straightforward, making it ideal for beginners while still offering room for creative expansion for more experienced sewists.
Another reason many crafters enjoy learning how to make a Fabric Fish Pattern is its versatility. These fabric fish can serve as soft toys, decorative garlands, nursery mobiles, cushion accents, or even quilting appliqués. By adjusting size and finishing details, you can tailor the project to suit different purposes. Throughout this tutorial, you will discover how to prepare materials, draft a simple pattern template, sew and assemble the fish, and add finishing touches for a polished final result.
Choosing Fabrics and Materials
Selecting the right materials is the first essential step in how to make a Fabric Fish Pattern. Cotton fabric is an excellent choice because it is easy to sew, durable, and available in countless prints and colors. Linen blends provide a slightly textured, natural look, while felt works well for simplified decorative fish. For stuffed fish, lightweight cotton or quilting fabric is recommended for smooth seams.
You will need basic sewing supplies including fabric scissors, pins or clips, a sewing machine or needle and thread for hand sewing, polyester fiberfill stuffing, and coordinating thread. Optional embellishments include buttons (for decorative purposes only), embroidery floss, ribbons, or small fabric scraps for fins and tails. Always ensure embellishments are securely attached if the fish is intended for children.
Before cutting fabric, pre-wash and press to remove wrinkles and prevent shrinkage. Proper preparation ensures clean edges and professional results in your finished fabric fish.
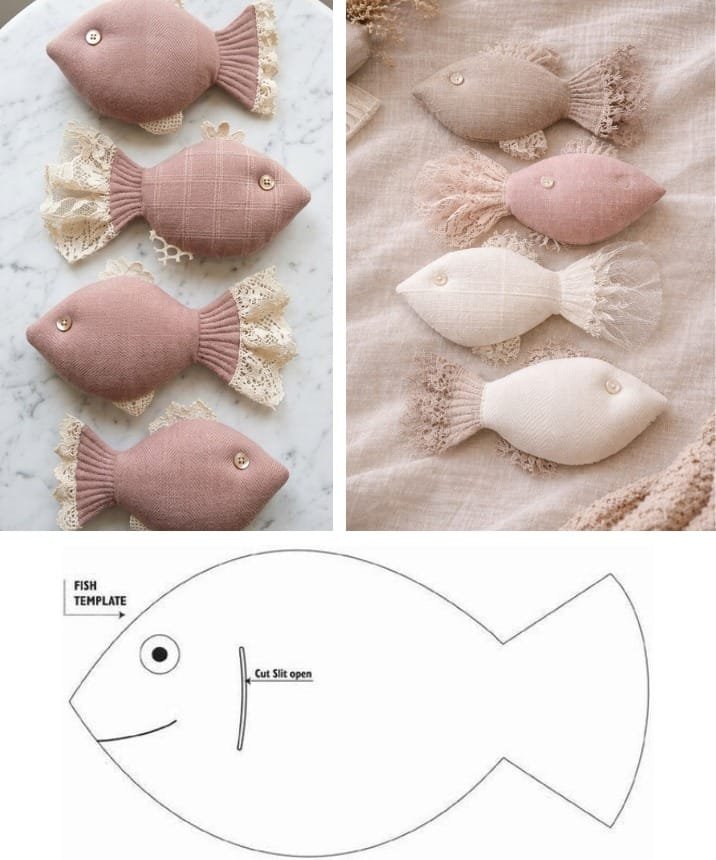
Drafting the Fabric Fish Pattern
To begin how to make a Fabric Fish Pattern, create a simple template on paper. Draw an oval shape for the body and add a triangular tail extension at one end. You may also sketch small fin shapes for added dimension. Keep the design simple for beginners, or experiment with curved lines for a more realistic silhouette.
Once satisfied with the shape, cut out the paper template. Place it on folded fabric and trace around it with a washable fabric marker, leaving approximately a ¼ inch seam allowance. Cut two identical body pieces. If adding separate fins, cut those pieces as well.
Using a template ensures consistency, especially if you plan to create multiple fish. You can resize the template to make smaller ornaments or larger plush decorations.
Sewing and Assembling the Fish
Place the two body pieces right sides together. Pin around the edges, leaving a small opening along the bottom edge for turning and stuffing. Sew along the traced line using a straight stitch and consistent seam allowance. If sewing by hand, use small, even backstitches for durability.
Clip small notches along curved edges to reduce bulk and allow the fabric to lay flat when turned right side out. Carefully turn the fish through the opening using your fingers or a blunt tool. Gently press the seams with an iron for a crisp finish.
Stuff the fish evenly with fiberfill, ensuring the tail and corners are filled but not overstuffed. Once satisfied with the shape, close the opening using a ladder stitch for an invisible seam.
Adding Decorative Details
Decorative elements bring personality to your Fabric Fish Pattern. You can embroider eyes and scales using simple stitches such as satin stitch or French knots. Appliqué fabric circles can create playful eyes, while contrasting fabric strips can be sewn onto the body for colorful stripes.
For a more dimensional look, sew separate fins between the body layers before stitching the main seam. Ribbons or loops can be added at the top if the fish will be used as hanging décor. Keep embellishments secure and proportionate to maintain a balanced appearance.
Take your time during this stage, as finishing details elevate the overall quality of your handmade project. Small accents can make each fish unique and expressive.
Creative Uses and Variations
Once you understand how to make a Fabric Fish Pattern, you can explore numerous variations. Create a series of fish in coordinating colors to form a nursery garland. Sew multiple sizes and combine them into a themed cushion cover. For educational purposes, label each fish with different ocean species names using embroidery.
Seasonal adaptations are also possible. Use festive fabrics for holiday décor or soft pastel prints for baby showers. You can even incorporate patchwork techniques for a quilted fish design. The possibilities are endless when combining creativity with sewing fundamentals.
This project is also an excellent way to use fabric scraps, making it both eco-friendly and budget-conscious.
FAQ
1. Is this pattern suitable for beginners?
Yes, the Fabric Fish Pattern is beginner-friendly and requires only basic sewing skills.
2. What fabric works best?
Cotton or quilting fabric is ideal for easy sewing and durability.
3. Can I hand sew instead of using a machine?
Absolutely. Use tight, even stitches for durability.
4. How do I prevent bulky seams?
Clip curves before turning the fabric right side out.
5. Is stuffing necessary?
No, you can create flat decorative fish without stuffing if preferred.
6. Can I wash the finished fish?
Yes, follow fabric care instructions. Most cotton fabrics are machine washable on gentle cycles.
Conclusion
Learning how to make a Fabric Fish Pattern is a fun and versatile sewing project that blends creativity with practical skill-building. By selecting quality materials, drafting a simple template, sewing carefully, and adding thoughtful decorative details, you can create charming fabric fish for various uses. This project is suitable for beginners yet flexible enough for advanced customization. If you enjoyed this tutorial, please share your honest opinion and suggestions. Your feedback helps inspire future sewing guides and creative ideas.
Beyond its decorative possibilities, mastering how to make a Fabric Fish Pattern also strengthens essential sewing skills such as accurate cutting, seam alignment, and curved stitching techniques. Projects like this help build confidence, especially for beginners who want to practice working with simple shapes before moving on to more complex designs. The repetition involved in creating multiple fish improves precision and consistency, which are fundamental abilities in sewing. Over time, these small projects contribute to greater craftsmanship and a deeper understanding of fabric handling.
Additionally, the Fabric Fish Pattern offers a wonderful opportunity for meaningful handmade gifting. Creating a set of personalized fish in coordinated colors can make a thoughtful present for baby showers, birthdays, or themed room décor. Handmade items often carry sentimental value because they reflect time, care, and creativity.
VIDEO TUTORIAL
By experimenting with different prints, textures, and embellishments, you can develop your own signature style. With patience and imagination, this simple sewing project becomes a lasting expression of artistic passion and skill.

