Sewing Fabric Snail Tutorial is a delightful and beginner-friendly project that brings charm and creativity into your sewing routine. Whether you are new to stitching or an experienced crafter looking for a quick and rewarding make, this sewing fabric snail tutorial offers a perfect balance of simplicity and personality. Fabric snails are soft, decorative, and incredibly versatile—they can be used as nursery décor, shelf accents, handmade gifts, or even playful educational toys.
In the world of handmade crafts, small stuffed projects are ideal for practicing precision, experimenting with fabric combinations, and refining your sewing skills. A fabric snail pattern allows you to explore curves, stuffing techniques, appliqué details, and even embroidery in a manageable format. Unlike large projects that require extensive cutting and assembly, this design is compact, approachable, and satisfying to complete in just a few hours.
If you’ve been searching for an easy and creative sewing idea, this DIY fabric snail project may be exactly what you need. Throughout this comprehensive guide, you’ll learn about materials, pattern preparation, step-by-step construction, customization ideas, and practical tips. By the end, you’ll feel confident creating your own adorable snail while enhancing your sewing abilities.
Materials and Preparation for Your Fabric Snail Pattern
Before beginning your sewing fabric snail tutorial, gathering the right materials ensures a smooth and enjoyable process. You will need cotton fabric for the body and shell, coordinating thread, fabric scissors, pins, stuffing, a sewing machine or needle for hand sewing, and optional embroidery thread for details.
Choosing the right fabric is important for structure and appearance. Medium-weight cotton works beautifully for a fabric snail pattern, as it is easy to handle and holds shape well after stuffing. You can mix solid fabrics with patterned prints to create visual contrast between the body and the shell.
Start by washing and ironing your fabric. Pre-washing prevents shrinkage and ensures your finished DIY fabric snail maintains its shape over time. Pressed fabric also allows for more accurate cutting and cleaner stitching.
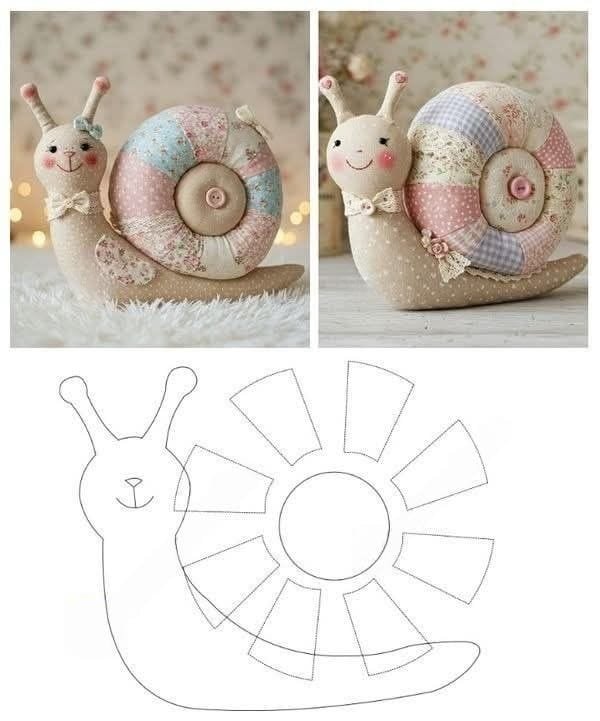
Next, prepare your pattern pieces. A basic fabric snail pattern includes a body shape with a curved back and a circular or spiral shell piece. You can draw the shapes freehand on paper or print a simple template to trace onto fabric.
When tracing onto fabric, remember to include seam allowances—typically ¼ inch. Accurate cutting ensures that your sewing fabric snail tutorial results in symmetrical and well-proportioned pieces.
Before stitching, organize all your pieces and tools in one place. A tidy workspace helps you stay focused and prevents mistakes while assembling your handmade snail.
Step-by-Step Sewing Instructions for a DIY Fabric Snail
Begin your sewing fabric snail tutorial by placing the body fabric pieces right sides together. Pin around the edges to secure them before stitching. Leave a small opening at the bottom for turning and stuffing.
Using a straight stitch, sew along the curved edges carefully. Since the snail’s body contains rounded shapes, sewing slowly helps maintain smooth lines. Trim seam allowances slightly around curves to reduce bulk in your fabric snail pattern.
Turn the body right side out through the opening. Use a blunt tool to gently push out corners and curves. Press lightly if needed to define the shape of your DIY fabric snail.
Stuff the body with polyester fiberfill. Add small amounts gradually to avoid lumps. Even stuffing ensures your snail looks balanced and sits properly once complete.
Close the opening with a ladder stitch or neat topstitch. A discreet closure gives your sewing fabric snail tutorial project a polished and professional finish.
For the shell, cut two circular pieces of fabric. Stitch them right sides together, leaving a small opening. Turn, stuff lightly, and close the seam. Then attach the shell securely to the snail’s back using hand stitching for stability.
Adding Personality and Decorative Details
The most enjoyable part of a sewing fabric snail tutorial is adding personality. Embroider simple eyes or attach small felt pieces for facial features. For children’s toys, embroidered details are safer than plastic embellishments.
You can stitch a spiral design onto the shell before attaching it to the body. This enhances the classic look of a fabric snail pattern and adds texture to the finished piece.
Consider using contrasting thread for decorative topstitching. Subtle details like this elevate your DIY fabric snail and showcase your craftsmanship.
Fabric scraps can be used creatively for antennae. Fold small strips of fabric, stitch them into thin tubes, and lightly stuff before attaching to the head area.
Another customization idea is adding lace trim, small bows, or patchwork shell panels. These elements make your sewing fabric snail tutorial project unique and gift-worthy.
You can also experiment with different sizes. Using larger pattern pieces creates a statement décor item, while smaller versions work beautifully as shelf accents or party favors.
Practical Uses and Creative Applications
A finished fabric snail pattern project can serve many purposes. In nurseries, these soft snails add a whimsical touch to shelves or changing tables.
They can also function as educational toys, helping children explore textures and shapes safely. A well-made DIY fabric snail encourages imaginative play without the need for electronic components.
If you enjoy seasonal décor, consider creating themed versions of your snail. Festive fabrics can transform your sewing fabric snail tutorial into holiday decorations.
These snails also make thoughtful handmade gifts. Personalizing colors to match a recipient’s room or favorite palette adds sentimental value.
For crafters who sell handmade items, a fabric snail pattern can become a signature product. Its small size makes it efficient to produce while still offering strong visual appeal.
Additionally, this project is perfect for using leftover fabric scraps, reducing waste and maximizing creativity in your sewing practice.
FAQ About Sewing Fabric Snail Tutorial
Is the sewing fabric snail tutorial suitable for beginners?
Yes, this project is beginner-friendly and ideal for practicing curves and basic stuffing techniques.
What type of fabric works best for a fabric snail pattern?
Medium-weight cotton is recommended because it is easy to sew and holds shape well after stuffing.
Can I hand-sew a DIY fabric snail?
Absolutely. While a sewing machine speeds up the process, hand stitching works perfectly for this project.
What stuffing should I use?
Polyester fiberfill is lightweight, washable, and commonly used for soft toy projects like this one.
How long does it take to complete?
Most crafters can finish a sewing fabric snail tutorial project within 2–4 hours, depending on details and customization.
Is it safe for children?
Yes, if you avoid small detachable pieces and secure all stitching properly, the snail can be child-friendly.
Conclusion
The Sewing Fabric Snail Tutorial offers a creative, relaxing, and rewarding sewing experience. Throughout this guide, we covered essential materials, step-by-step construction, decorative ideas, and practical uses for your fabric snail pattern. This charming project is perfect for beginners looking to build confidence and experienced sewists wanting a quick, enjoyable make.
By following this DIY fabric snail guide, you can transform simple fabric pieces into a delightful handmade creation. Small projects like this not only enhance your technical skills but also bring joy and personality into your crafting routine.
VIDEO TUTORIAL
Now we would love to hear from you. Have you tried this sewing fabric snail tutorial? Share your honest opinion, creative variations, or suggestions. Your feedback can inspire others to start their own handmade sewing adventure.

