Zippered Fanny Pack Tutorial is a practical and creative sewing project that combines functionality, modern style, and handmade charm into one versatile accessory. The Zippered Fanny Pack Tutorial has become increasingly popular among sewing enthusiasts who want to create useful items that fit into everyday life while showcasing personal craftsmanship.
One of the biggest advantages of following a Zippered Fanny Pack Tutorial is the opportunity to learn essential sewing techniques in a single project. From installing zippers to working with structured fabrics and straps, this tutorial brings together multiple skills in a clear and approachable way.
The Zippered Fanny Pack Tutorial also allows for extensive personalization. Fabric choices, pocket layouts, strap length, and finishing details can all be customized to suit individual preferences. This makes the project appealing not only to beginners looking to expand their skills but also to experienced sewists who enjoy modifying patterns and experimenting with design details.
In addition to its creative value, the Zippered Fanny Pack Tutorial aligns well with sustainable sewing practices. Making your own bag encourages mindful consumption, fabric reuse, and long-lasting construction. Instead of purchasing fast-fashion accessories, sewists can create a durable, reusable item that reflects both style and intention.
By following a well-structured Zippered Fanny Pack Tutorial, you gain more than just a finished bag. You develop practical sewing knowledge, improve accuracy and patience, and experience the satisfaction of completing a project that is both attractive and useful in daily life.
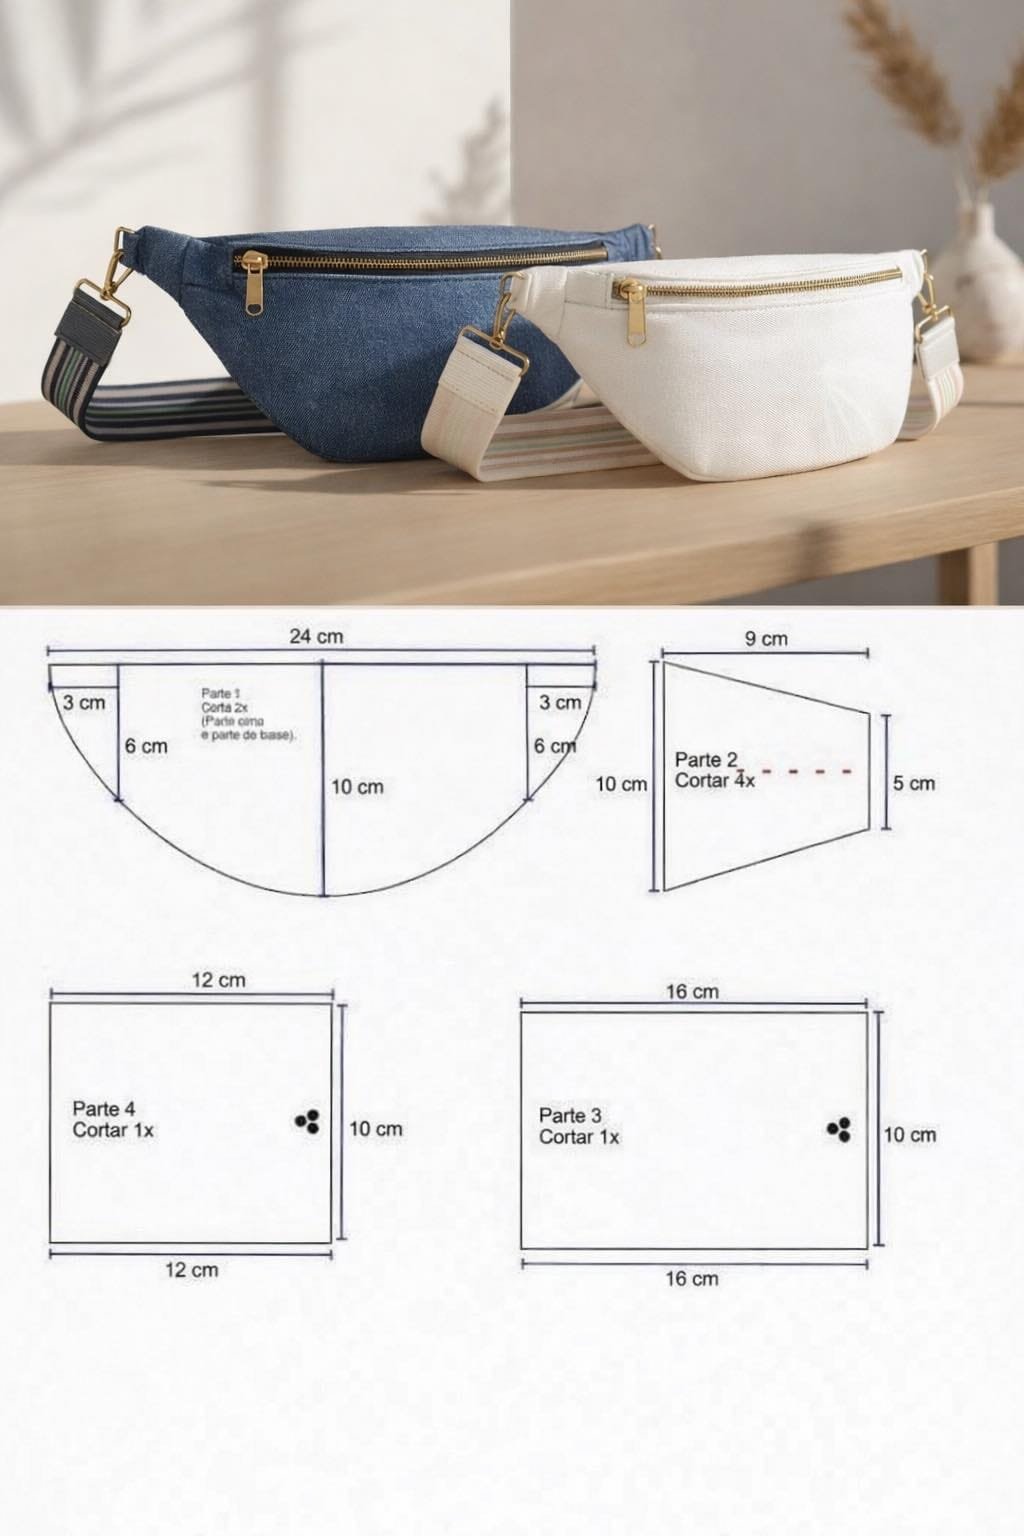
Understanding the Structure of a Zippered Fanny Pack
The foundation of any Zippered Fanny Pack Tutorial begins with understanding the basic structure of the bag. Most fanny packs consist of a main body panel, a lining, a zipper opening, and an adjustable strap. This simple yet effective construction allows the bag to sit comfortably against the body while securely holding personal items.
In a typical Zippered Fanny Pack Tutorial, the bag body is designed with a slight curve to follow the natural shape of the waist or hips. This curved structure improves comfort and prevents the bag from feeling bulky or awkward when worn. Accurate cutting and careful seam alignment are essential at this stage to ensure a clean final shape.
The zipper is a defining element of the Zippered Fanny Pack Tutorial. It provides security and functionality while also contributing to the bag’s overall aesthetic. Zippers may be installed straight or along a curved opening, depending on the design. Learning proper zipper installation techniques is one of the most valuable skills gained from this tutorial.
Many variations of the Zippered Fanny Pack Tutorial include additional features such as front pockets, internal slip pockets, or zippered compartments. These optional elements enhance organization and allow sewists to tailor the bag to specific needs, such as carrying a phone, keys, or small personal items.
The strap system is another important structural component in the Zippered Fanny Pack Tutorial. Adjustable straps, usually made with webbing and hardware, allow the bag to be worn around the waist or across the body. Proper attachment and reinforcement ensure durability and long-term use.
Understanding how each part of the bag works together is essential when following a Zippered Fanny Pack Tutorial. This knowledge makes assembly smoother and helps troubleshoot common issues during construction.
Fabric, Materials, and Tools for the Zippered Fanny Pack Tutorial
Choosing the right materials is crucial for success in a Zippered Fanny Pack Tutorial. The outer fabric should be durable enough to withstand regular use while maintaining its shape. Popular choices include canvas, denim, corduroy, and quilting cotton reinforced with interfacing.
Interfacing plays a key role in the Zippered Fanny Pack Tutorial, as it provides structure and stability. Fusible interfacing or foam stabilizers help the bag hold its form and give it a professional appearance. The weight of the interfacing should be matched carefully to the fabric to avoid stiffness or sagging.
For the lining, lightweight cotton fabrics are commonly used in a Zippered Fanny Pack Tutorial. A smooth lining makes it easier to access contents and adds a polished finish to the interior of the bag. Lining fabrics also offer an opportunity to introduce contrasting colors or playful prints.
Zipper selection is another important consideration in the Zippered Fanny Pack Tutorial. Nylon coil zippers are often preferred due to their flexibility, especially when sewing along curves. Choosing a zipper slightly longer than required makes installation easier and allows for cleaner finishing.
Essential tools for the Zippered Fanny Pack Tutorial include a sewing machine, zipper foot, fabric scissors or rotary cutter, pins or clips, and basic measuring tools. Having all materials prepared before starting helps maintain a smooth workflow and reduces errors.
High-quality materials significantly enhance the outcome of the Zippered Fanny Pack Tutorial, ensuring the finished bag is sturdy, functional, and visually appealing.
Step-by-Step Sewing Process in the Zippered Fanny Pack Tutorial
The Zippered Fanny Pack Tutorial usually begins with cutting all fabric pieces according to the pattern instructions. Accurate cutting is critical, as even small discrepancies can affect alignment during assembly. Labeling pieces can help keep everything organized.
Next, interfacing is applied to the outer fabric pieces in the Zippered Fanny Pack Tutorial. This step reinforces the fabric and prepares it for construction. Careful pressing ensures the interfacing adheres smoothly without wrinkles or bubbles.
Zipper installation is often the most anticipated part of the Zippered Fanny Pack Tutorial. The zipper is sewn between the outer fabric and lining, creating a clean and professional opening. Taking time to align edges and sew slowly improves accuracy and confidence.
Once the zipper is installed, the main body of the bag is assembled in the Zippered Fanny Pack Tutorial. This involves stitching the outer panels and lining together, usually leaving a small opening for turning the bag right side out. This step brings the bag’s shape to life.
Strap attachment is another key stage in the Zippered Fanny Pack Tutorial. Webbing straps are measured, hardware is added, and ends are securely sewn into the bag seams. Reinforcement stitches ensure the strap can support the bag’s weight during use.
Finally, the bag is turned right side out, the lining opening is closed, and final topstitching may be added. These finishing touches in the Zippered Fanny Pack Tutorial enhance durability and give the bag a polished, store-quality appearance.
Customization, Styling, and Practical Uses
One of the most enjoyable aspects of the Zippered Fanny Pack Tutorial is customization. Fabric combinations allow sewists to express personal style, whether through bold prints, neutral tones, or textured materials. Color blocking and contrast zippers add visual interest.
Size adjustments are also common in the Zippered Fanny Pack Tutorial. By modifying pattern dimensions, sewists can create compact minimalist bags or larger versions that hold more essentials. This flexibility makes the pattern suitable for different lifestyles.
The Zippered Fanny Pack Tutorial supports functional customization as well. Adding internal pockets, key loops, or extra compartments increases organization. These features are especially useful for travel or daily commuting.
From a styling perspective, items made from the Zippered Fanny Pack Tutorial can be worn in multiple ways. Around the waist, across the chest, or over the shoulder, the bag adapts easily to different outfits and occasions.
Handmade fanny packs are also popular gift items. The Zippered Fanny Pack Tutorial allows sewists to create thoughtful, personalized gifts that combine usefulness with sentimental value.
For small business owners, the Zippered Fanny Pack Tutorial offers strong selling potential. Well-made, handmade bags appeal to customers seeking unique, high-quality accessories.
FAQ About the Zippered Fanny Pack Tutorial
Is the Zippered Fanny Pack Tutorial suitable for beginners?
Yes, the Zippered Fanny Pack Tutorial is beginner-friendly when instructions are followed carefully, especially for those new to zippers.
What fabric works best for the Zippered Fanny Pack Tutorial?
Durable fabrics like canvas, denim, or reinforced cotton are ideal for the Zippered Fanny Pack Tutorial.
Do I need special tools for the Zippered Fanny Pack Tutorial?
A zipper foot and basic sewing tools are sufficient for most versions of the Zippered Fanny Pack Tutorial.
Can I resize the Zippered Fanny Pack Tutorial?
Yes, the Zippered Fanny Pack Tutorial can be adjusted in size to suit personal needs.
How long does it take to complete the Zippered Fanny Pack Tutorial?
Most sewists complete the Zippered Fanny Pack Tutorial in a few hours to a full day.
Can I sell items made from the Zippered Fanny Pack Tutorial?
Many tutorials allow selling finished items, but it’s important to review individual usage terms.
Conclusion
The Zippered Fanny Pack Tutorial is a rewarding sewing project that blends creativity, practicality, and skill development. Throughout this article, we explored the structure, materials, sewing process, and customization options involved in the Zippered Fanny Pack Tutorial, showing how accessible and versatile this project can be.
VIDEO TUTORIAL
Whether you are sewing for personal use, gifting, or selling handmade items, this tutorial offers lasting value and satisfaction. Leave an honest opinion and share your suggestions or experiences, as your feedback helps inspire and guide future sewing projects.

