Crochet Cage Tile Pattern Tutorial is a striking and versatile crochet technique that has gained popularity among makers who love textured designs with a modern and geometric feel. The Crochet Cage Tile Pattern Tutorial focuses on creating a raised, lattice-like surface that resembles tiled structures or cage-style grids, making it perfect for blankets, cushions, bags, garments, and decorative home projects.
From the first rows, the Crochet Cage Tile Pattern Tutorial introduces crocheters to a design that looks complex but is built from well-structured, repeatable steps. This balance between sophistication and accessibility is what makes the pattern so appealing.
In this complete article, you will learn everything about the Crochet Cage Tile Pattern Tutorial, including how the pattern works, which materials are best, the stitches involved, texture development, customization ideas, common uses, and answers to the most frequently asked questions.
Whether you are a beginner looking to expand your stitch vocabulary or an experienced crocheter searching for a bold new texture, the Crochet Cage Tile Pattern Tutorial offers an engaging and rewarding experience. Its repeating structure makes it ideal for mindful crafting while still delivering a visually impressive final piece.
The Crochet Cage Tile Pattern Tutorial is more than just a stitch pattern; it is a creative foundation that can be adapted and scaled for countless projects. Once mastered, it becomes a go-to design for makers who want their crochet to stand out.
Understanding the Crochet Cage Tile Pattern Tutorial
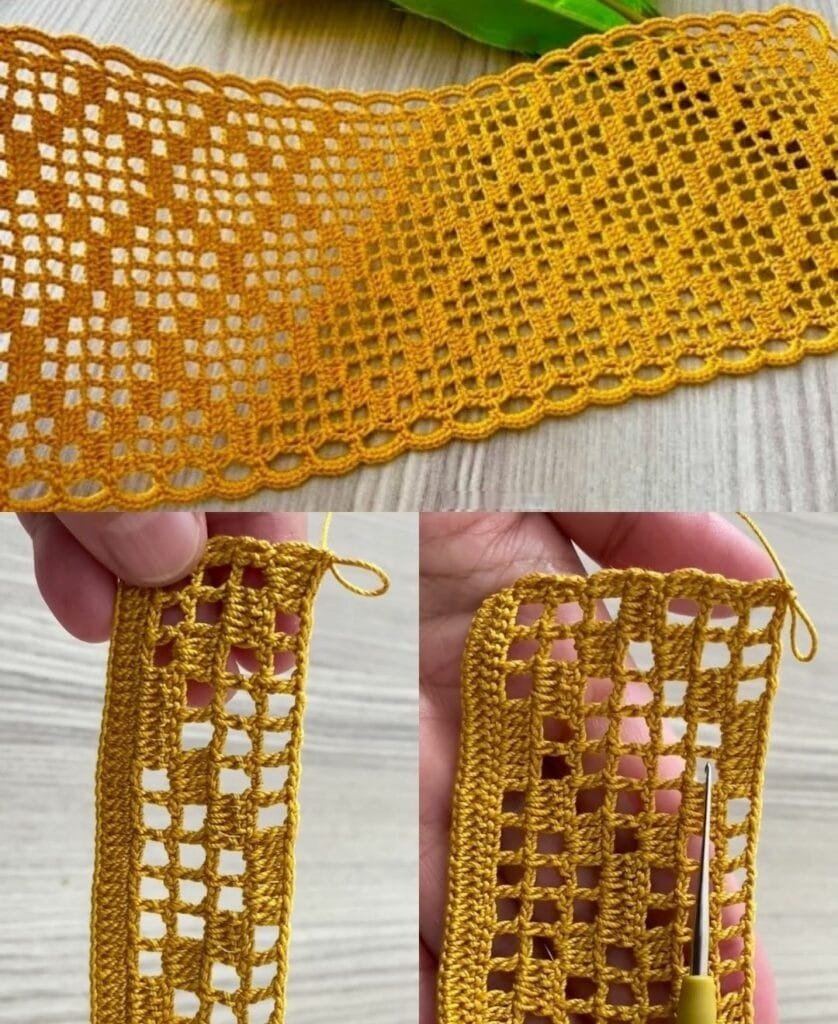
The Crochet Cage Tile Pattern Tutorial is built around the concept of raised tiles framed by open or recessed sections, creating a caged appearance. This effect is achieved through a combination of post stitches, chains, and carefully placed anchoring stitches that define each tile.
What makes the Crochet Cage Tile Pattern Tutorial unique is its three-dimensional quality. Unlike flat crochet patterns, this design creates depth by alternating between raised and recessed areas. The tiles appear to sit on top of the fabric, while the cage structure frames them neatly.
The pattern is typically worked in rows or rounds, depending on the project. Each repeat forms a tile unit that locks into the surrounding structure, ensuring consistency across the entire piece.
Although the finished texture looks intricate, the Crochet Cage Tile Pattern Tutorial relies on logical repetition. Once you understand how one tile is formed, the rest of the pattern becomes intuitive and meditative.
This pattern is often chosen by crocheters who enjoy visual impact without overly complex stitch combinations. It provides a satisfying sense of progress as each tile becomes clearly defined.
Materials and Yarn Selection for the Crochet Cage Tile Pattern Tutorial
Selecting the right materials is essential for highlighting the texture of the Crochet Cage Tile Pattern Tutorial. Because this pattern emphasizes structure and relief, yarn choice directly affects the final appearance.
Medium-weight yarns, such as worsted or aran weight, are ideal for this pattern. They provide enough body to showcase the raised tiles while remaining flexible and comfortable to work with.
Cotton yarn is a popular option for the Crochet Cage Tile Pattern Tutorial because it offers excellent stitch definition. The crisp nature of cotton helps the cage structure remain clear and well-defined, especially for home décor projects.
Acrylic yarn is another common choice due to its affordability and wide color range. When worked with consistent tension, acrylic produces a soft yet structured fabric suitable for blankets and accessories.
Blended yarns that combine cotton and acrylic can offer the best of both worlds, balancing stitch clarity with softness and durability.
Using a hook size slightly smaller than recommended for your yarn helps maintain tight stitches, which enhances the tile definition and prevents the cage sections from becoming too loose.
Stitches Used in the Crochet Cage Tile Pattern Tutorial
The Crochet Cage Tile Pattern Tutorial incorporates a combination of basic and intermediate crochet stitches. Understanding how these stitches interact is key to mastering the pattern.
Single crochet stitches are often used as anchors, providing stability and structure to the cage framework.
Double crochet stitches create height and flexibility, forming the foundation for raised sections and chain spaces.
Front post double crochet stitches are commonly used to create the raised tile effect. These stitches are worked around the post of a stitch from a previous row, pulling it forward to add dimension.
Chain stitches form the open cage sections, allowing the tiles to stand out visually. These chains also contribute to the pattern’s airy yet structured feel.
Slip stitches may be used for transitions or finishing edges, ensuring clean and polished results.
The combination of these stitches gives the Crochet Cage Tile Pattern Tutorial its distinctive look while keeping the technique approachable.
How Texture Is Created in the Crochet Cage Tile Pattern Tutorial
Texture is the defining feature of the Crochet Cage Tile Pattern Tutorial. The raised tiles are created by working stitches around previous rows, pulling them forward and stacking layers of dimension.
The cage effect comes from surrounding these raised sections with chains and recessed stitches. This contrast between high and low areas creates visual depth and tactile interest.
Consistent tension is critical. Even tension ensures that tiles are uniform and that the cage framework remains balanced.
Blocking can further enhance the texture, helping tiles settle into their intended shape and making the pattern appear more refined.
When worked in solid colors, the texture becomes the focal point. When worked in multiple colors, the tile structure becomes even more pronounced, offering endless creative possibilities.
Step-by-Step Logic Behind the Crochet Cage Tile Pattern Tutorial
The Crochet Cage Tile Pattern Tutorial follows a predictable and logical sequence. Each tile is formed over multiple rows, gradually building height and definition.
Typically, one row establishes the cage framework using chains and base stitches. The next row introduces the raised tile through post stitches anchored to earlier rows.
This alternating structure continues, with each repeat reinforcing the pattern’s rhythm. Because of this repetition, crocheters often find the Crochet Cage Tile Pattern Tutorial relaxing once the initial setup is complete.
Counting stitches and using stitch markers can help maintain accuracy, especially in larger projects.
Understanding the structure rather than memorizing rows allows crocheters to adapt the pattern easily to different sizes and shapes.
Customization Options for the Crochet Cage Tile Pattern Tutorial
Customization is one of the greatest strengths of the Crochet Cage Tile Pattern Tutorial. Small adjustments can significantly change the final look.
Color choices play a major role. Solid colors emphasize texture, while color changes per row or tile highlight the geometric design.
Using contrasting colors for the tiles and cage sections creates a bold, graphic effect.
The pattern can be scaled by adjusting stitch counts, making it suitable for everything from small swatches to large blankets.
Edge treatments such as ribbing, scallops, or simple borders can complement the structured interior design.
The Crochet Cage Tile Pattern Tutorial can also be adapted for circular projects, adding versatility to its applications.
Best Projects for the Crochet Cage Tile Pattern Tutorial
The Crochet Cage Tile Pattern Tutorial is incredibly versatile and works well for many types of projects.
Blankets and afghans benefit from the texture, creating a cozy and visually engaging fabric.
Pillow covers showcase the tile design beautifully, especially in neutral or modern color palettes.
Bags and totes gain structure and durability from the raised pattern, making them both stylish and functional.
Table runners and placemats add a sophisticated, handmade touch to home décor.
Garments such as cardigans or vests can incorporate the pattern as feature panels for added interest.
Tips for Success with the Crochet Cage Tile Pattern Tutorial
Practice the stitch combination on a small swatch before starting a large project.
Use stitch markers to identify repeat sections and avoid mistakes.
Maintain consistent tension to ensure uniform tile size.
Choose yarn colors that enhance, rather than hide, the texture.
Take breaks to prevent hand fatigue, as post stitches can be more demanding.
Review each row before moving on to catch errors early.
FAQ About the Crochet Cage Tile Pattern Tutorial
Is the Crochet Cage Tile Pattern Tutorial beginner-friendly
It is suitable for confident beginners who are comfortable with basic stitches and ready to learn post stitches.
Does this pattern use a lot of yarn
The raised texture uses slightly more yarn than flat patterns, but the result is worth it.
Can I use multiple colors
Yes, color changes work beautifully and highlight the tile structure.
Is this pattern reversible
The front side features the raised tiles, while the back has a flatter, subtler texture.
Can it be worked in the round
Yes, with slight adjustments, the pattern can be adapted for circular projects.
Conclusion
The Crochet Cage Tile Pattern Tutorial is a perfect blend of structure, texture, and creative flexibility. Throughout this article, we explored how the pattern works, which materials to use, the stitches involved, customization options, practical applications, and essential tips for success.
By learning the Crochet Cage Tile Pattern Tutorial, you gain access to a powerful crochet technique that elevates your projects with depth and visual impact. It is a pattern that rewards patience and creativity, resulting in pieces that feel both modern and timeless.
VIDEO TUTORIAL
I would love to hear your honest opinion about this tutorial. Please share your thoughts, experiences, or suggestions, and let me know how you plan to use the Crochet Cage Tile Pattern Tutorial in your own creative projects.

