The Crochet Hanging Flower-Fairy Ornament Pattern is a magical project that beautifully blends whimsy, charm, and delicate handmade detail.
These enchanting fairies bring a touch of fantasy to any space, making them perfect for hanging on Christmas trees, decorating nurseries, enhancing seasonal décor, or gifting to loved ones who adore fairy-inspired crafts.
This pattern allows crafters to explore texture, color, and imaginative design while creating ornaments that feel both joyful and timeless. Each fairy becomes a tiny piece of art, carrying personality and handmade warmth.
Working through the Crochet Hanging Flower-Fairy Ornament Pattern introduces a delightful journey of creativity.
The project combines simple stitches with charming embellishments, enabling crocheters to shape elegant dresses, flower-inspired skirts, dainty wings, and expressive facial features. This pattern is accessible even for confident beginners, as most components are small and stitched separately before being assembled into a complete ornament. The beauty lies in the customization possibilities: color palettes, hair textures, flower shapes, and even accessories can be tailored to fit personal preferences or seasonal themes.
Creating a Crochet Hanging Flower-Fairy Ornament Pattern is also a relaxing and satisfying experience. Many crocheters enjoy working on small projects because they allow quick progress and instant gratification. These fairies are ideal for using leftover yarn, experimenting with different fibers, and trying new decorative techniques such as embroidery and appliqué. They make wonderful keepsakes, thoughtful gifts, and charming décor pieces throughout the year. Whether you hang them in a sunny window, on a holiday tree, or around a child’s room, they bring a sense of wonder and magic that only handmade crafts can provide.
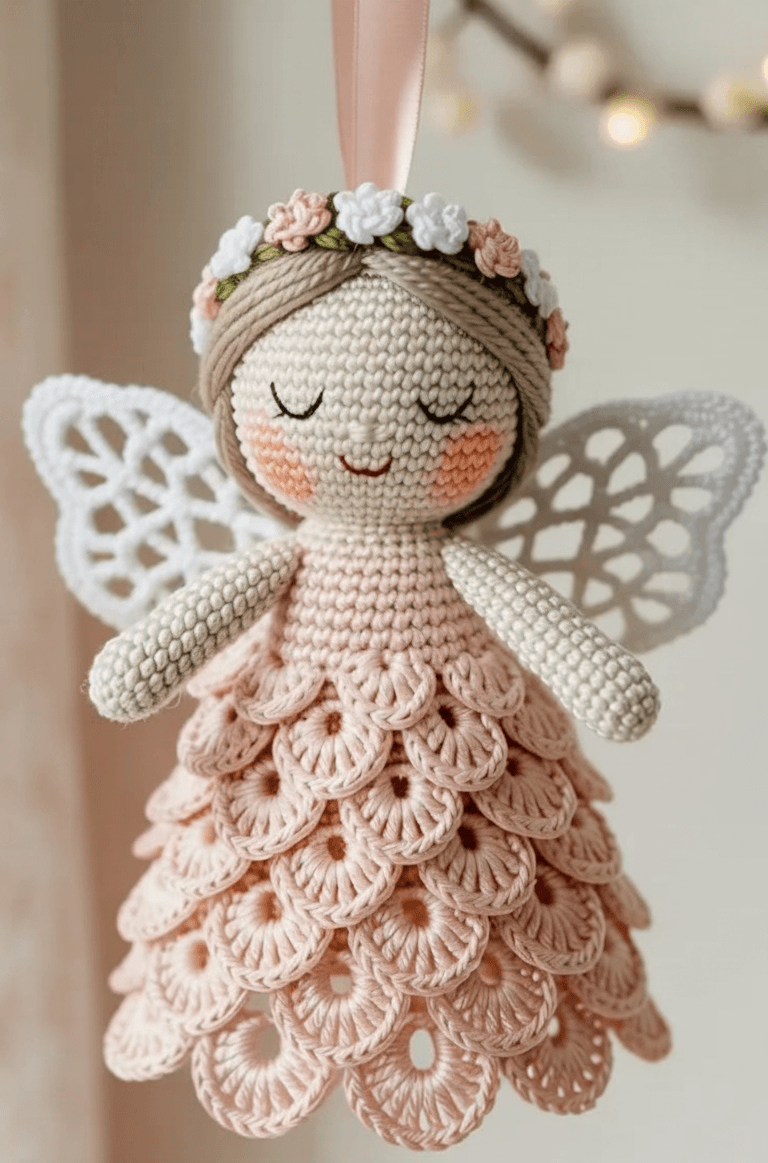
Understanding the Flower-Fairy Structure
The Crochet Hanging Flower-Fairy Ornament Pattern begins with a small body shape that forms the foundation of the fairy. This body is typically crocheted in the round, creating a neat, firm structure that holds the limbs and clothing securely. Keeping consistent tension ensures the body remains smooth and proportional.
The head is usually a larger sphere connected to the body or attached separately. Many crafters embroider simple eyes and a smile to give the fairy a sweet expression. Some add tiny blush details with fabric paint or soft yarn for a warm, whimsical appearance.
The flower-inspired skirt or dress is one of the most recognizable features of the fairy. Petals are created individually or worked as layers using shell stitches, picots, or ruffles to mimic natural floral shapes. These details give the ornament its delicate, fairy-tale charm.
Wings are essential to the design and can be crocheted using lace-like stitches, mesh patterns, or simple shapes. Light, airy yarns enhance the wing effect by creating a gentle, ethereal look that stands out against the dress.
Hair can be styled in various ways, from long braids to curly strands or simple buns. The yarn texture you choose—smooth, fluffy, or wavy—greatly influences the fairy’s personality and aesthetic.
Finally, a hanging loop is added at the top of the head or attached to a small crocheted hat or flower crown. This loop allows the fairy to be displayed as an ornament anywhere you wish.
Materials Needed for a Flower-Fairy Ornament
Creating the Crochet Hanging Flower-Fairy Ornament Pattern requires only small amounts of yarn, making it ideal for stash-busting. Most crafters prefer cotton or acrylic yarn for crisp stitch definition, though fine and lightweight yarns produce more delicate results.
A crochet hook size between 2.25 mm and 3.5 mm works best for ornament-sized fairies. Using a smaller hook ensures tight stitches that help the fairy hold its shape and maintain durability over time.
A yarn needle is essential for sewing body parts, attaching the wings, weaving in ends, and adding embroidered features. Using a needle with a sharp tip can help with precise detailing.
Polyester fiberfill or similar stuffing material is used to shape the head and body. Only a small amount is needed, but it plays a key role in achieving a smooth, even finish.
Optional embellishments such as beads, sequins, small ribbons, or miniature flowers can be added to enhance the fairy’s outfit. These decorative touches make each ornament unique and more expressive.
Finally, you may want to use a bit of fine thread or transparent fishing line for the hanging loop if you prefer an invisible effect. This choice makes the fairy appear as though it is floating in the air.
How to Crochet the Fairy Body and Features
To begin the Crochet Hanging Flower-Fairy Ornament Pattern, start by crocheting the head using a small sphere pattern worked in continuous rounds. Increase and decrease stitches evenly to shape the ball, making sure the stuffing is smooth and firm.
Next, crochet the body as a tapered shape or cylinder. This section does not require stuffing in some patterns, but adding a small amount can create a more structured form. Keep your stitches tight for stability.
The arms and legs are usually made from simple chains or small tubes. These limbs give the fairy character and movement, especially when positioned creatively or slightly angled outward.
Once the body and limbs are complete, attach them securely using sewing techniques. Ensure the limbs are symmetrical and firmly connected so they maintain their position without sagging.
Creating the face involves embroidering small eyes and a smile. Minimal facial features help maintain the fairy’s sweet, gentle appearance. Simplicity enhances the charm of the design.
After completing the basic body, move on to adding clothing, wings, hair, and decorative details. Each component individually contributes to the magical personality of the finished fairy.
Decorating and Assembling the Flower-Fairy Ornament
The flower-inspired skirt is typically crocheted using petal shapes or layered ruffles. Colors like pink, lavender, yellow, and soft blue are common choices, but any palette can work. Secure the skirt around the body with neat, hidden stitches.
Add the wings by positioning them symmetrically on the fairy’s back. Using lighter yarn or lace patterns helps the wings stand out elegantly against the dress.
Crochet or attach hair next. Many crafters enjoy experimenting with hairstyles—long curls, tiny buns, side braids, or loose waves all add charm. Stitch the hairline securely to prevent unraveling.
A flower crown, tiny hat, or delicate headpiece can be added to emphasize the fairy theme. These small details instantly elevate the ornament’s visual appeal.
Add embellishments such as tiny beads on the dress, sequins on the wings, or a ribbon around the waist. These details make the ornament sparkle and feel more enchanting.
Finally, sew a hanging loop onto the top of the head or crown. Ensure the loop is securely attached so the ornament can hang safely without slipping or stretching.
FAQ About the Crochet Flower-Fairy Ornament
1. Is this pattern suitable for beginners?
Yes, confident beginners can complete it since most parts use basic stitches and simple shaping.
2. What yarn works best for the fairy?
Cotton or acrylic yarn in lightweight categories creates crisp details and a neat finish.
3. Can I personalize the fairy’s colors?
Absolutely. You can create seasonal fairies, pastel fairies, or even themed fairies based on holidays.
4. How large is the final ornament?
Most ornaments measure between 10 cm and 15 cm, depending on yarn thickness and hook size.
5. Can I sell finished ornaments?
Yes, handmade fairies are popular at craft fairs, online shops, and during the holiday season.
Conclusion
The Crochet Hanging Flower-Fairy Ornament Pattern is a magical project that fills any space with charm, creativity, and handmade beauty. These delicate fairies make wonderful gifts, stunning decorations, and unforgettable keepsakes.
With endless possibilities for personalization, each ornament becomes a unique expression of your imagination. I hope this article inspires you to create your own collection of flower-fairy ornaments.

