How to Sew Cross Back Apron Pattern is a wonderfully practical skill for anyone who enjoys sewing and wants to create a comfortable, stylish, and functional apron for everyday tasks. The cross-back apron style has become extremely popular because it offers excellent coverage, easy wearability, and a beautiful handmade charm.
Unlike traditional aprons that rely on neck ties or tight straps, the cross-back design distributes weight evenly across the shoulders, making it ideal for cooking, gardening, crafting, and general home projects. Learning to sew this apron style is rewarding and accessible for beginners and experienced sewists alike.
When exploring how to sew a cross back apron pattern, you will find that this project blends simplicity with elegance. Most patterns involve clean lines, soft curves, and a loose fit that flatters all body types. This apron style slips on effortlessly and fits comfortably without the need for adjustments.
You can customize the pockets, fabric type, and finishing details to match your style or create thoughtful handmade gifts for friends and family. The cross-back apron is timeless, versatile, and enjoyable to make.
Sewing your own apron also means you can choose durable fabrics that stand up to daily use, whether in the kitchen, workshop, or garden. Personalization is an essential part of this project: select vibrant prints, soft linens, sturdy cotton canvas, or blended fabrics to match your activity. Because the cross back apron pattern includes simple shapes, it is an excellent project for improving your sewing skills while creating something genuinely useful. Let’s explore everything you need to know to make your own beautiful cross-back apron.
Understanding the Cross Back Apron Style
The cross-back apron design is loved for its comfort and effortless style. One of the key features is its straps, which cross over the back instead of tying around the neck. This helps reduce strain, making it a preferred choice for people who spend long hours cooking or crafting. The apron stays securely in place without slipping, creating a more enjoyable and comfortable experience.
Another advantage of the cross-back apron is its universal fit. Because it does not rely on buckles or ties, it fits a wide range of body shapes and sizes. This makes it a great gift option and an ideal pattern for selling handmade items, as you don’t have to worry about multiple sizing variations.
Additionally, this apron offers excellent coverage both in the front and sides, helping protect your clothing from spills, splashes, and fabric threads. Many people love using cross-back aprons for kitchen work, gardening, art projects, pottery, woodworking, or sewing sessions. The generous width and natural drape give it a beautiful aesthetic appeal.
Choosing the right fabric is also an essential part of the design. Lightweight linen offers a soft, breathable feel, while cotton canvas provides extra durability. Quilting cotton is fun for decorative aprons, though heavier fabrics may be better suited for heavy use. Your choice of fabric influences the apron’s look, weight, and ease of movement.
The shape of the apron typically includes wide panels and optional pockets. You can add one large pocket, two small ones, or even a divided multi-functional pocket. Decorative stitching, contrasting fabric, or bias binding can elevate your finished piece into a stylish, personalized garment.
Finally, the cross-back apron style is ideal for beginners. The curved lines, straight stitching, and simple construction make this project approachable, while still offering the satisfaction of creating a beautiful wearable piece. It’s the perfect blend of functionality and creativity.
Materials Needed for Sewing a Cross Back Apron
When learning how to sew a cross back apron pattern, gathering the right materials is the first step. Your apron will depend heavily on the fabric and stabilizers you choose. Linen, cotton canvas, denim, and medium-weight cotton are excellent choices because they hold their shape well and resist wear. Lighter fabrics give a soft drape, while heavier ones are better for messy or demanding tasks.
Cutting tools are essential for clean and accurate pieces. A rotary cutter paired with a self-healing mat ensures straight lines and easy cutting, while sharp fabric scissors help with curves and detailed cuts. Accuracy in cutting improves the overall professional appearance of your finished apron.
Interfacing may be helpful depending on your fabric and design. While most aprons do not require heavy structure, pockets often benefit from lightweight interfacing to maintain shape. This helps keep tools or utensils from stretching the pocket fabric over time.
You will also need strong, durable thread such as polyester thread, which resists breakage and handles constant movement. Matching thread provides a clean finish, while contrasting thread can add decorative flair. The topstitching on an apron is often visible, so thread choice matters.
Pins, clips, and marking tools help in securing curves and edges before sewing. Fabric markers or chalk ensure accurate seam allowances and guide your sewing lines. These small tools play an important role in maintaining precision throughout the entire project.
Finally, a basic sewing machine is all you need. Straight stitches are the primary technique used in a cross-back apron, so beginner-level machines work perfectly. A walking foot may help with thicker fabrics, but it is not required. Having the right tools ensures a smooth and enjoyable sewing experience.
Steps for Sewing a Cross Back Apron Pattern
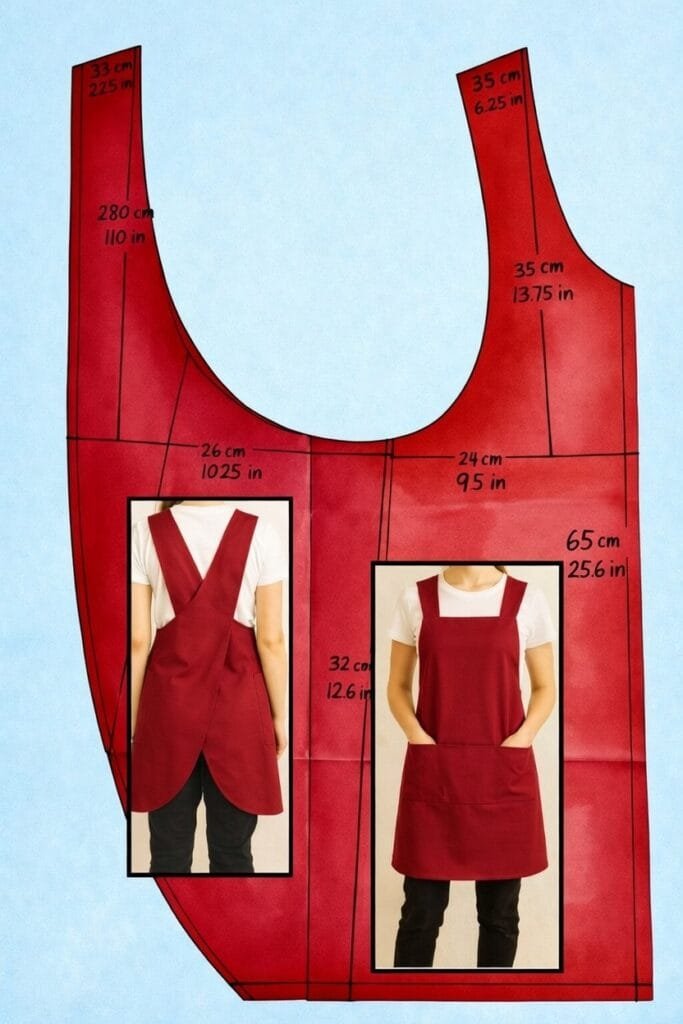
The first step in how to sew a cross back apron pattern is cutting your fabric pieces. Most patterns include two body panels and two straps. Some designs call for one continuous piece, but the general idea remains the same. Measure carefully and follow the grain direction to ensure even drape and durability.
Next, you sew the straps. They are typically made by folding the fabric lengthwise, stitching along the long edge, turning them right side out, and pressing them flat. Pressing is essential to achieving crisp, clean edges. You may topstitch the straps to add strength.
Attaching the straps requires following the pattern markings. The straps cross on the back and connect to the opposite side of the apron body. Pin them securely, ensuring they are not twisted, because the strap orientation determines comfort and fit.
Sew the body panels together, including side seams and curved areas. Use notches and markings to align pieces accurately. After sewing, press the seams open or to one side to keep the apron flat and polished. Pressing each step enhances the final appearance.
Next, hem the edges of the apron. Many sewists prefer double-fold hems for strength and a clean finish. Curved hems require patience—press small sections at a time to maintain smoothness. Take your time on this step, as neat hems contribute greatly to the apron’s overall beauty.
Finally, attach the pockets if your pattern includes them. You can add decorative stitching, divisions, or reinforcements based on your needs. Pockets are a great place to personalize your apron, whether through quilting, embroidery, or contrasting fabric. After attaching pockets, your apron is complete and ready to wear.
Tips for Achieving a Professional Finish
Pressing is the most important technique for achieving professional results. Press every seam as you sew. This creates sharper lines, reduces bulk, and helps the apron maintain its shape. A well-pressed apron always looks better and more refined.
Topstitching adds strength and beauty to your project. Use even stitching around edges, pocket openings, and straps. If you want a decorative touch, use contrasting thread. If you prefer a subtle finish, match the thread to the fabric.
Choose quality fabric for the best results. Linen, cotton canvas, and denim are excellent for durability. If you plan to use the apron in the kitchen, consider prewashing your fabric to prevent shrinking after assembly.
Reinforce high-stress areas like pockets and strap attachment points. Small triangular stitches or bar tacks help strengthen these parts. Reinforcement ensures your apron lasts for years and withstands heavy use.
When sewing curves, clip or notch the seam allowances. This helps the fabric lie flat when turned right side out. Smooth curves give your apron a polished and professional look.
Finally, try on the apron before finishing final hems or topstitching. Ensure the straps sit comfortably, and the length feels right for your height. Making adjustments early prevents the need for time-consuming fixes later.
FAQ – How to Sew a Cross Back Apron Pattern
1. Is a cross back apron beginner-friendly?
Yes. It uses simple stitches and basic shapes, making it perfect for beginners.
2. What fabric is best for a cross back apron?
Linen, cotton canvas, quilting cotton, and denim are great options for durability and comfort.
3. Do I need interfacing for this project?
Only for pockets or areas that need extra support. The apron itself usually does not require interfacing.
4. How much fabric do I need?
Most cross-back apron patterns require between 1.5 and 2 meters/yards of fabric, depending on size and style.
5. Can I adjust the straps?
Yes. You can lengthen or shorten straps based on your height or preference for a tighter or looser fit.
Conclusion
Learning how to sew a cross back apron pattern is a rewarding project that blends comfort, practicality, and creativity into one beautiful handmade item.
With simple techniques, thoughtful fabric choices, and personalized details, you can create an apron that suits your daily needs while reflecting your unique style.
VIDEO TUTORIAL
Whether you sew for fun, for gifting, or for selling, the cross-back apron is a timeless classic that always brings joy.

