Classic Granny Square Tutorial is one of the most beloved and timeless crochet topics in the crafting world. From beginners to advanced crocheters, everyone appreciates the versatility and charm of a traditional granny square.
This simple yet iconic design has been used for decades to create blankets, bags, pillows, clothing, and home décor. In this article, you will learn all about the Classic Granny Square Tutorial, including materials, techniques, variations, and tips.
Whether you’re learning to crochet for the first time or refining your skills, this guide will help you master the classic granny square with confidence.
The beauty of the granny square lies in its adaptability. It can be made in any color combination, any size, and with almost any type of yarn.
Many crafters begin their crochet journey with the Classic Granny Square Tutorial because it provides a gentle introduction to essential stitches such as the chain, slip stitch, and double crochet.
Once you understand the pattern’s rhythm, the process becomes relaxing, repetitive, and incredibly satisfying. Each square feels like a small accomplishment, and before long, you’ll have a collection of motifs ready to join into a larger project.
This pattern has stood the test of time for good reason. It is simple, efficient, and endlessly customizable. The Classic Granny Square Tutorial allows you to explore color theory, learn shaping techniques, and express personal creativity through yarn crafts. In the sections below, you’ll find detailed explanations and practical advice that will help you create perfect granny squares every time. Let’s begin your journey into one of the most iconic patterns in crochet.
Understanding the Classic Granny Square
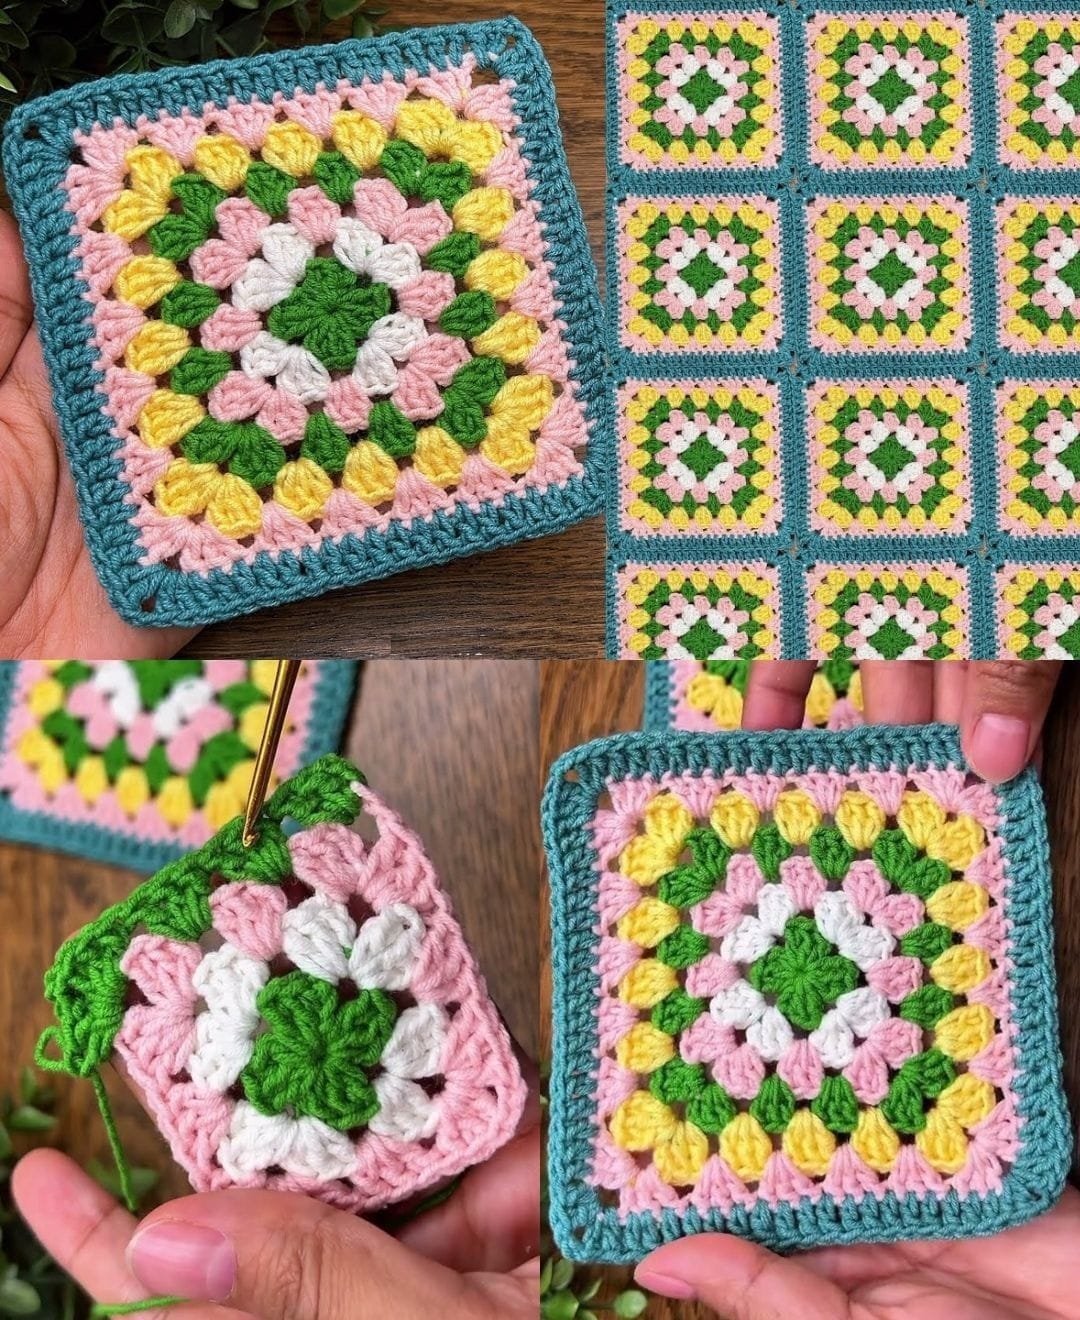
The Classic Granny Square Tutorial begins with the fundamental concept of working in rounds rather than rows. Unlike traditional flat crochet, granny squares are constructed outward from a central ring. This creates the familiar geometric appearance that makes the square so distinctive. The center often sets the tone for the rest of the design, whether you’re using a single color or multiple shades.
At its core, the classic granny square consists of clusters of double crochet stitches separated by chain spaces. These clusters form the structure of each round, gradually expanding the square with well-placed increases. The simplicity of this structure is what makes the pattern so timeless. Even after creating dozens of squares, the process remains predictable yet deeply enjoyable.
Color placement is one of the most exciting parts of the pattern. Some people choose a single color for their entire square, creating a clean and modern look. Others enjoy changing colors every round, resulting in bold, vibrant designs. The Classic Granny Square Tutorial encourages creativity and experimentation, making each square a unique work of art.
One of the reasons this pattern is ideal for beginners is that mistakes are easy to identify and correct. If a stitch count feels off or a corner looks uneven, it can usually be fixed without unraveling too much work. The repeated clusters make it simple to maintain rhythm, and you quickly learn to recognize the structure of each round.
Granny squares also teach foundational skills that are essential for more advanced crochet patterns. They help you understand how to turn corners, maintain tension, and join motifs. Mastering the Classic Granny Square Tutorial gives you a strong foundation to explore more complex shapes and designs later on.
Ultimately, understanding this pattern opens the door to a world of creative possibilities. Once you learn the method, you can make scarves, blankets, clothing, accessories, and even three-dimensional items. The classic granny square remains a staple in the crochet community because it offers endless potential with minimal complexity.
Materials and Tools You Need
Before starting the Classic Granny Square Tutorial, it’s important to choose the right materials. While granny squares can be made using almost any type of yarn, beginners often find it easiest to work with worsted-weight yarn. It’s thick enough to be visible, easy to hold, and quick to work with, making the learning process more enjoyable.
Your crochet hook size will depend on the yarn you choose. Most worsted-weight yarns pair well with a 5 mm or 5.5 mm hook. However, you can adjust this to achieve different textures. A smaller hook creates a tighter, more structured square, while a larger hook produces a softer, looser fabric. The Classic Granny Square Tutorial allows for flexibility, so feel free to experiment.
Scissors and a yarn needle are also essential tools. You’ll use the scissors to trim yarn ends when changing colors or finishing squares. The yarn needle helps you weave in ends neatly, giving your finished project a polished look. A simple, clean finish can make even beginner-made squares look professional.
Some crocheters like to use stitch markers, especially in the early stages. These markers can help you keep track of the start of each round or mark corner spaces. While optional, they can be helpful as you learn the structure of the granny square.
Color selection is another important part of gathering materials. You can choose a single color for a minimalist aesthetic, or select multiple shades for a more traditional look. The Classic Granny Square Tutorial works beautifully with both solid and variegated yarns. Holiday colors, pastel themes, and bold rainbow palettes all bring their own personality to the pattern.
Once you have your materials prepared, you’re ready to begin crocheting. Having the right tools not only makes the process easier but also enhances the overall enjoyment of the craft. A comfortable hook, smooth yarn, and a relaxing workspace can turn your project into a peaceful and rewarding experience.
Step-by-Step Guide to Creating Your Granny Square
The Classic Granny Square Tutorial typically starts with a slip knot and a series of chain stitches that form a small ring. Some crocheters prefer the magic ring technique for a tighter center, while others enjoy the simplicity of chaining and joining. Either method works well and depends entirely on your preference.
Once the center ring is formed, you’ll create the first round of double crochet clusters. These clusters establish the foundation of the entire square. After completing your first round, you’ll already see the beginning of the familiar granny square structure. This moment is always satisfying, especially for beginners.
The second round is where the square shape truly begins to emerge. At each corner, you’ll make two clusters separated by chain spaces to create the necessary increases. These corners will continue to guide your pattern as the square grows. You’ll quickly become comfortable identifying each corner and working around the shape.
Changing colors is an optional but common step in the granny square. Many crocheters change colors at the start of each round to create bold and attractive designs. The Classic Granny Square Tutorial works beautifully with color changes, and it can be a great way to use leftover yarn. When changing colors, be sure to secure your ends neatly to maintain a clean finish.
As you continue adding rounds, your square will grow evenly and symmetrically. Most classic granny squares are worked until they reach the desired size, whether that’s four inches for small motifs or twelve inches for larger designs. You can stop at any point, making this one of the most flexible patterns in crochet.
Finally, once your square reaches the size you want, you’ll fasten off the yarn and weave in the ends with a yarn needle. This simple finishing touch transforms your piece from a work in progress into a finished motif. Completing your first square using the Classic Granny Square Tutorial is a moment of accomplishment that inspires many to keep creating more.
Creative Uses for Your Granny Squares
Once you’ve mastered the Classic Granny Square Tutorial, a world of creative possibilities opens up. Granny squares are incredibly versatile and can be used in countless projects. One of the most popular uses is creating blankets. Whether large or small, a granny square blanket can be made from dozens or hundreds of squares in any color combination you love.
Clothing items such as cardigans, vests, crop tops, and shawls are also popular choices. The flexibility of the granny square makes it easy to shape and customize garment pieces. Modern fashion trends have embraced granny squares, bringing this classic technique into contemporary styles.
Home décor is another exciting category for granny square projects. Pillows, table runners, placemats, and wall hangings can all be constructed from squares. The Classic Granny Square Tutorial lends itself beautifully to decorative pieces, adding warmth and handmade charm to any space.
Smaller accessories such as bags, pouches, coasters, and bookmarks are perfect for using leftover scraps of yarn. These projects are quick, practical, and enjoyable to make. Many crocheters even sell their handmade items at markets or gift them to friends and family.
Holiday crafts are also a fun way to use granny squares. They can be transformed into ornaments, festive garlands, or even seasonal clothing. The versatility of the pattern means you can adapt the design to any theme or occasion.
Ultimately, the Classic Granny Square Tutorial empowers you to craft beautiful, handmade items with endless creativity. Whether your style is traditional, modern, minimalist, or colorful, granny squares can be adapted to match your personal aesthetic. Each project becomes a reflection of your imagination and skill.
FAQ – Frequently Asked Questions
1. Is the classic granny square beginner-friendly?
Yes. It is one of the easiest and most traditional patterns, perfect for beginners.
2. How many colors can I use in a granny square?
You can use one, two, or as many colors as you want. There are no limits.
3. Why is my granny square curling or warping?
This often happens due to tight tension or incorrect stitch count. Relax your stitches and count carefully.
4. Can I use any yarn for this tutorial?
Yes. Any yarn works, though medium-weight yarn is easiest for beginners.
5. Do granny squares have to be square?
No. With variations, you can create triangles, hexagons, rectangles, and more.
6. How do I join multiple granny squares together?
You can sew them with a yarn needle or use crochet joins such as slip stitch or single crochet.
Conclusion
The Classic Granny Square Tutorial is a timeless and enjoyable pattern that opens the door to countless creative projects. Whether you’re making a simple square or designing an entire blanket, the granny square offers endless versatility and satisfaction.
VIDEO TUTORIAL
I hope this guide has helped you understand the techniques, materials, and possibilities behind this beloved pattern. Feel free to leave your honest opinion and share suggestions for future tutorials—I’d love to create more guides for you!

