The Crochet Snowman Lantern Pattern is a heartwarming and creative project that beautifully blends the magic of winter with the coziness of handmade crafts.
This pattern is perfect for anyone who loves adding a touch of charm and light to their holiday décor. Imagine a glowing snowman softly illuminating your room, spreading warmth and festive spirit during the cold season.
With its cheerful design, this crochet lantern can serve as a centerpiece, a decorative shelf accent, or a lovely handmade gift.
Whether you’re an experienced crocheter or a beginner seeking a fun challenge, this project offers both satisfaction and creativity in every stitch.
Crocheting your own snowman lantern allows you to combine practicality and artistry. The pattern creates a structure sturdy enough to hold a small LED light or candle safely while maintaining the whimsical appearance of a snowman. You can personalize each lantern with different scarves, hats, or buttons, making every creation one of a kind. Using soft, snow-white yarn and a few accent colors, you can craft a snowman that glows with a cozy holiday vibe.
Beyond being an adorable decoration, the Crochet Snowman Lantern Pattern represents the essence of handmade joy — crafting something from scratch that brings happiness and beauty into your surroundings. This tutorial will guide you through materials, stitches, assembly, and decoration ideas to ensure you can create a delightful lantern that brightens any room during wintertime.
Materials and Tools You’ll Need
Before beginning your Crochet Snowman Lantern Pattern, it’s essential to prepare the right materials. This ensures that your lantern is both beautiful and functional.
You’ll need cotton or acrylic yarn in white for the snowman’s body, plus small amounts of orange, black, and any other accent colors for accessories like the hat and scarf. Cotton yarn gives your lantern better structure and definition, while acrylic adds a soft and cozy touch.
Select an appropriate crochet hook, typically around 3.5 mm or 4 mm, depending on the yarn thickness. A smaller hook will help create tighter stitches, ensuring the lantern maintains its shape.
You’ll also need a plastic or glass jar to serve as the lantern base. The crochet snowman will wrap around this jar, allowing light to shine through safely. Choose a transparent or frosted jar that fits the size you desire.
Additional tools include a yarn needle for sewing parts together, scissors, and stitch markers to help you keep track of your rounds. For lighting, use battery-operated LED tealights or fairy lights — never real candles, as yarn is flammable.
Optional embellishments like buttons, felt pieces, or tiny pom-poms can make your snowman come alive. Once your materials are ready, you can begin crocheting your festive snowman lantern.
Step-by-Step Crochet Instructions
Let’s start creating your Crochet Snowman Lantern Pattern step by step. Don’t worry if you’re a beginner — this pattern is straightforward and repetitive, making it perfect for improving your crochet skills.
Begin with the base of your lantern. Using white yarn, create a magic ring and make 6 single crochets into it. Pull tight to close. Continue working in the round, increasing evenly until your circle matches the size of your jar’s bottom. This will ensure your snowman fits perfectly over the base.
Once you have the base, start working upward without increases to form the snowman’s body section. Continue crocheting single crochet rounds until your piece covers about two-thirds of the jar’s height. Keep your tension consistent for a smooth and snug fit.
Now, create a small ridge or division for the head. To do this, you can change your stitch slightly or add one decrease round to create a gentle narrowing. Afterward, switch back to regular single crochet and continue working until the height reaches the top of the jar. This will form the snowman’s head section.
For the hat, switch to black yarn and crochet a few rounds directly above the head portion, adding slight increases in the first round to form the hat brim. You can make the hat tall and floppy or short and classic — customize it to match your style.
Next, add details such as the carrot nose, eyes, and buttons. Use orange yarn to crochet a tiny cone for the nose and small black circles for the eyes and buttons. Sew them carefully onto your snowman’s face and body.
Finally, crochet a scarf using red, green, or striped yarn. Chain about 45–50 stitches and work a few rows of single crochets until the scarf reaches your desired width. Wrap it around the snowman’s neck area and secure it with a few stitches.
Slide the crochet piece over your jar, place your LED light inside, and watch your snowman lantern glow with holiday cheer.
Creative Decoration and Color Variations
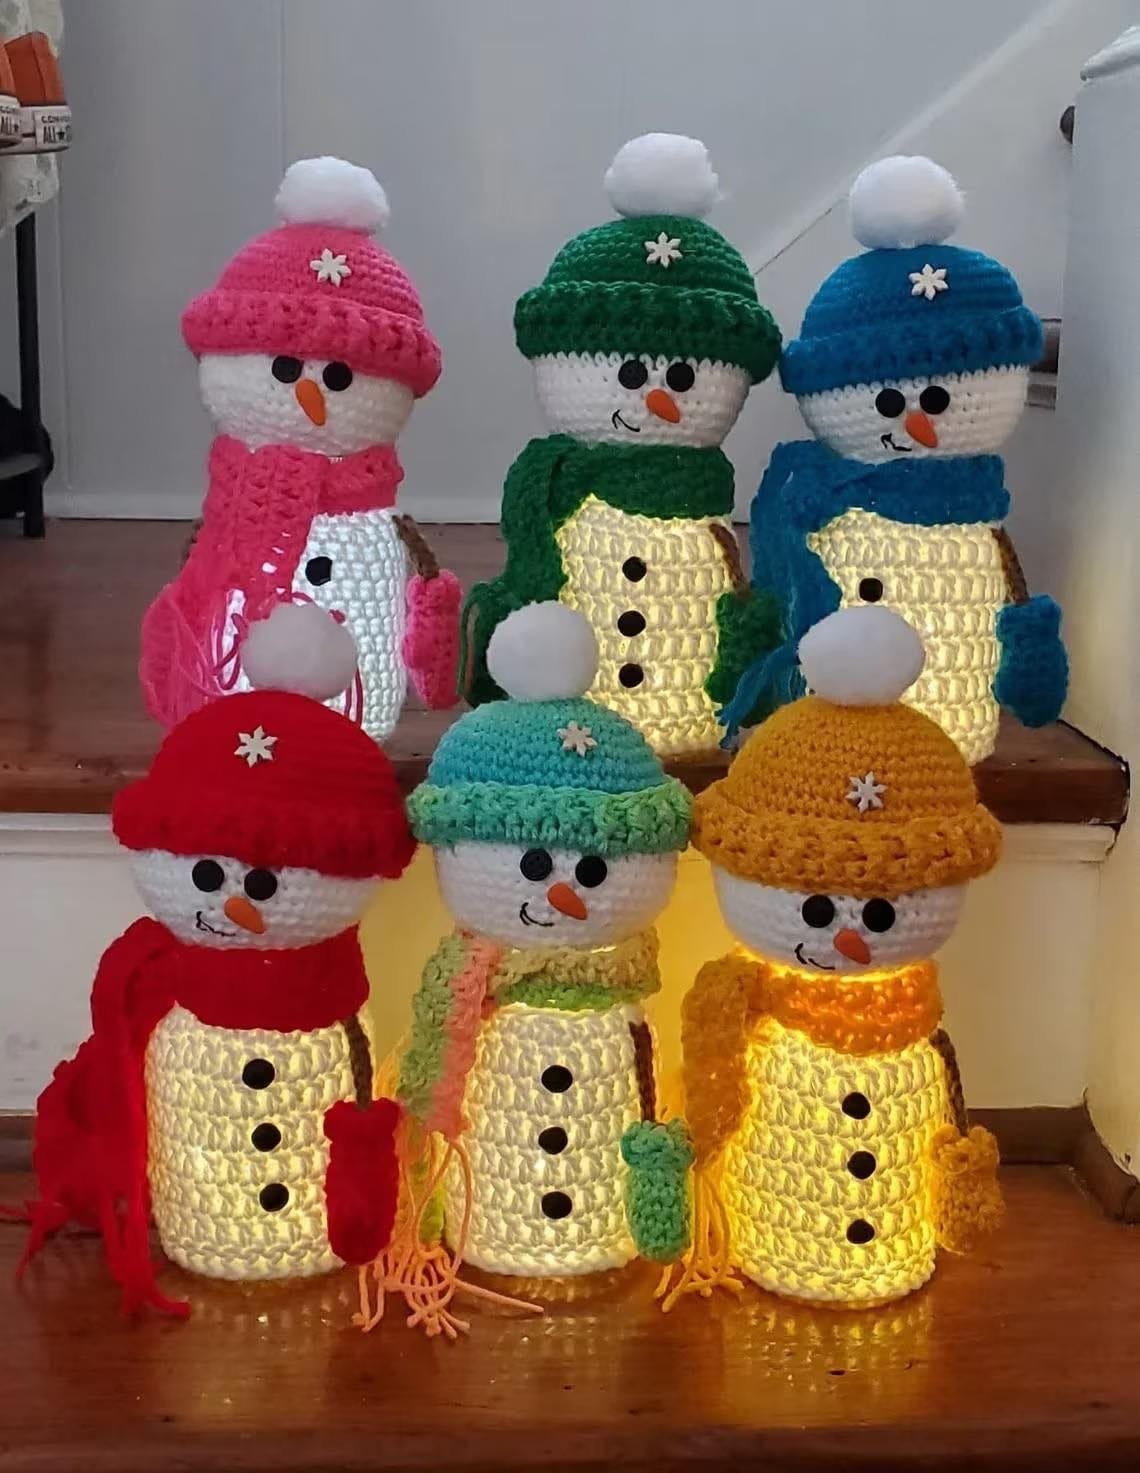
The Crochet Snowman Lantern Pattern allows for endless customization. You can change colors, accessories, and embellishments to create unique versions for each snowman.
For a classic winter look, keep the body pure white, with black buttons and an orange carrot nose. Add a red or green scarf for a traditional Christmas touch. You can even add small embroidered snowflakes or sequins for a bit of sparkle.
For a modern twist, use off-white, beige, or pastel shades like baby blue or light pink. These colors give your lanterns a contemporary aesthetic that blends beautifully with minimalistic décor.
If you’re crafting with kids or want a playful theme, consider making colorful snowmen. Use bright yarns for the hats and scarves — yellow, purple, or turquoise — and add cheerful buttons or googly eyes.
You can also experiment with different materials. For example, metallic yarn gives the illusion of frost, while fluffy textured yarn creates a “snowy” appearance. Combining both can produce a striking contrast between the soft snow and the shiny accents.
Some crocheters love to personalize their snowmen with names stitched onto the scarf or little felt hearts on the body. These small details make your creations more meaningful and perfect as gifts.
Finally, if you’re making a set of lanterns, vary their heights and hat styles to create a lively winter family scene. Group them together on a mantel or windowsill to make your home feel festive and full of handmade charm.
Tips for Assembling and Displaying
Once your Crochet Snowman Lantern Pattern is complete, it’s time to assemble and display your masterpiece. Proper assembly ensures the lantern stays stable and safe while enhancing its beauty.
When sliding the crochet body over the jar, make sure it fits snugly but not too tight. The goal is for the fabric to stay in place without stretching excessively. You can secure the bottom edge with a few stitches or a thin elastic band hidden under the base.
If you’re using LED tealights, place them at the bottom of the jar before adding the crochet cover. For fairy lights, weave them gently inside and let the battery pack rest outside the jar for easy access.
For extra brightness, you can line the inside of the jar with translucent paper to diffuse the light evenly. This gives your snowman a soft, glowing effect that feels magical at night.
When displaying, consider placing your lantern on a wooden tray surrounded by pinecones, holly leaves, or artificial snow. This setup looks stunning as a table centerpiece or window decoration.
If gifting your lantern, wrap it carefully in a box with tissue paper. You can also pair it with a matching crocheted item like a small snowflake coaster or ornament for an extra special touch.
Above all, remember that safety comes first — always use battery-powered LED lights, never real candles, to prevent fire hazards.
FAQ
Q1: Is the Crochet Snowman Lantern Pattern suitable for beginners?
Yes! This pattern mainly uses simple stitches like single crochet and slip stitch, making it easy even for beginners. The key is maintaining even tension and following the step sequence.
Q2: Can I use other types of yarn for this pattern?
You can, but cotton or acrylic works best because they hold shape and provide a smooth finish. Avoid fuzzy yarns if you want the lantern’s details to remain visible.
Q3: What can I use instead of a glass jar?
Plastic jars or transparent containers also work well. They’re lightweight and safe, especially if the lantern is for children’s rooms.
Q4: How can I clean my crochet lantern?
Remove the crochet cover from the jar and hand wash it gently in cold water. Lay it flat to dry to prevent stretching. Avoid machine washing or harsh detergents.
Q5: Can I make a bigger snowman lantern?
Absolutely. Just continue increasing rounds on the base until it matches the larger jar’s bottom, then crochet more body rounds to fit the jar’s height.
Q6: What kind of light is safest to use?
Battery-operated LED tealights or fairy lights are ideal. They emit no heat, making them safe for use with yarn materials.
Conclusion
The Crochet Snowman Lantern Pattern captures the essence of the holiday season — joy, warmth, and creativity all in one project. Through this pattern, you can transform simple yarn and a jar into a glowing snowman that lights up your home with festive charm. Whether displayed on a table, window, or mantel, each lantern brings handmade beauty to your winter décor.
This project is more than just a decoration — it’s a symbol of love and craftsmanship. The process of creating each stitch, adding tiny details, and watching it come to life is deeply satisfying. From the first loop to the final light, your snowman lantern will reflect your dedication and creativity.
If you’ve enjoyed following this guide, share your thoughts and experiences! Leave your honest opinion and suggestions about this Crochet Snowman Lantern Pattern, and continue exploring the joy of crafting handmade wonders for every season. Happy crocheting!

